
Oh, friends, if there’s one thing that instantly whisks me back to my grandmother’s Midwest kitchen, it’s the smell of Christmas baking! We all want that showstopper dessert come December, but sometimes the daily rush leaves us needing something spectacular that doesn’t take all day. Well, I found the perfect answer, and it involves some serious nostalgia. I’m talking about the Little Debbie Christmas Tree Cheesecake. Yes, you heard me right! We take those classic, wonderfully soft snack cakes and fold them right into a rich, creamy base. This isn’t complicated baking; this is heart-filled baking, adapted just like I learned in my own busy home. Trust me, this Christmas tree cheesecake is reliable, delicious, and exactly what your holiday table needs.
- Why This Little Debbie Christmas Tree Cheesecake is Your Must-Make Holiday Dessert
- Gathering Ingredients for Your Christmas Tree Cheesecake Recipe
- Step-by-Step Instructions for the Showstopper Christmas Tree Cheesecake
- Decorating Your Christmas Tree Cheesecake Centerpiece for Christmas
- Tips for Success When Making This Nostalgic Christmas Snack Cake Dessert
- Make-Ahead and Storage for Your Creamy Holiday Cheesecake
- Frequently Asked Questions About the Christmas Tree Cheesecake Recipe
- Estimated Nutritional Information for This Festive Cheesecake
- Share Your Showstopper Christmas Dessert Experience
Why This Little Debbie Christmas Tree Cheesecake is Your Must-Make Holiday Dessert
If you are looking for that perfect blend of old-school holiday joy mixed with a genuinely decadent treat, this is it. This isn’t just any cheesecake; it’s a proper showstopper Christmas dessert that tastes exactly like happy memories. We’re using those Little Debbie cakes because sometimes, nostalgic Christmas baking just hits different! It looks incredible on your table, requires very little hands-on decoration time, and it delivers every single time for holiday hosts.
Achieving That Creamy Holiday Cheesecake Texture
The goal here is that amazing, melt-in-your-mouth feel. We aren’t aiming for light and fluffy; we want that classic, dense, creamy holiday cheesecake. That rich, velvety tree cheesecake quality comes straight from making sure the cream cheese is perfectly softened before you start. My main rule, which I learned back when I was teaching and rushing dinner: don’t overmix the eggs! Just beat them until they vanish into the batter. That keeps those lovely air pockets smooth instead of turning your dessert rubbery.
Gathering Ingredients for Your Christmas Tree Cheesecake Recipe
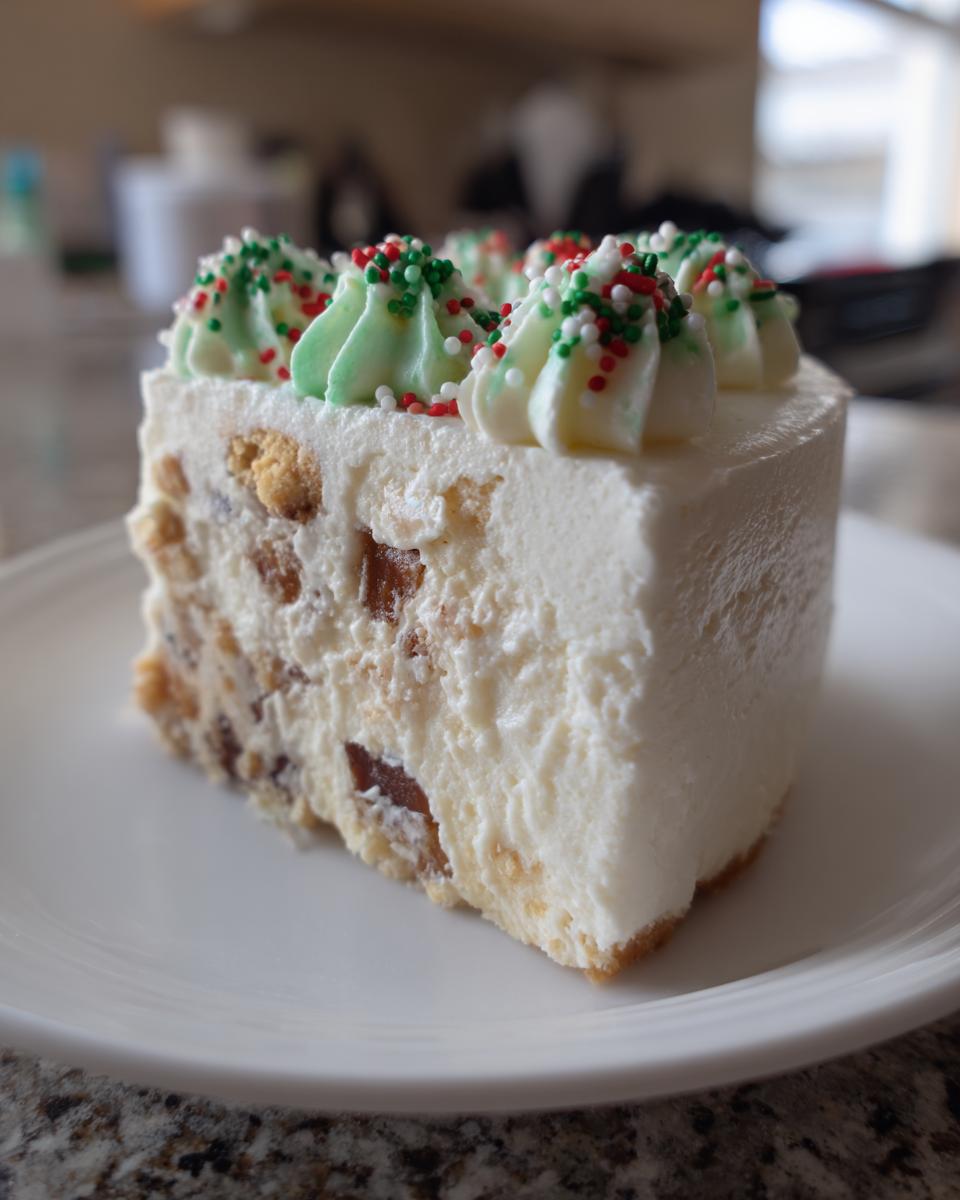
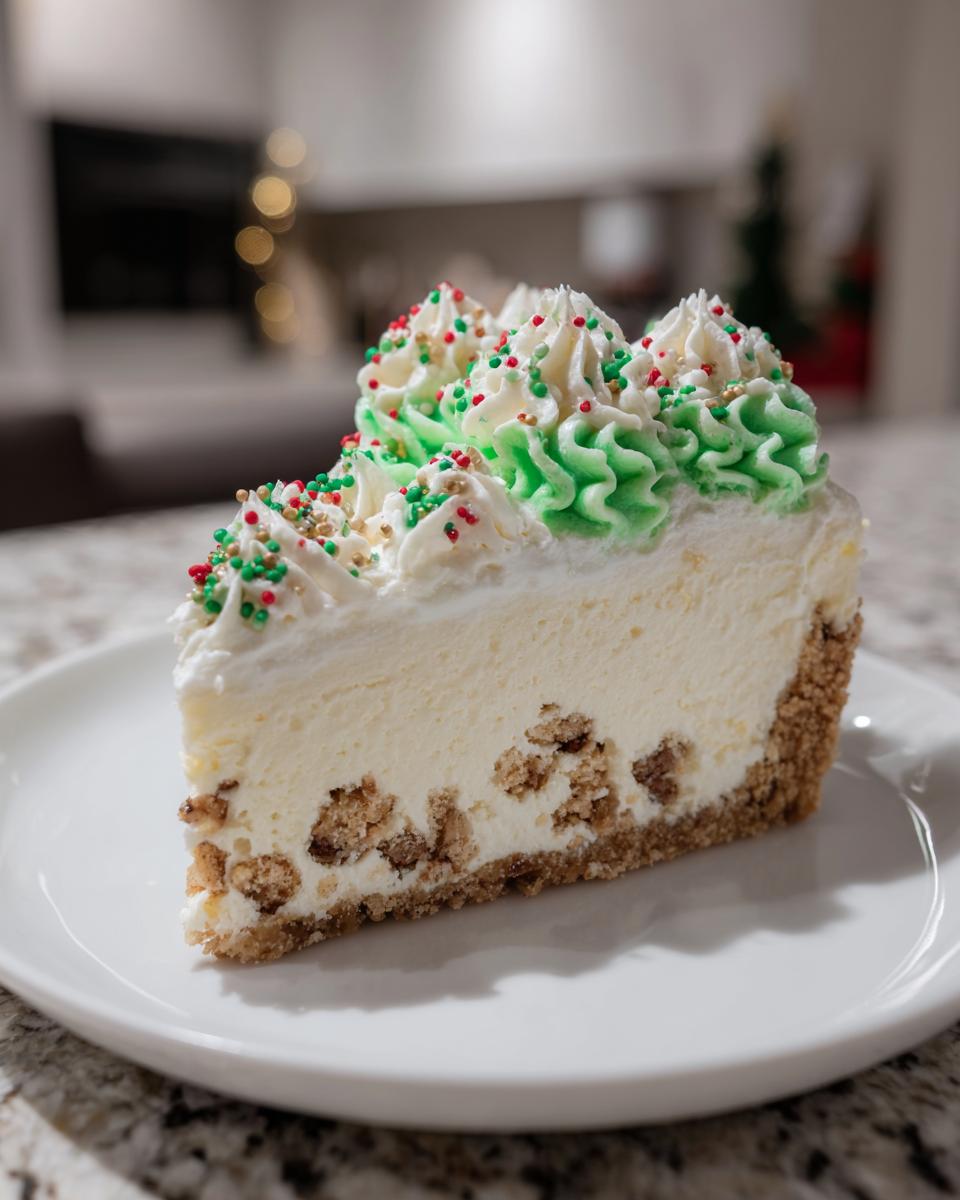
Okay, let’s talk about what you need to bring this beauty to life. Remember, for a reliable result, we stick to the list! For the crust, you’ll want those graham cracker crumbs and melted butter pressed in tight. The filling is standard cheesecake fare—softened cream cheese is mandatory, trust me on that—along with sugar, vanilla, salt, and the eggs. But the real star, the flavor bomb that makes this a true holiday classic, is those Little Debbie Christmas Tree Snack Cakes. You need a whole box, and you’ll want to chop them roughly so you get surprising pockets of flavor throughout the filling.
Ingredient Notes and Substitutions for Your Festive Cheesecake
I always get asked if we can skip the eggs, especially if someone needs to make this super fast. If you want to pivot to a no-bake christmas cheesecake, ditch the eggs! Instead, just fold a cup of thawed whipped topping into your cream cheese mixture before pouring it over the crust. It works beautifully, though the texture is slightly different. Also, if you don’t have graham crackers on hand, go ahead and use vanilla wafers—crush them up the same way. Utilizing a recipe from my sugar cookie icing post for decorating sometimes means I skip the whipped cream topping altogether, but I rarely skip the snack cakes!
Step-by-Step Instructions for the Showstopper Christmas Tree Cheesecake
Now, let’s get this incredible base mixed and baked! Cheesecake is one of those desserts where timing matters, not because it’s hard, but because we want it gorgeous and crack-free for serving. That beautiful graham cracker crust goes in first while the oven preheats to 325°F. Once that crust has its little 10-minute head start, we move right onto that dreamy filling. The key here is precision in mixing the wet ingredients, which sets us up for success later on. If you want to see more about keeping things smooth, check out my creamy no-crack cheesecake post!
Preparing the Crust and Filling for the Christmas Tree Cheesecake
First, mix your crumbs and butter and press them firmly into that greased 9-inch springform pan. Pop it in for 10 minutes; it gives the crust a nice set. While that cools just a touch, start smoothing out your cream cheese—no lumps allowed! Beat in the sugar slowly until it looks pale and happy. Then, add your eggs one at a time, making sure each one is just incorporated. For step four, take your time! Remember to gently fold in those chopped Little Debbie Christmas Tree Snack Cakes. We want chunks of flavor, not a smooth batter!
Baking and Cooling Techniques for a Perfect Christmas Tree Cheesecake
Pour that fantastic batter over your cooled crust. We bake this for about 50 to 60 minutes. You want the edges set, but the very center should still have a tiny, almost nervous little jiggle when you nudge the pan. Now, here’s the secret from my baking mentor—don’t rush the cooling! Turn the oven off, crack the door open, and just let it sit in that residual heat for a whole hour. Seriously, one hour! This slow transition is how we avoid those awful cracks. After that hour, take it out fully, let it come to room temperature, and then it needs a minimum of six hours, but overnight is best, to chill before we even think about decorating.
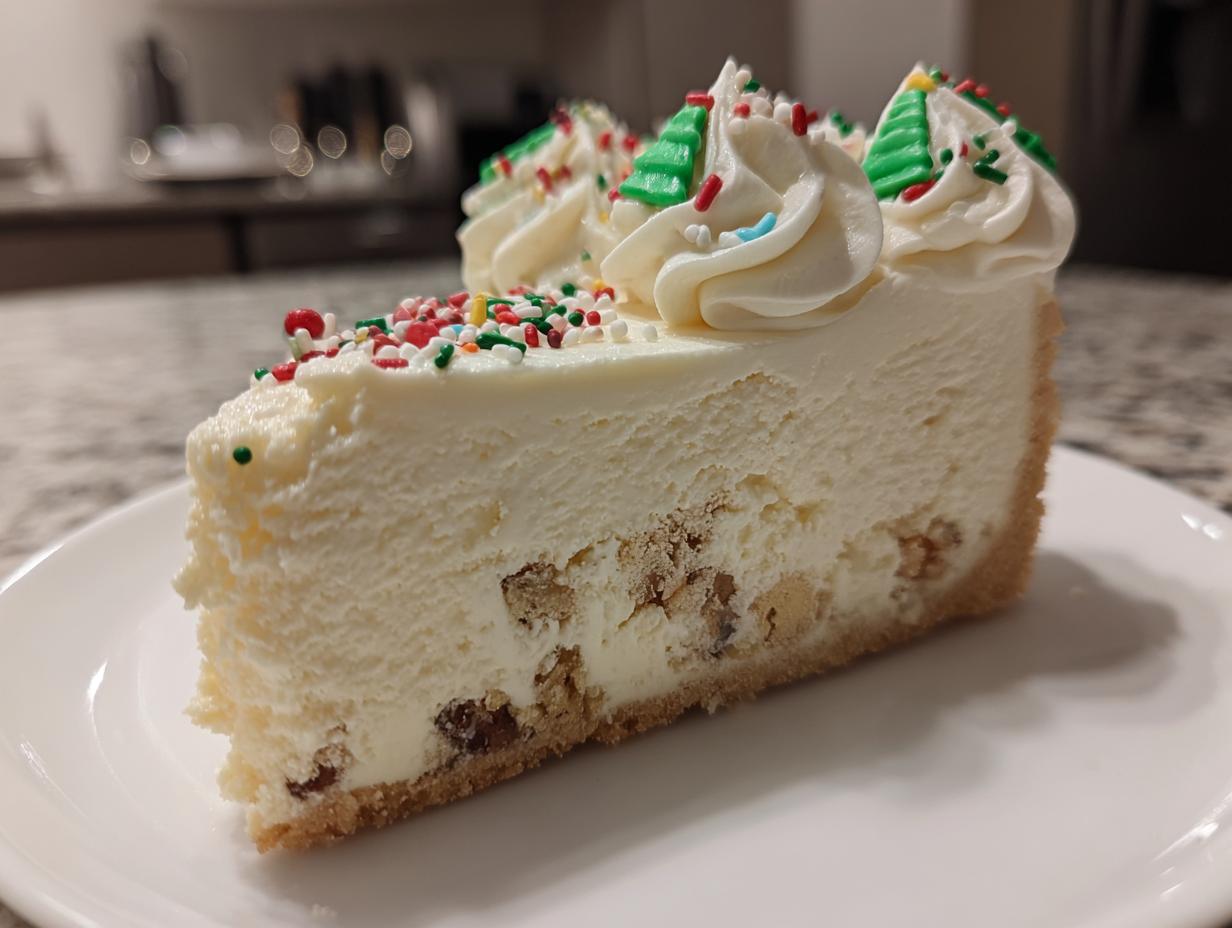
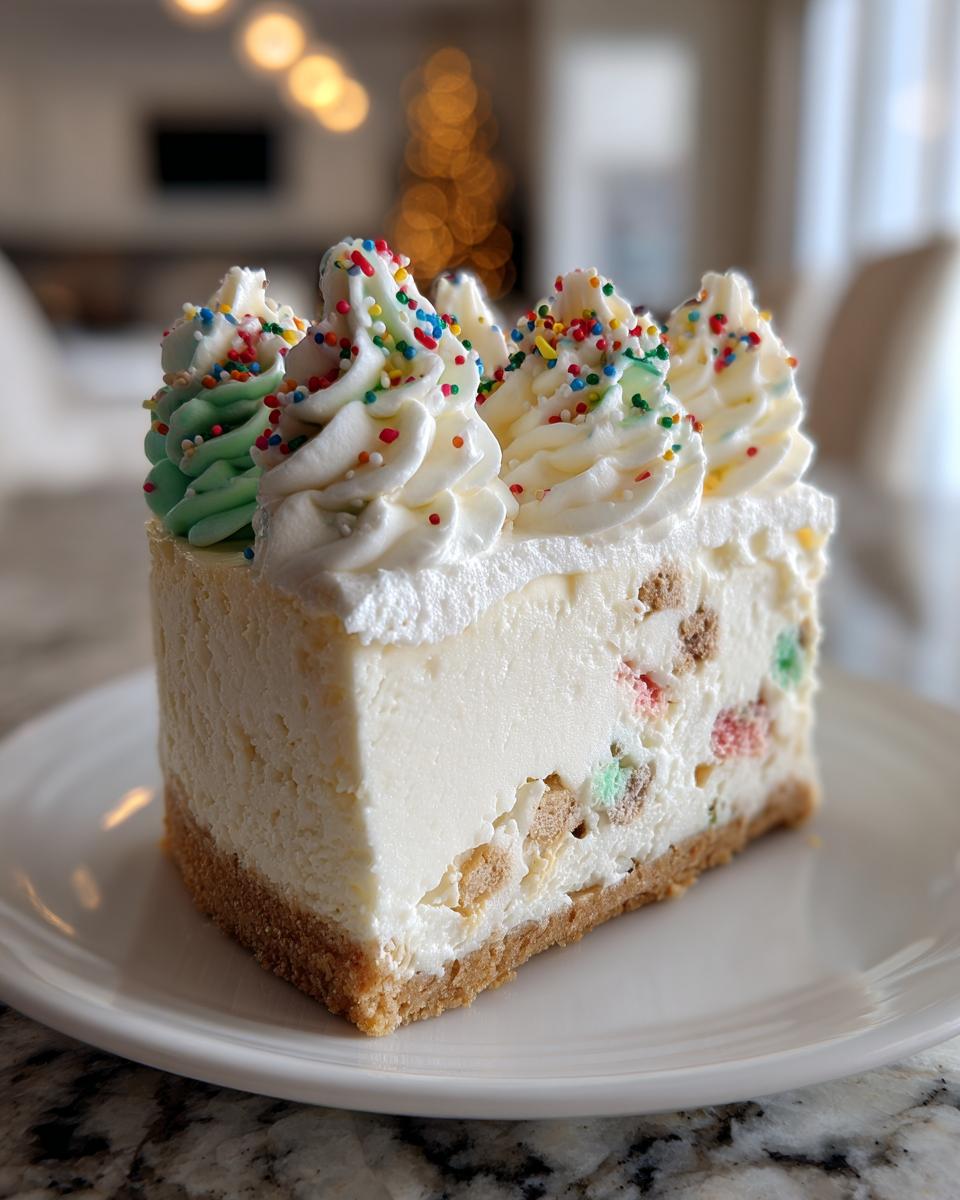
Decorating Your Christmas Tree Cheesecake Centerpiece for Christmas
Alright, the hard part is over! The cheesecake is chilled, perfectly creamy, and ready for its glow-up. This final step is where your Decorated Christmas Cheesecake truly becomes the Cheesecake Centerpiece for Christmas. We are making that topping. I usually whip my heavy cream with a bit of powdered sugar and vanilla until it holds stiff peaks. If you want that classic tree look, add a tiny drop of green food coloring right at the end.
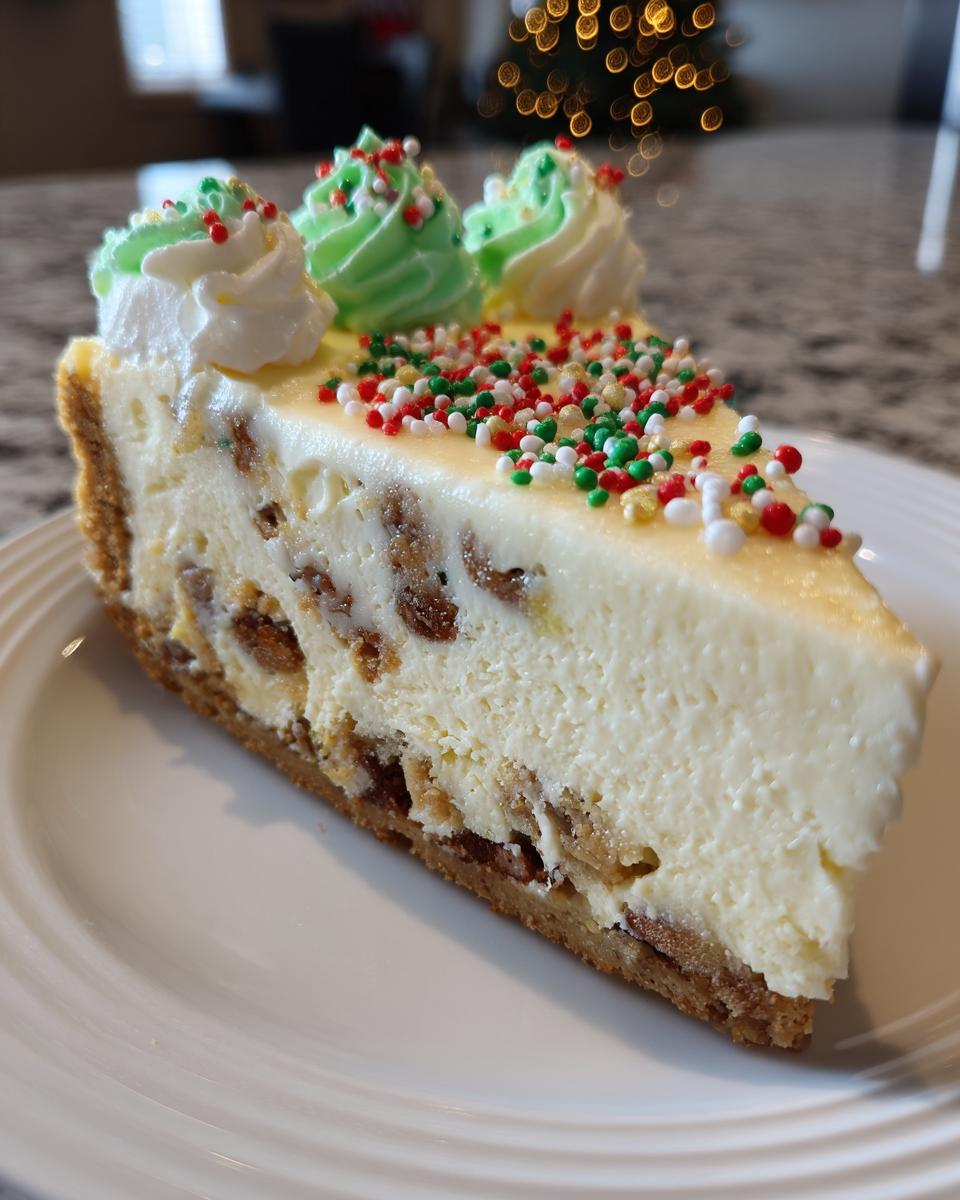
My biggest decorating ‘oops’ came in my first year trying this—I tried spreading the whipped cream on cold, and it looked like a lumpy snowdrift, not branches! Now, I use a piping bag with a large star tip. Pipe swirls all over the top, making them overlap slightly to build up that beautiful tree shape. Then, treat the sprinkles like ornaments! Little silver dragées? Perfect tiny lights. Red nonpareils? Tiny red balls. Make it fun, because honestly, the kids love helping with this part more than the actual baking!
Tips for Success When Making This Nostalgic Christmas Snack Cake Dessert
Even though this is a super friendly recipe, cheesecake still likes a little respect! If you want your Christmas Snack Cake Dessert to be utterly flawless, you need to focus on temperature. I cannot stress this enough: your cream cheese must be completely at room temperature before you start mixing the filling. If it’s still cold, you’ll get lumps, and you’ll be tempted to overmix to smooth them out, which ruins the texture. Don’t do it!
For the oven part, you have to trust the visual cue over the timer sometimes. Since every oven runs slightly differently, go by that gentle center jiggle we talked about, not just the clock. Also, make sure your springform pan is greased well underneath the crust layer, not just the sides. That little bit of extra security helps the crust release cleanly when we finally pop that top layer off!
Make-Ahead and Storage for Your Creamy Holiday Cheesecake
The best part about this amazing christmas tree cheesecake? You can absolutely make it ahead, which is a lifesaver during the holidays! I always bake mine the day before I plan to serve it. Why? Because chilling overnight gives the filling time to fully firm up—that’s essential for clean slices.
Here’s my crucial tip for the topping: Don’t even think about adding that gorgeous whipped cream until right before you serve it! If you try to chill the decorated cake overnight, the moisture from the cheesecake will make the whipped cream weep and slide right off. That’s a holiday party disaster waiting to happen, and we want to avoid that drama!
Once the cheesecake is completely chilled and unwrapped from the foil, cover it loosely with plastic wrap or foil and keep it in the cold part of the fridge. If you made freezer jam last summer, you could serve a slice of this cheesecake with a little dollop on the side, but honestly, the cake stands all on its own!
Frequently Asked Questions About the Christmas Tree Cheesecake Recipe
When I bring this recipe out for parties, I always get the same few questions, so let’s clear those up now! I want everyone to feel confident serving this as a Christmas Tree Shaped Dessert.
Can I make this a no bake christmas cheesecake instead of baking it?
You absolutely can pivot this to an Easy Holiday Cheesecake! If you plan to skip the oven, you need to skip the eggs completely. Instead of adding eggs to your cream cheese mixture, beat one cup of heavy whipping cream separately until it forms soft peaks, then gently fold that into your sweetened cream cheese base. That keeps it light and creamy without needing heat to set up. Remember to chill it for longer, though—at least 8 hours, perhaps even using my trick from my no-bake peanut butter pie.
What if I can’t find the Little Debbie Christmas Tree Snack Cakes?
Oh, that’s tough because those cakes are what make this recipe special! If you can’t find them, you can try crushing up plain Little Debbie Swiss Rolls or even vanilla wafers for the crust and maybe folding in chunks of a vanilla Pound Cake—but you will lose that signature hint of holiday spice they bring. It won’t be the same, but it will still be a wonderfully Festive Cheesecake!
How do I stop the cheesecake from cracking like the world’s saddest holiday table?
Cracking happens when the temperature changes too fast! Trust me, I learned this the hard way when I didn’t listen to my own advice. The absolute best way to prevent cracks is the slow cool-down: when the baking time is done, turn the oven off, prop the door open with a wooden spoon, and leave that cheesecake inside for a full hour before you even think about taking it out to the countertop. That gentle transition is everything!
Estimated Nutritional Information for This Festive Cheesecake
Now, I know some of you are watching ingredients closely, and I totally get that! Keep in mind that because we are mixing a store-bought snack cake into this recipe, the numbers can shift a bit depending on the brand of crackers or size of the eggs you use. These are just ballpark figures for one generous slice so you can plan your holiday menu accordingly.
- Calories: Approximately 450
- Fat: About 30g
- Carbohydrates: Around 40g
- Protein: Roughly 6g
Please consider this an estimate for your planning, not a guarantee like you’d get from a nutrition label at the store! But trust me, after all that hard work, every bite is worth celebrating!
Share Your Showstopper Christmas Dessert Experience
Well, that’s it! You have just finished making what I promise will be the star of your holiday dessert spread. The absolute best part of sharing recipes, especially a christmas tree cheesecake like this one, is seeing how you make it your own! I truly hope you loved creating this slice of nostalgic christmas baking.
If this recipe made it onto your Christmas table and brought smiles to faces, please do me a huge favor: come right back here and give it a five-star rating! It helps me know what recipes I should keep perfecting for you all.
And don’t just keep those gorgeous decorated cheesecakes to yourselves! Snap a picture of your handiwork—whether you went wild with green swirls or stuck to a simple dusting—and share it on social media. Tag me so I can see your creations! If you have any questions while serving it up, or if you tried a fun substitution, drop a comment below. I read every single one. Thank you so much for hanging out in my kitchen today. Happy Holidays, and please reach out through my contact page anytime!
PrintLittle Debbie Christmas Tree Cheesecake
Make this show-stopping Little Debbie Christmas Tree Cheesecake for your holiday gatherings. This creamy, festive dessert incorporates nostalgic snack cakes for a rich flavor everyone will enjoy.
- Prep Time: 25 min
- Cook Time: 60 min
- Total Time: 7 hours 25 min
- Yield: 12 servings 1x
- Category: Dessert
- Method: Baking
- Cuisine: American
- Diet: Vegetarian
Ingredients
- 1 1/2 cups graham cracker crumbs
- 6 tablespoons unsalted butter, melted
- 16 ounces cream cheese, softened
- 1 cup granulated sugar
- 1 teaspoon vanilla extract
- 1/4 teaspoon salt
- 3 large eggs
- 1 box (10.5 oz) Little Debbie Christmas Tree Snack Cakes, roughly chopped
- 1 cup heavy whipping cream
- 2 tablespoons powdered sugar
- 1/2 teaspoon vanilla extract
- Green food coloring (optional, for decoration)
- Holiday sprinkles and small candies for decoration
Instructions
- Preheat your oven to 325°F (160°C). Lightly grease a 9-inch springform pan.
- Prepare the crust: Mix the graham cracker crumbs and melted butter until combined. Press the mixture firmly into the bottom of the prepared springform pan. Bake for 10 minutes. Let cool slightly.
- Prepare the filling: In a large bowl, beat the softened cream cheese until smooth. Gradually add the granulated sugar, beating until light and fluffy. Mix in the vanilla extract and salt. Beat in the eggs one at a time, mixing just until combined after each addition. Do not overmix.
- Fold in the chopped Little Debbie Christmas Tree Snack Cakes gently into the cheesecake batter.
- Pour the batter over the cooled crust in the springform pan.
- Bake for 50 to 60 minutes, or until the edges are set and the center has a slight jiggle.
- Turn off the oven, crack the oven door open slightly, and let the cheesecake cool inside the oven for 1 hour. This prevents cracking.
- Remove the cheesecake from the oven and cool completely on a wire rack. Then, cover and chill in the refrigerator for at least 6 hours, or preferably overnight.
- Prepare the topping: In a chilled bowl, beat the heavy whipping cream, powdered sugar, and vanilla extract until stiff peaks form. Add a few drops of green food coloring if you want green whipped cream for piping.
- Decorate the chilled cheesecake by piping or spreading the whipped cream over the top to resemble tree branches. Place holiday sprinkles and small candies on the whipped cream to look like ornaments.
- Remove the springform ring before serving your showstopper Christmas dessert.
Notes
- For a no-bake version, substitute the eggs with 1 cup of thawed, frozen whipped topping folded into the cream cheese mixture, then chill until firm.
- If you want a richer flavor, use a vanilla wafer crust instead of graham crackers.
- You can press a few whole or halved Little Debbie cakes around the base of the finished cheesecake for extra visual appeal.
Nutrition
- Serving Size: 1 slice
- Calories: 450
- Sugar: 35g
- Sodium: 250mg
- Fat: 30g
- Saturated Fat: 18g
- Unsaturated Fat: 12g
- Trans Fat: 0.5g
- Carbohydrates: 40g
- Fiber: 1g
- Protein: 6g
- Cholesterol: 95mg