
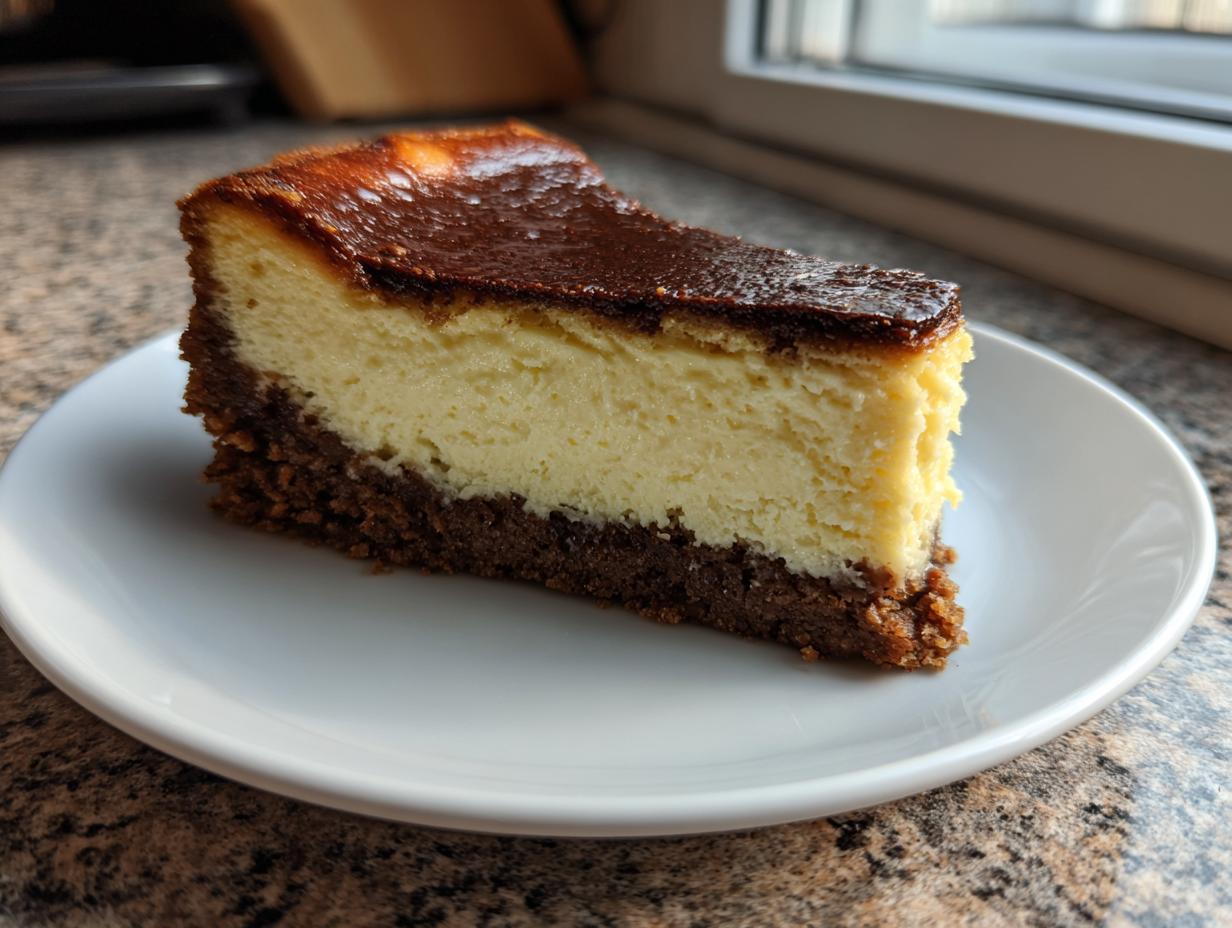
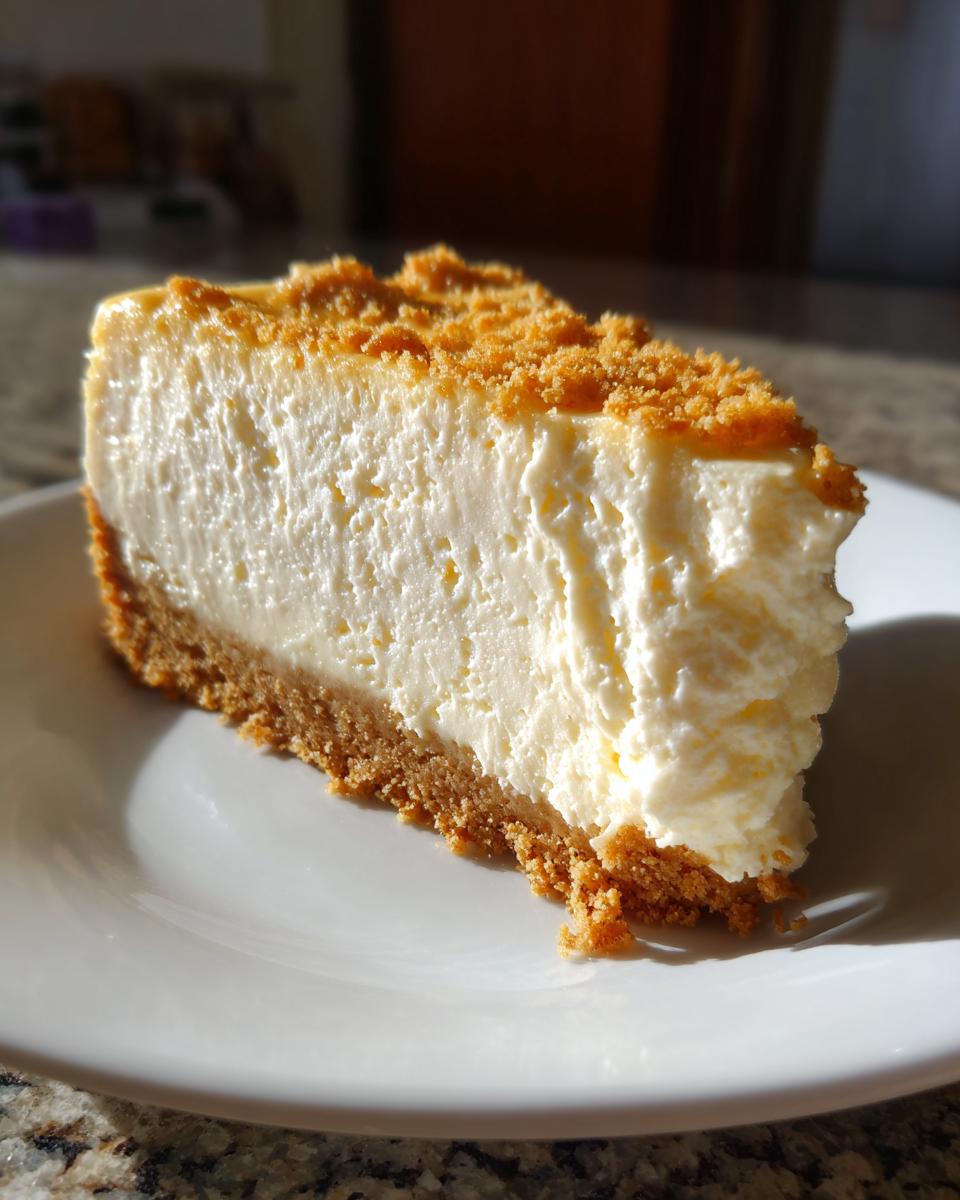
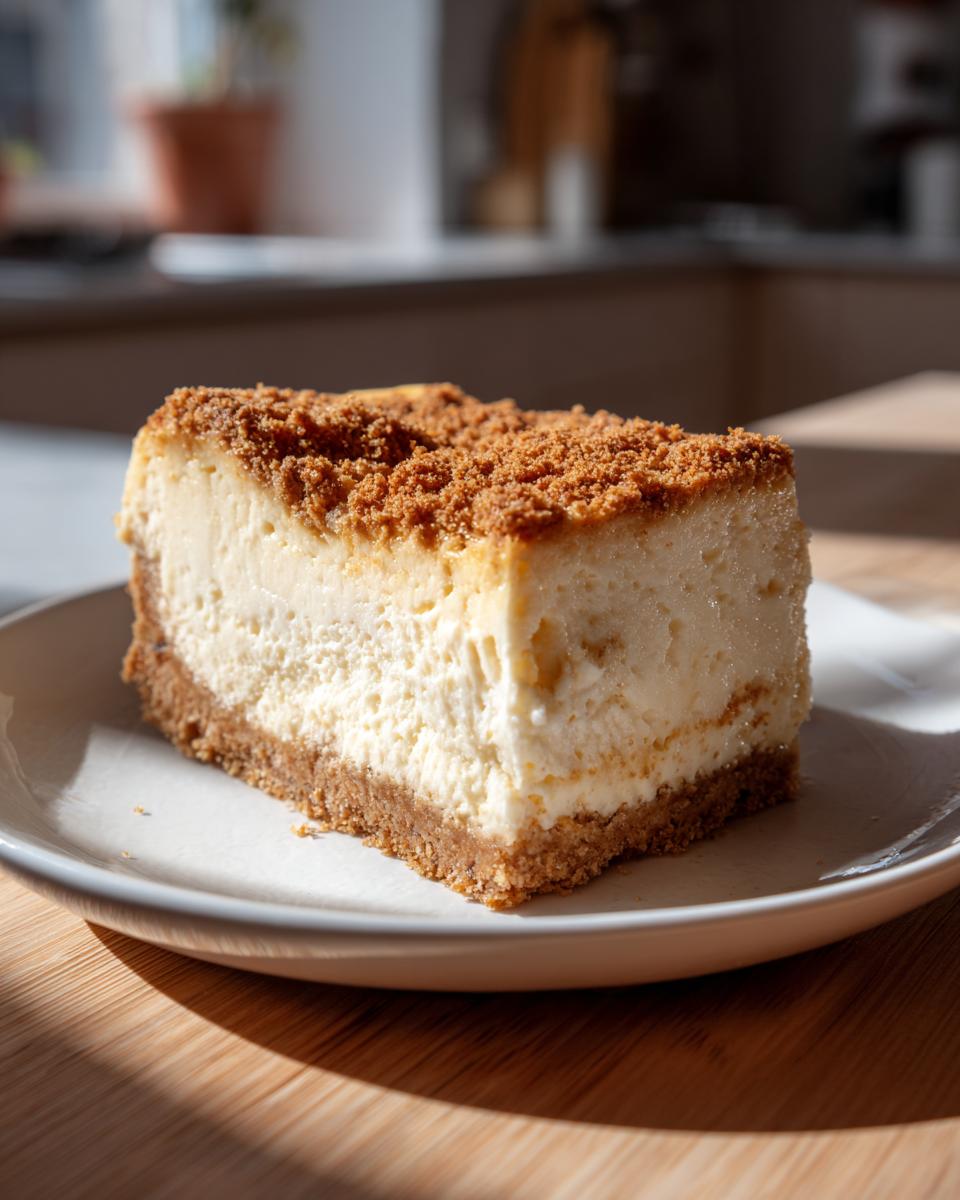
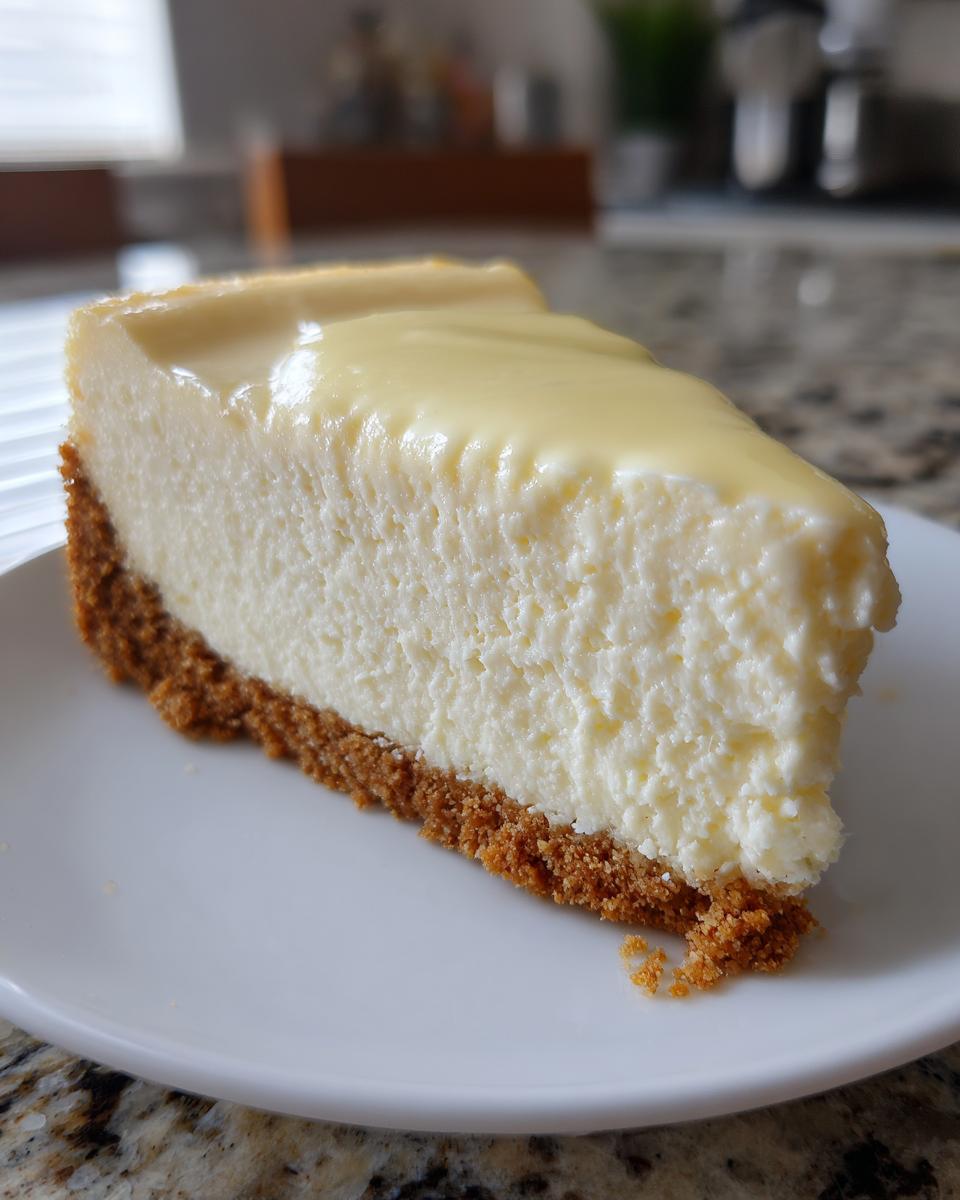
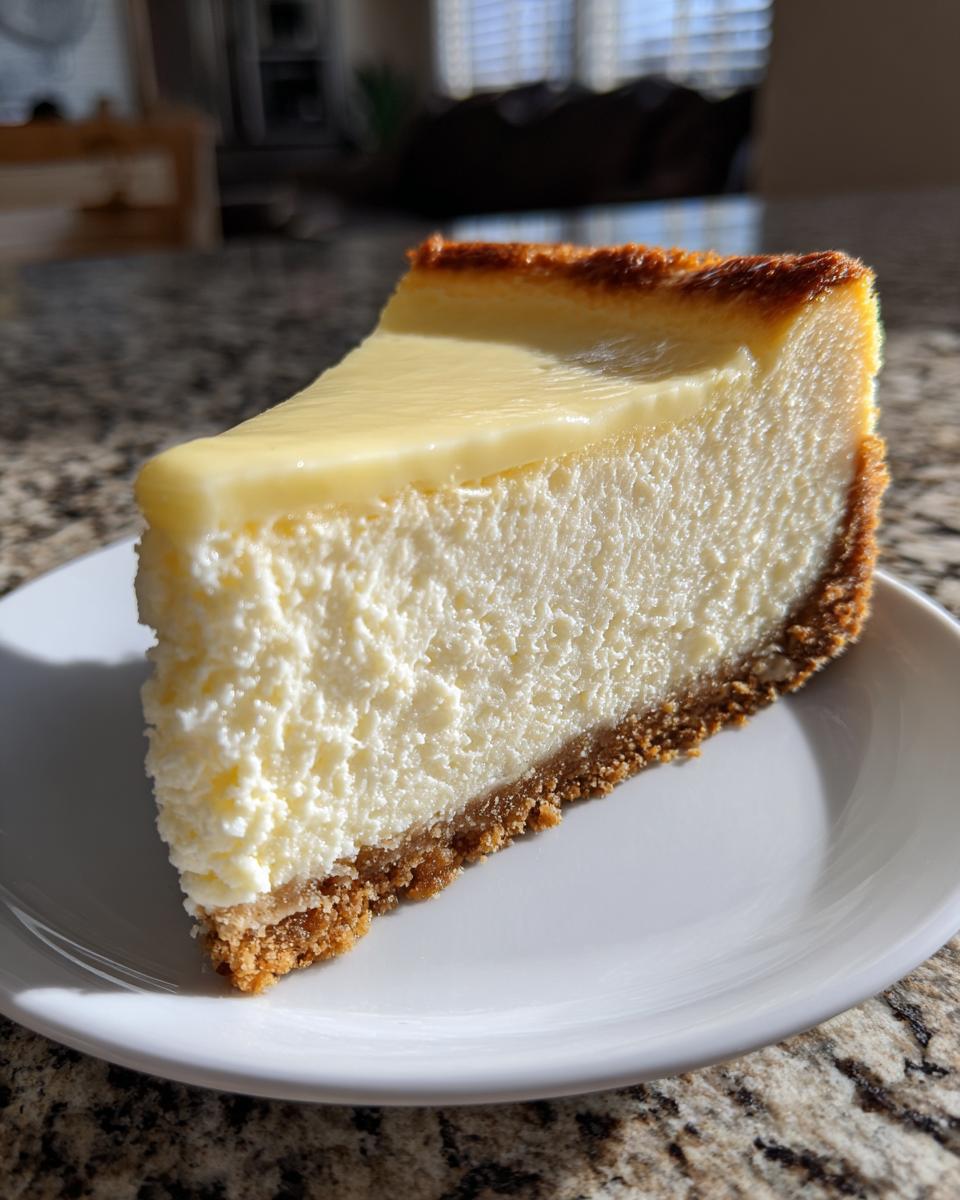
If you have ever stared at a gorgeous, towering cheesecake only to find a network of tiny cracks across the top after it cooled, I know exactly how you feel. It always seems like achieving that rich, velvety texture means juggling fussy water baths and worrying constantly. Well, put those worries aside, friends! I’m sharing my ultimate secret for the best homemade dessert: this is the ultimate, rock-solid, creamy, crack-free New York Style cheesecake recipe that I make right on the counter—water bath officially banned from my kitchen! My philosophy is simple: great food should bring joy without complication, and this reliable cheesecake recipe delivers unbelievable deliciousness every single time. You are going to love how simple this celebration dessert truly is. Check out all my best homemade desserts for more joys like this!
- Why This Creamy Cheesecake Recipe Works Every Time (No Crack Cheesecake Secrets)
- Gathering Ingredients for the Best Cheesecake Recipe
- Step-by-Step Classic Cheesecake Directions: Making Your New York Style Cheesecake
- Ingredient Notes and Substitutions for Your Cheesecake Recipe
- Tips for Success: Achieving the Perfect Rich Cheesecake Recipe
- Serving Suggestions and Make Ahead Dessert Planning
- Variations on This Classic Cheesecake Recipe
- Frequently Asked Questions About This Cheesecake Recipe
- Estimated Nutritional Data for This Cheesecake Recipe
- Share Your Perfect Cheesecake Recipe Experience
Why This Creamy Cheesecake Recipe Works Every Time (No Crack Cheesecake Secrets)
Let’s be honest; the major reason folks shy away from making a true New York Style cheesecake is the fear of cracks! I’ve dealt with enough sunken, split desserts to last a lifetime before I figured out the simple secrets to a perfect, creamy cheesecake recipe result. The magic for getting a guaranteed no crack cheesecake isn’t just in the mixing; it’s about respecting what the ingredients need! This wonderful cheesecake recipe skips the wet, messy water bath entirely because we focus on consistency and a gradual cool-down.
The Importance of Room Temperature Ingredients for Your Cheesecake Recipe
This is where so many wonderful intentions go wrong! If your cream cheese or eggs are cold, they won’t blend properly. You end up forcing the mixer to work too hard, which whips too much air into the filling. Air bubbles are the enemy because they expand in the heat and then contract too fast when cooling, leading to those dreaded fissures.
When everything is room temperature, you get that smooth, velvety cheesecake filling I mentioned earlier. It mixes beautifully, stays dense, and bakes evenly. Trust me, setting your cream cheese and eggs out for at least two hours before you start is non-negotiable for a creamy result!
If you need another reliable, incredibly smooth, creamy recipe to add to your rotation, you simply must try my easy creamy chicken alfredo recipe. Sometimes dinner just needs that extra touch of decadence!
Gathering Ingredients for the Best Cheesecake Recipe
One of the best parts about this incredible dessert is that it doesn’t call for any fancy stuff hiding in the back of your pantry! This is my promise to you: everything you need for this amazing cheesecake recipe, including the cheesecake with graham cracker crust, can be found at your neighborhood grocery store. Just remember those crucial details about using room temperature blocks for the filling!
For the Graham Cracker Crust
- 1 1/2 cups graham cracker crumbs
- 1/4 cup granulated sugar
- 6 tablespoons unsalted butter, melted
This simple mixture is the foundation for our classic cheesecake directions, giving us that perfect crunchy contrast.
For the Velvety Cheesecake Filling
- 4 (8 ounce) packages full-fat cream cheese, softened
- 1 1/2 cups granulated sugar
- 1/4 cup all-purpose flour
- 1 teaspoon vanilla extract
- 1/4 teaspoon salt
- 4 large eggs, room temperature
- 1/2 cup sour cream, room temperature
See? All everyday items! Make sure you are reaching for the full-fat cream cheese; that’s the secret to a deeply satisfying and rich cheesecake recipe.
When you’re done here, you can check out my recipe for easy creamy chicken tortilla soup recipe—it’s comfort in a bowl after a day spent baking!
Step-by-Step Classic Cheesecake Directions: Making Your New York Style Cheesecake
Alright, let’s get down to business! Following these classic cheesecake directions is the key to success for a tall, gorgeous dessert that never splits. Remember that we are building the structure for a perfect, rich cheesecake recipe, so please don’t rush the temperatures. I want you to see that beautiful, dense texture, not a sad, cracked mess!
Preparing and Baking the Crust
First things first: heat up that oven to 350 degrees F! While it’s warming up, wrap the bottom of your 9-inch springform pan tightly in heavy-duty aluminum foil—this is a little insurance policy just in case. Mix your graham cracker crumbs, the 1/4 cup of sugar, and the melted butter until it looks like wet sand. Press that firmly into the bottom of your foil-wrapped pan. Give that crust a 10-minute head start in the oven. Once it’s done baking, pull it out and let it cool just a bit while you drop your oven temperature down to 325 degrees F.
Mixing the Creamy Cheesecake Filling
Now for the smooth part. Get your completely softened cream cheese (remember room temp!) mixing until it laughs at you—no lumps allowed! Add the rest of your sugar, the flour, vanilla, and salt. Beat that on medium only until it’s just combined. This is so vital: When you add your eggs, do it one at a time, mixing only long enough for the yolk to disappear before adding the next. If you overmix here, you’re adding air, and air means *cracks*. Finish by gently folding in the sour cream until the batter is uniform. Do not grab that whisk attachment for this final part!
The Essential Slow Cooling Method for a No Crack Cheesecake Recipe
Pour that glorious filling over your cooled crust and gently tap the pan on the counter a couple of times—just to persuade any big air bubbles to leave the party. Bake at 325 degrees F for about 60 to 75 minutes. You’re looking for set edges but a little wobble right in the center—like soft jelly. As soon as it’s done, turn the oven OFF. Don’t remove it! Prop the oven door open with a wooden spoon and just leave your amazing cheesecake recipe inside for a full hour. This slow descent keeps your dessert happy and guarantees that no crack cheesecake finish. After the hour, pull it out, let it finish cooling on the rack, then cover it, and chill it for at least six hours. When it’s fully chilled, run a thin knife around the edge before you release the springform sides. Enjoy that perfect slice!
If you need a quick, flavorful dip to serve while you wait (or even a fantastic topper!), you should check out my recipe for easy creamy smoked salmon dip recipe!
Ingredient Notes and Substitutions for Your Cheesecake Recipe
When you’re attempting a truly New York Style cheesecake, the ingredients matter a ton! I get asked all the time if you can swap out that good old Philadelphia cream cheese, and here’s my take: for this specific cheesecake recipe, just don’t. Full-fat cream cheese is what gives us that essential dense structure and the luxurious mouthfeel we are aiming for. Low-fat versions just don’t set up correctly and can lead to a softer, almost pudding-like texture instead of that rich slice you deserve.
However, we can absolutely play with the tang! If you want that slightly sharper, more traditional taste, you can easily swap out a quarter cup of the sour cream for fresh lemon juice. It brightens everything up beautifully. Remember, my goal is always to give you a stress-free, excellent result for your cheesecake recipe, and these simple ingredient rules help keep things on track!
If you’re interested in how to capture amazing creamy textures in a savory dish, you have to try my recipe for chicken salad sandwich creamy easy filling!
Tips for Success: Achieving the Perfect Rich Cheesecake Recipe
Okay, so you baked it, you cooled it slowly, and now it’s chilling—but let me give you a couple of extra little whispers of wisdom for making this the best cheesecake recipe you’ve ever attempted. When you’re aiming for that ultimate, dense, rich cheesecake recipe, one thing I learned the hard way is about prepping the pan *before* you even mix! Once, years ago, I forgot to wrap the foil well, and a tiny bit of water leaked in during the cooling phase (even though we skip the bath!). That cheesecake survived, but the bottom crust was soggy, and honestly, it was heartbreaking.
So, here’s my tip: double-wrap that springform pan with heavy-duty foil, extending it up about two inches so you have a tight seal. It’s just easy insurance! Also, when you transfer the cheesecake from the wire rack to the fridge, make sure you let it get fully room temperature first. Suddenly dropping a warm cake into a cold fridge can shock it and potentially cause a very minor, hairline crack. We want perfection here! For more foolproof baking tips, feel free to check out easy creamy chicken alfredo recipe—it shares the same ‘don’t rush the temperature’ philosophy!
For more ideas on flawless baking, always check out the experts, too; I always love seeing how others tackle their classic cheesecake recipe techniques!
Serving Suggestions and Make Ahead Dessert Planning
This is where the fun really begins! While this cheesecake recipe is divine on its own, it’s also the perfect canvas for creativity, especially when you are planning a holiday cheesecake idea. Since this is a rich base, you don’t need much to dress it up. If you want to go all out, imagine drizzling it with caramel pecan sauce for a homemade turtle cheesecake recipe vibe, or maybe swirling in some fresh strawberry puree right before it chills completely for a beautiful topping effect!
I often make this ahead of time because honestly, it tastes even better the second day—the flavors really meld together. It’s truly the perfect make ahead dessert for busy party days.
Storage and Make Ahead Dessert Tips
The most important rule for this dessert is patience! You absolutely must let your cheesecake chill completely. The instructions call for at least six hours, but if you can manage to leave your masterpiece in the fridge overnight, you’re golden. This extended chilling time helps the filling firm up to that rich, perfect density we worked so hard to achieve.
Once it’s fully chilled, cover the entire springform pan loosely with plastic wrap—try not to let it touch the surface if you can help it. It keeps beautifully in the refrigerator for about five to seven days. If you happen to have leftovers (which is rare in my house!), you can even freeze slices tightly wrapped. It’s such a wonderful simple cheesecake dessert to have ready to go!
If you’re looking for a bright, lighter beverage to serve alongside your rich slice, you have to try my strawberry matcha latte recipe!
Variations on This Classic Cheesecake Recipe
Once you master this foolproof cheesecake recipe, the possibilities are endless! You’ve got the perfect creamy base, so now you can start playing around for your next party or holiday gathering. I know some of you look for fun, single-serving treats, so making these into mini cheesecake bites is super easy! Just line a standard muffin tin with paper liners and pour the filling in. They bake faster, usually in about 20 minutes, which is fantastic when you’re in a hurry.
If you’re feeling adventurous, you can completely change the flavor profile! Think about adding a couple of teaspoons of cinnamon and some chopped pecans to the crust mixture for a flavor reminiscent of a snickerdoodle cheesecake—it’s divine! Or, if you’re craving fruit, you can check out how to make a gorgeous strawberry swirl cheesecake recipe. You just marble the puree into the filling before baking. It really shows how versatile this core dessert truly is. Don’t forget to look at my recipe for moist bran muffins recipe freezer hack if you need a great make-ahead breakfast idea, too!
Frequently Asked Questions About This Cheesecake Recipe
I know when you’re about to tackle something as iconic as a New York-style dessert, you’re going to have questions! That’s totally normal, and honestly, it’s how we learn to be better cooks. Here are the things I hear most often about making this cheesecake recipe, aimed at helping you achieve that creamy cheesecake recipe result without any drama!
Can I use a water bath even though this cheesecake recipe skips it?
You certainly *could*, but I really wouldn’t bother! The beauty of this particular cheesecake recipe is precisely that we don’t need the fuss of foil, dripping water, and steam. My method relies entirely on using room temperature ingredients and then that slow, gentle cooling time inside the turned-off oven. That slow cooling is what effectively replaces the humidifier effect of a water bath, giving you the perfect, level top. Save yourself the extra step—it just adds risk!
How long does this easy homemade cheesecake last in the fridge?
This is the best part about an easy homemade cheesecake: it’s a wonderful make ahead dessert! Because it’s so rich and dense, it holds up beautifully. Once it has chilled for that mandatory minimum of six hours (or whenever you can resist cutting into it!), you can cover it tightly and it will stay absolutely delicious for about five to seven days in the refrigerator. The flavor often gets even better by day three. It’s fantastic for holiday planning!
If you’re ever looking for simpler recipes when you don’t have hours to wait for a dessert to chill, I have lots of great ideas for easy breakfast recipes that come together in a flash!
Estimated Nutritional Data for This Cheesecake Recipe
I always want you to feel confident about what you are serving, even when it’s a truly indulgent treat like this classic dessert. Now, please remember, since this recipe is made from scratch using real ingredients, these numbers are estimates based on general calculations for one generous slice of this rich cheesecake recipe. If you add extra decadent toppings, like sauce or fresh fruit, those will definitely change the final tally!
But for the base cake—the perfect, dense, no-crack slice—here is what you can generally expect from this cheesecake recipe:
- Calories: Around 450 per slice
- Total Fat: About 30g (mostly from that necessary full-fat cream cheese!)
- Carbohydrates: Roughly 38g
- Sugar: Near 35g
- Protein: A solid 8g
It is certainly a decadent slice, and honestly, that’s part of the appeal! It’s meant for special occasions and celebrations. If you are looking for something super quick for a weeknight when you don’t want a big bake, I have some fantastic ideas in my post on quick healthy lunch ideas!
Share Your Perfect Cheesecake Recipe Experience
I’m so excited for you to try this! If you managed to keep your top smooth and crack-free using my simple cooling method, please let me know down below! Ratings and comments really help other home cooks decide to tackle this amazing dessert. If you loved this cheesecake recipe, feel free to reach out via my contact page. Happy baking, friends!
PrintThe Ultimate Creamy, Crack-Free New York Style Cheesecake Recipe (No Water Bath Required)
Follow this simple, homemade cheesecake recipe to create a rich, velvety New York Style dessert that stays perfectly creamy and crack-free every time, without needing a water bath.
- Prep Time: 20 min
- Cook Time: 75 min
- Total Time: 1 hour 35 min
- Yield: 12 servings 1x
- Category: Dessert
- Method: Baking
- Cuisine: American
- Diet: Vegetarian
Ingredients
- 1 1/2 cups graham cracker crumbs
- 1/4 cup granulated sugar (for crust)
- 6 tablespoons unsalted butter, melted
- 4 (8 ounce) packages full-fat cream cheese, softened
- 1 1/2 cups granulated sugar (for filling)
- 1/4 cup all-purpose flour
- 1 teaspoon vanilla extract
- 1/4 teaspoon salt
- 4 large eggs, room temperature
- 1/2 cup sour cream, room temperature
Instructions
- Preheat your oven to 350 degrees F. Wrap the outside bottom of a 9-inch springform pan tightly with heavy-duty aluminum foil.
- Prepare the crust: Mix graham cracker crumbs, 1/4 cup sugar, and melted butter in a bowl. Press the mixture firmly and evenly into the bottom of the prepared springform pan. Bake for 10 minutes. Remove from the oven and let it cool slightly. Reduce the oven temperature to 325 degrees F.
- Prepare the filling: In a large bowl using an electric mixer, beat the softened cream cheese until it is completely smooth. Scrape down the sides of the bowl.
- Add 1 1/2 cups sugar, flour, vanilla extract, and salt to the cream cheese mixture. Beat on medium speed until just combined and smooth. Do not overmix.
- Beat in the eggs one at a time, mixing only until each egg is incorporated. Mix in the sour cream until the batter is uniform.
- Pour the filling over the cooled crust in the springform pan. Gently tap the pan on the counter a few times to release any large air bubbles.
- Bake at 325 degrees F for 60 to 75 minutes. The edges should look set, but the center 2 inches should still have a slight jiggle when gently nudged.
- Turn off the oven, but leave the cheesecake inside with the oven door propped open slightly (use a wooden spoon). Let it cool slowly in the oven for 1 hour. This slow cooling helps prevent cracks.
- Remove the cheesecake from the oven and let it cool completely on a wire rack. Once cool, cover and refrigerate for at least 6 hours, or preferably overnight, before serving.
- Run a thin knife around the edge of the pan before releasing the springform sides. Serve your rich cheesecake recipe cold.
Notes
- Use room temperature ingredients for the filling; this prevents lumps and ensures a velvety cheesecake filling.
- Do not substitute low-fat cream cheese; full-fat is necessary for the best texture.
- For a tangy cheesecake flavor, you can substitute 1/4 cup of the sour cream with fresh lemon juice.
Nutrition
- Serving Size: 1 slice
- Calories: 450
- Sugar: 35
- Sodium: 250
- Fat: 30
- Saturated Fat: 18
- Unsaturated Fat: 12
- Trans Fat: 0.5
- Carbohydrates: 38
- Fiber: 1
- Protein: 8
- Cholesterol: 120