
Oh, goodness, do I have a weeknight hero for you today! When the clock is ticking down and the kids (or your partner, or just yourself!) are starving, you need something satisfying that doesn’t require staring into the oven for an hour. Believe me, as a busy mom who spent years juggling school bells and dinner bells, I know that pressure!
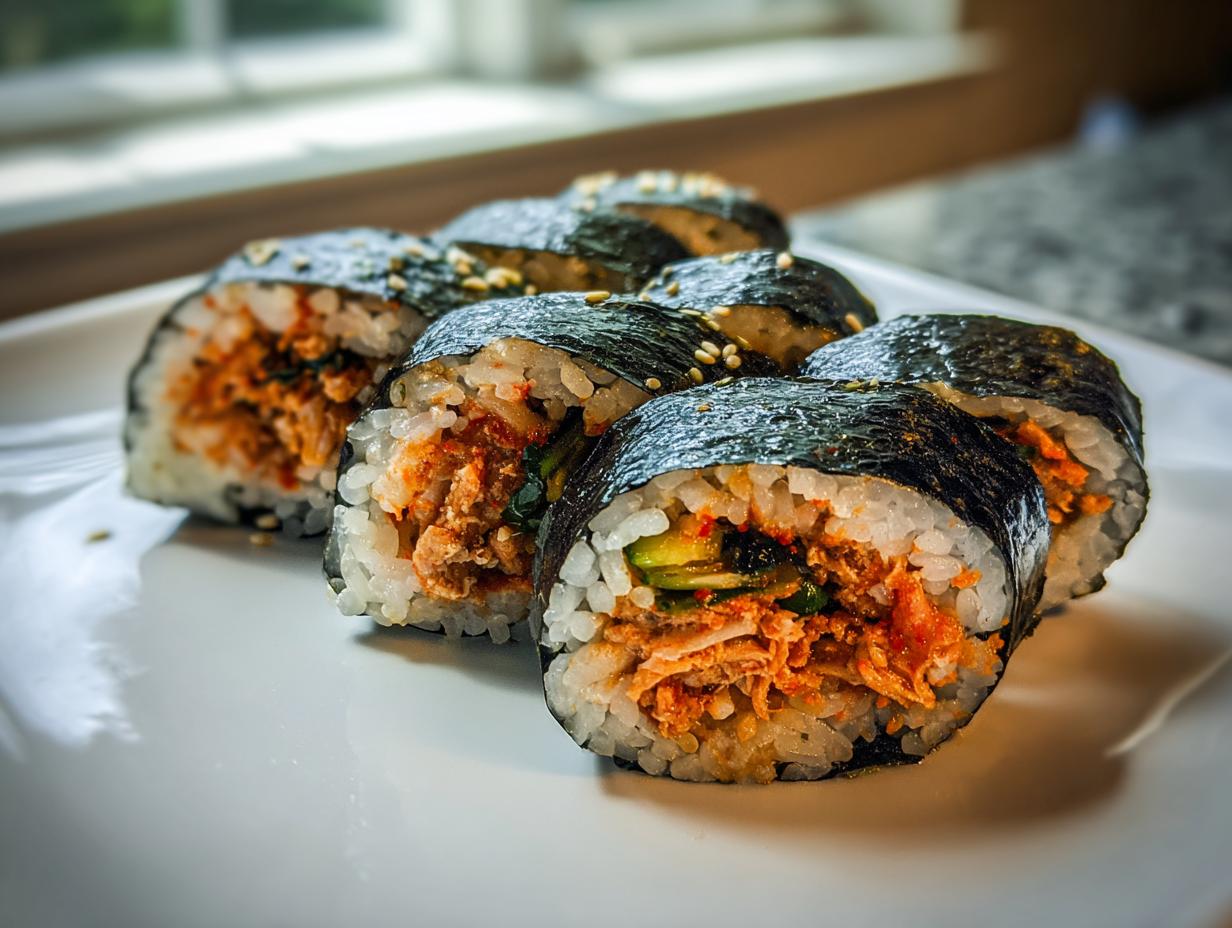
That’s why I’m obsessed with tuna kimbap, or as my Korean friends call it, *Chamchi Kimbap*. It’s the ultimate customizable Quick Asian Meal. We aren’t doing the complicated, slow-cooked fillings today. We are diving straight into the crowd-pleaser: Spicy Tuna Kimbap. It’s fast, it tastes incredible, and it makes fantastic leftovers for any Korean Lunch Box Idea. If you’ve been looking for an easy kimbap to try, this is it. You can find more of my fast lunch tricks right here!
- Why This Spicy Tuna Kimbap Recipe is Your New Go-To (Easy Kimbap)
- Gathering Ingredients for Perfect Tuna Kimbap
- How to Make Tuna Kimbap: Step-by-Step Instructions
- Tips for Perfect Homemade Kimbap
- Serving Suggestions for Your Tuna Kimbap Rolls
- Storage and Reheating Instructions for Chamchi Kimbap
- Variations on Classic Tuna Kimbap Filling Ideas
- Frequently Asked Questions About Tuna Kimbap Recipe
- Nutritional Estimates for Spicy Tuna Rolls
- Share Your Homemade Kimbap Experience
Why This Spicy Tuna Kimbap Recipe is Your New Go-To (Easy Kimbap)
When I say easy, I truly mean it. Most homemade kimbap recipes force you to cook carrots, spinach, seasoned egg, and maybe even bulgogi. That sounds lovely for a weekend project, but not when you’re rushing home from work! This version cuts out all that complexity without losing a single bit of authentic flavor.
This recipe is all about maximizing taste while minimizing stress. I designed it specifically for those moments when you need something exciting on the table fast. It’s honestly my favorite Quick Korean Snack to keep on hand.
- It requires zero cooking time for the fillings. That’s right—we are relying on tasty canned tuna and jarred radishes!
- The cleanup is minimal because we are barely dirtying a pan.
- It’s customizable! Perfect for tossing in whatever veggies you happen to have hanging out in the crisper drawer.
Speed and Simplicity: Ready in 15 Minutes
Friends, the goal here is 15 minutes, total, once your rice is cooked. I always keep a bag of pre-cooked, short-grain rice in the freezer for this exact scenario, making this a true Quick Asian Meal savior. You dump out the rice, mix your tuna, and start rolling. That’s it!
You don’t have to worry about turning on the stove for any vegetable prep. This simplicity truly earns it the title of Easy Kimbap—even if you’ve never touched a bamboo mat before, you’ll have rolls ready in a flash.
The Secret to Flavorful Tuna Kimbap Filling
If this roll tastes better than those sad, dry versions you sometimes find, it’s all down to that spicy tuna mash-up. It’s creamy, tangy, and has just the right zip from the sriracha.
The real trick here is the mayonnaise. I swear by Japanese Kewpie mayo—it’s less sweet and richer than standard American mayo because it uses egg yolks only. That little bit of extra richness makes the Tuna Kimbap Recipe feel unbelievably decadent for something so simple. Just drain your oil-packed tuna well, mix in the mayo, sriracha, and some minced green onion, and you’ve got magic filling!

Gathering Ingredients for Perfect Tuna Kimbap
Okay, let’s get our supplies ready! Since this recipe moves so fast, having everything prepped and measured out makes the rolling process incredibly smooth. Think of this like getting all your painting supplies ready before you start the masterpiece. We are keeping this super simple, focusing just on the essentials that make our spicy tuna kimbap sing.
I always use canned tuna packed in oil because it yields a creamier filling, but feel free to use water-packed if that’s what you have on hand—just be sure to drain it really well! And if you’ve ever wanted to try making your own mayo (it’s so much better!), you should check out my easy creamy mayonnaise recipe.
For the Seasoned Rice and Assembly
This is the canvas for our roll, so we need to season it right! Don’t skip the salt and sesame oil here—it makes all the difference in balancing the spicy tuna later on. Remember, we need short grain rice; the stickiness is vital for holding that roll shape together.
- 4 cups cooked short grain rice (cooled slightly)
- 4 sheets roasted seaweed (nori or gim)
- 1 tablespoon sesame oil, divided
- 1 teaspoon salt
- 1 teaspoon sesame seeds, divided
For the Spicy Tuna Filling and Fresh Vegetables
This is where the flavor punch comes from! I always measure my sriracha right over the sink, just in case I give it a little extra kick. For the veggies, we want them cut slim so they fit nicely without making the roll too fat to close.
- 1 (5.3 oz) can tuna in oil, drained thoroughly
- 2 tablespoons Japanese mayonnaise (Kewpie preferred, trust me!)
- 1 tablespoon sriracha sauce (add more or less to taste!)
- 1 green onion, very finely chopped
- 4 perilla leaves, washed and dried, stems removed (these give that signature fresh, minty note!)
- 1 small cucumber, julienned (cut into thin matchsticks)
- 1/2 cup pickled yellow radish (danmuji), julienned
How to Make Tuna Kimbap: Step-by-Step Instructions
Alright, now that all our gorgeous ingredients are prepped, let’s dive into the fun part! Learning how to make kimbap sounds intimidating, but I promise you, once you see how quickly the tuna filling comes together, you’ll be a pro. My goal with this Tuna Kimbap Recipe is to have these rolling off the mat in minutes. We want tight, beautiful rolls, perfect for slicing into little bite-sized pieces.
Seasoning the Rice and Preparing the Filling
First up, that rice needs flavor! In a big bowl—and be gentle here—we mix the cooked rice with 1 teaspoon of sesame oil, half a teaspoon of salt, and half a teaspoon of sesame seeds. You have to fold it softly, almost massaging the flavor in without smashing the grains. If you smash the rice, it gets gummy, and we aren’t looking for gummy rice!
While that cools slightly, get your filling station ready. In another bowl, we combine the drained tuna, the delightful Kewpie mayo, your sriracha (don’t be shy!), and that finely chopped green onion. Mix that up until everything is totally covered and creamy. You’re basically making a spicy tuna salad, but for rolling!
Assembling and Rolling Your Chamchi Kimbap
Time for the bamboo mat! Lay one sheet of nori down glossy-side down. Remember that little bit of sesame oil we saved? Lightly brush the entire sheet. Now, spread about one cup of that seasoned rice evenly across the seaweed, but leave about an inch bare at the top edge—that bare strip is our seal later!
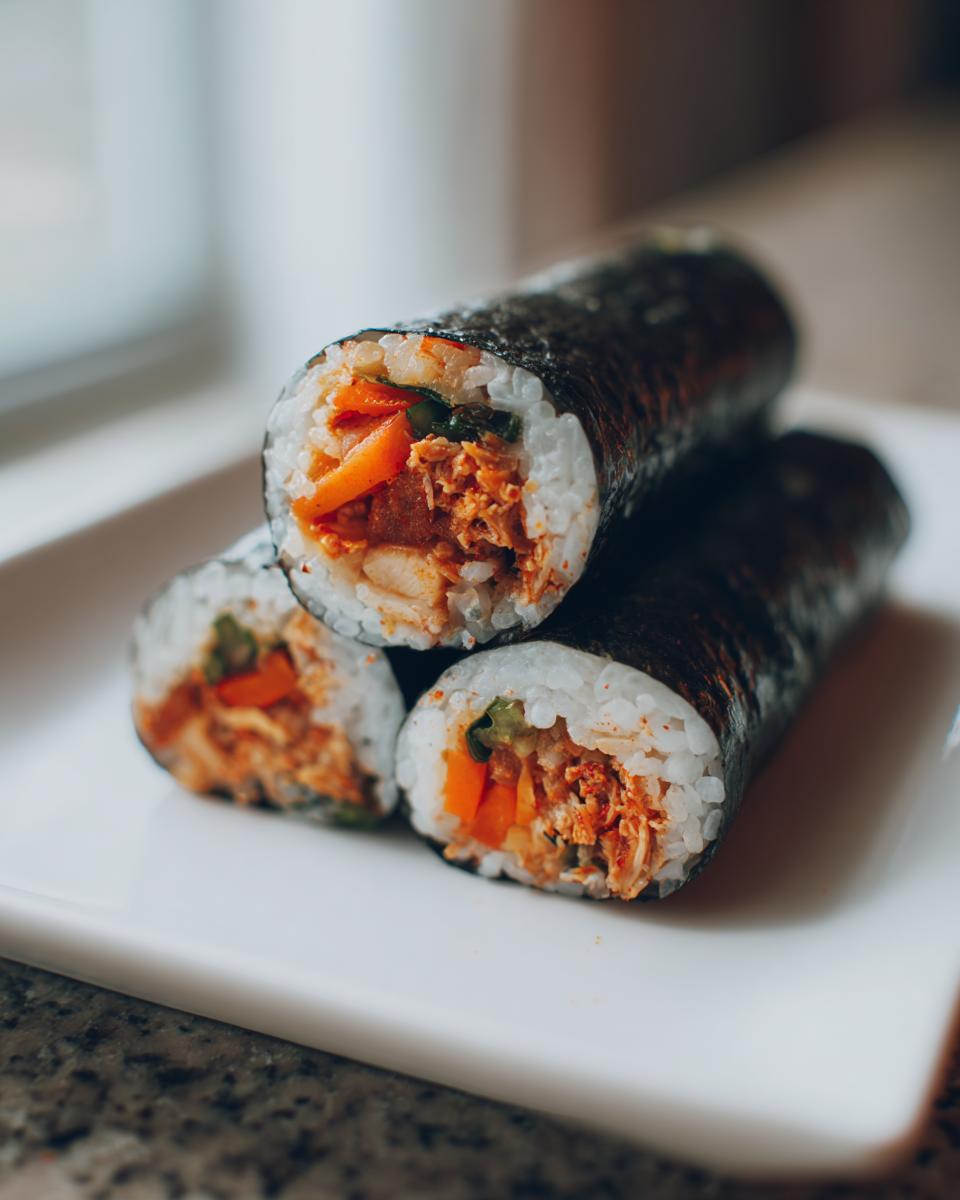
Next, arrange your fillings in one neat line down the center: start with that perilla leaf for zing, then a line of spicy tuna, some cucumber sticks, and finally those yellow pickled radish strips. Now for the crucial part of Chamchi Kimbap: lift the mat closest to you, fold it right over the fillings, and tuck that edge TIGHTLY under the filling line. Use your fingers to press firmly, then keep rolling forward until you reach that bare strip. Give the edge a tiny dab of water to make it stick, and you’ve got yourself a beautifully compact roll!
Finishing and Slicing the Korean Seaweed Rolls
We’re almost done! Once your roll is sealed, brush the outside lightly with the very last bit of sesame oil and sprinkle on the rest of those sesame seeds for that classic look. This finish really seals in the freshness! I know this section is about kimbap, but if you ever need a quick comforting carb that isn’t rice, you have to try my easy homemade naan bread.
Now, grab your sharpest knife, and here’s my biggest secret for pretty cuts: dip the knife blade into a little cup of water before every single slice. Wiping it down and dampening it prevents the seaweed from dragging and tearing the roll open. Slice it into nice, even pieces.
Tips for Perfect Homemade Kimbap
Look, making Homemade Kimbap should be fun, not a wrestling match with your seaweed sheet! If you’ve ever had a roll fall apart the second you lift it, don’t panic—that happens to everyone. Since this is our go-to quick lunch, I’ve definitely learned a few tricks over the years to keep things neat and tidy so you get those perfect slices every time. You need that tight, compact roll!
If you want rice that holds together beautifully, make sure you check out my notes on getting perfect sushi rice—even though this is kimbap, the rice prep matters! A good foundation prevents so many headaches later on.
Adjusting Fillings for Your Tuna Kimbap
When you start rolling, you might feel like you have to cram every bit of filling into that line, but resist the urge! Overstuffing is the #1 reason kimbap explodes when you try to tuck the edge. My big piece of advice is to start small, especially if you are new to rolling. Try using only two main fillings at first, like just the spicy tuna and the pickle, to get the technique down.
And don’t sweat the perilla leaves if you can’t find them or just aren’t sure about that flavor yet! Nana always said a recipe should work for you, not the other way around. You can absolutely swap those aromatic leaves out for a piece of blanched spinach or maybe even some thin shreds of lettuce if you want that fresh crunch but prefer not to use perilla.
Making This a Quick Asian Meal with Prepped Ingredients
To really nail that 15-minute promise for this Quick Asian Meal, you need to lean into shortcuts where it makes sense. The biggest time suck is always the rice, even when it’s just seasoning it. If you’re truly crunched for time, go ahead and use those microwaveable pouches of short-grain rice.
If you heat them up according to the package, they are ready to be seasoned right away! It shaves about 20 minutes off the start time. Just remember to season them while they are piping hot so the oil and salt mix in properly. That keeps this recipe firmly in the ‘under 20 minutes’ category, perfect for those busy weeknights!

Serving Suggestions for Your Tuna Kimbap Rolls
Now that you’ve mastered the art of rolling these beautiful tuna kimbap, we have to talk about what to serve them with! These rolls are amazing all on their own, especially packed up tight as Picnic Food Rolls, but a great side dish or dipping sauce just takes things to the next level.
When I pack these for quick lunches, I always make sure there’s a little something extra tucked into the container. A traditional accompaniment is kimchi, of course, but since this is a quicker, more tuna-centric roll, I love pairing it with something tangy or savory.
My absolute favorite pairing is a simple dipping sauce. It cuts through the richness of the spicy mayo filling perfectly. I usually whip up a quick batch of my 5-minute dumpling sauce—it has a little soy sauce, vinegar, chili flakes, and a tiny bit of sugar. It’s the perfect bright counterpoint to the creamy tuna. You can grab the recipe for it right here; it honestly takes less time than washing your cutting board.
If you are serving these as part of a bigger spread or for dinner, think light Korean sides (banchan). Sometimes I’ll toss a few cubes of seasoned tofu alongside them, or maybe some simple blanched spinach with garlic. The key is keeping the sides light so they don’t overshadow the fresh flavor of the Chamchi Kimbap!
Storage and Reheating Instructions for Chamchi Kimbap
Now, here’s where I need to be real with you: kimbap—any kind, including our amazing tuna kimbap—is absolutely, one hundred percent best eaten the day you make it. The rice firms up a bit in the fridge, and the seaweed (nori) starts to lose that crisp edge it had right after we brushed it with sesame oil.
But life happens, and sometimes you make too many! If you have leftovers, don’t toss them! You want to wrap your rolls up individually. I take a small square of plastic wrap for each section of the roll, wrap it tightly, and then place those wrapped pieces into an airtight container. That little bit of separation helps prevent the rolls from sticking together into one big seaweed brick.
You can safely keep them in the refrigerator for just one day, two days maximum. Beyond that, the texture of the rice changes quite significantly. Please, please, please forget about reheating them! Microwaving kimbap makes the seaweed rubbery and the rice steam and get soft—it just ruins the whole vibe.
If you want them to taste *almost* fresh, take the tightly wrapped rolls out of the fridge about 30 minutes before you plan to eat them. Let them warm up slightly on the counter. It takes the hard chill off the rice, and they become much easier to chew. If you’re looking for other tasty recipes you can easily freeze (unlike kimbap!), you might want to check out my tips for easy freezer jam!
Variations on Classic Tuna Kimbap Filling Ideas
One of the best things about this tuna kimbap is how forgiving it is! Honestly, once you master that spicy tuna mixture, you can treat it like a base and then start experimenting with other Kimbap Filling Ideas. This is where you get to play chef right there in your own kitchen, using up little bits of leftovers too!
When I first learned this recipe, I found that my little one wasn’t quite ready for the full sriracha blast. So, I always keep a batch of plain tuna mayo ready to go for the kids’ portions. It’s nice to have enough rice and seaweed prepped so you can build two different styles in one go!
If you want to bulk up the volume or add a nice texture that complements the creaminess, adding some thin strips of cooked egg is fantastic. People often add strips of seasoned omelet, which is a classic addition to many types of kimbap. Think about how amazing a simple, savory omelet strip would taste next to that spicy kick!
If you ever want to see how a truly traditional, folksy approach to tuna gimbap looks—without the spice, mind you—you should peek at my friend over at Korean Bapsang. It gives you a lovely baseline!
Are you looking for something richer? If you happen to have some leftover shredded carrot or sautéed mushrooms from an earlier meal, throw them in! You can even make a quick, creamy addition by whipping up a small batch of my best egg salad recipe, using just one egg, and folding that right into the tuna mix instead of all the mayo. Just make sure anything you add isn’t soaking wet, or we’ll end up with soggy rolls again—and nobody wants that!
Frequently Asked Questions About Tuna Kimbap Recipe
I get so many questions in my comments after folks try making this tuna kimbap for the first time! It’s such a simple recipe, but rice and rolling can sometimes trip people up. I pulled together the questions I see most often so you feel super confident about your Homemade Kimbap attempt. If you’re looking for other quick ideas for the morning, you can pop over to see some easy breakfast recipes too!
Can I use regular mayonnaise instead of Kewpie for this tuna kimbap?
Yes, absolutely you can! Kewpie mayo is a lovely bonus—it has a slightly richer flavor profile because it uses only egg yolks and a bit of rice vinegar, giving it that signature tang that really brightens up the spicy tuna mix. But if all you have is regular American mayonnaise, go for it! The substitution is perfectly fine, and you’ll still get a creamy, delicious filling for your Spicy Tuna Rolls.
What is the best rice to use for Korean Seaweed Rolls?
This is so important! For any successful kimbap, you need short-grain rice. I always stress this because long-grain rice, like Basmati or Jasmine, is too fluffy and won’t stick together properly once it cools. Short-grain rice has enough starch to become sticky and slightly gluey when cooked, and that’s exactly what you need to hold all your fillings snugly inside the seaweed when you roll it. If you use the wrong rice, your beautiful Chamchi Kimbap might just fall apart when you try to slice it!
How do I pack this for Korean Lunch Box Ideas without it getting soggy?
Making these rolls ahead for Korean Lunch Box Ideas is one of their best features, but sogginess is the enemy! The main culprit is usually moisture migration between the rice and the fillings overnight. My best trick—and this works wonders—is wrapping each roll individually *tightly* in plastic wrap immediately after you finish rolling and brushing it with oil.
The tight plastic wrap acts like a little barrier and keeps the nori sheet from absorbing too much moisture from the rice while it chills. When you pack the lunch box the next morning, place the tightly wrapped rolls in. They stay firm, hold their shape beautifully, and have the best texture when you take them out for lunch!
Nutritional Estimates for Spicy Tuna Rolls
I always keep this in the back of my mind when I’m making plates for the family—especially when I know we’re eating these Spicy Tuna Rolls more than once a week! Because we are using canned tuna and mostly fresh vegetables, these Korean Seaweed Rolls are surprisingly well-balanced when you look at the macros.
Now, remember what I always say: I learned to cook in a bustling home kitchen, not in a lab! These numbers are my best, highly educated guess based on standard store-bought ingredients. They are fantastic Korean Lunch Box Ideas, but they are just estimates, so take them as a helpful guide.
Here are the rough figures per serving (which we calculated as one-fourth of the entire recipe):
- Calories: Around 350
- Protein: About 18g (That good protein punch from the tuna!)
- Total Fat: Roughly 12g, mostly coming from the rich tuna oil and mayonnaise.
- Carbohydrates: Around 45g (mostly from the rice).
- Sugar: Very low, just 3g!
- Sodium: This is the one to watch, weighing in around 550mg, mostly due to the pickled radish and salt in the rice.
You’ll notice the fat breakdown shows about 10g of unsaturated fat, which is great! We are getting healthy fats from the tuna oil and the sesame oil we brush on top. This deliciousness really balances out nicely when you consider it’s a full, satisfying meal wrapped up neatly!
Share Your Homemade Kimbap Experience
Whew! We did it! We made the easiest, creamiest, spiciest tuna kimbap rolls, and I hope they tasted just as amazing for you as they do in my kitchen. Honestly, when I see your beautiful rolls pop up on my screen, it just makes my whole day!
Now that you’ve mastered these Korean Seaweed Rolls, I absolutely want to hear about it. Did you go heavy on the sriracha? Did your kids devour the spicy version or did you have to sneak some plain tuna filling in for them?
Please, please leave a comment below the recipe and let me know how it went! A quick rating right at the top helps other busy cooks decide to give this Quick Korean Snack a try. Tag me on social media if you snap a picture of your perfectly sliced Chamchi Kimbap—nothing makes me happier than seeing my recipes making their way to your family tables.
If you are curious about my own journey, from teaching to starting Rosa’s Tasty Kitchen, you can learn a little more about me right here. Happy rolling, everyone!
PrintEasy 15-Minute Spicy Tuna Kimbap (Chamchi Kimbap)

Make satisfying Korean seaweed rolls quickly with this easy Spicy Tuna Kimbap recipe. This roll uses canned tuna mixed with a spicy mayo sauce and fresh fillings, perfect for lunch boxes or a quick snack.
- Prep Time: 15 min
- Cook Time: 0 min
- Total Time: 15 min
- Yield: 4 servings 1x
- Category: Lunch
- Method: Rolling
- Cuisine: Korean
- Diet: Vegetarian
Ingredients
- 4 cups cooked short grain rice
- 4 sheets roasted seaweed (nori or gim)
- 1 tablespoon sesame oil, divided
- 1 teaspoon salt
- 1 teaspoon sesame seeds, divided
- 1 (5.3 oz) can tuna in oil, drained
- 2 tablespoons Japanese mayonnaise (Kewpie preferred)
- 1 tablespoon sriracha sauce
- 1 green onion, very finely chopped
- 4 perilla leaves, washed and dried, stems removed
- 1 small cucumber, julienned
- 1/2 cup pickled yellow radish (danmuji), julienned
Instructions
- Prepare the seasoned rice: In a large bowl, combine the cooked rice, 1 teaspoon sesame oil, 1/2 teaspoon salt, and 1/2 teaspoon sesame seeds. Mix gently until combined. Set aside.
- Prepare the spicy tuna filling: In a separate bowl, combine the drained tuna, mayonnaise, sriracha sauce, and chopped green onion. Mix well until the tuna is fully coated.
- Prepare the vegetables: If using, lightly sauté the julienned cucumber for one minute or leave it raw for extra crunch. Drain any excess liquid from the pickled radish.
- Assemble the kimbap: Lay one sheet of seaweed on a bamboo rolling mat. Lightly brush the entire surface with a small amount of sesame oil.
- Spread about 1 cup of the seasoned rice evenly over the seaweed, leaving a 1-inch border at the top edge.
- Arrange the fillings in a line across the center of the rice: place one perilla leaf, a small amount of spicy tuna mixture, some cucumber strips, and some pickled radish.
- Roll the kimbap: Lift the edge of the mat closest to you and fold it over the fillings, tucking the edge tightly. Continue rolling forward, pressing gently to keep the roll compact. Moisten the top edge of the seaweed with a little water to seal the roll.
- Finish the rolls: Brush the outside of the finished roll lightly with the remaining sesame oil and sprinkle with the remaining sesame seeds.
- Slice and serve: Using a sharp, damp knife, slice the roll into bite-sized pieces. Serve immediately or pack for a Korean lunch box idea.
Notes
- For an easier roll, use only two or three fillings instead of all of them.
- If you do not have perilla leaves, you can substitute them with blanched spinach or omit them.
- To make this a quick Asian meal, use pre-cooked rice or microwave rice pouches.
Nutrition
- Serving Size: 1 roll (1/4 recipe)
- Calories: 350
- Sugar: 3
- Sodium: 550
- Fat: 12
- Saturated Fat: 2
- Unsaturated Fat: 10
- Trans Fat: 0
- Carbohydrates: 45
- Fiber: 2
- Protein: 18
- Cholesterol: 35