
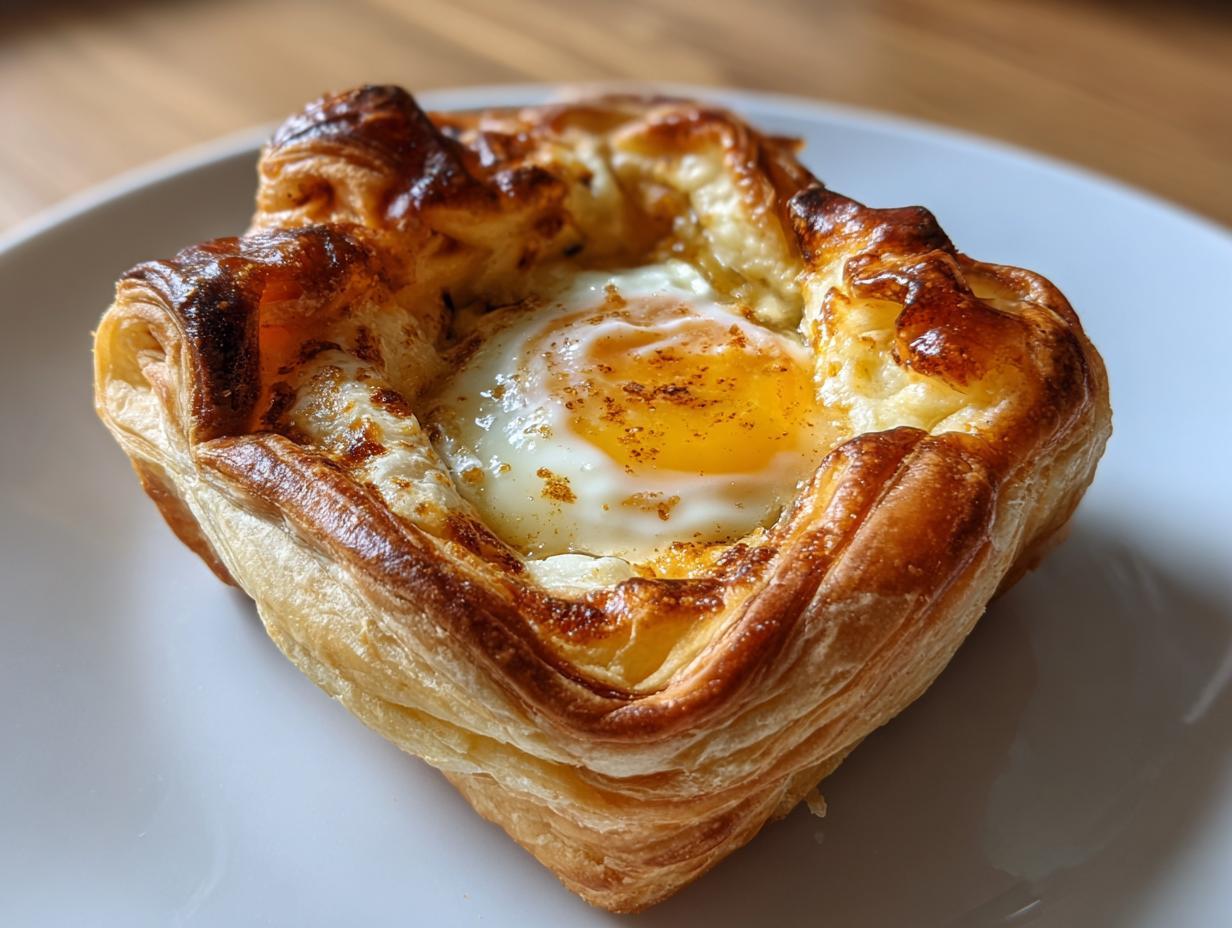
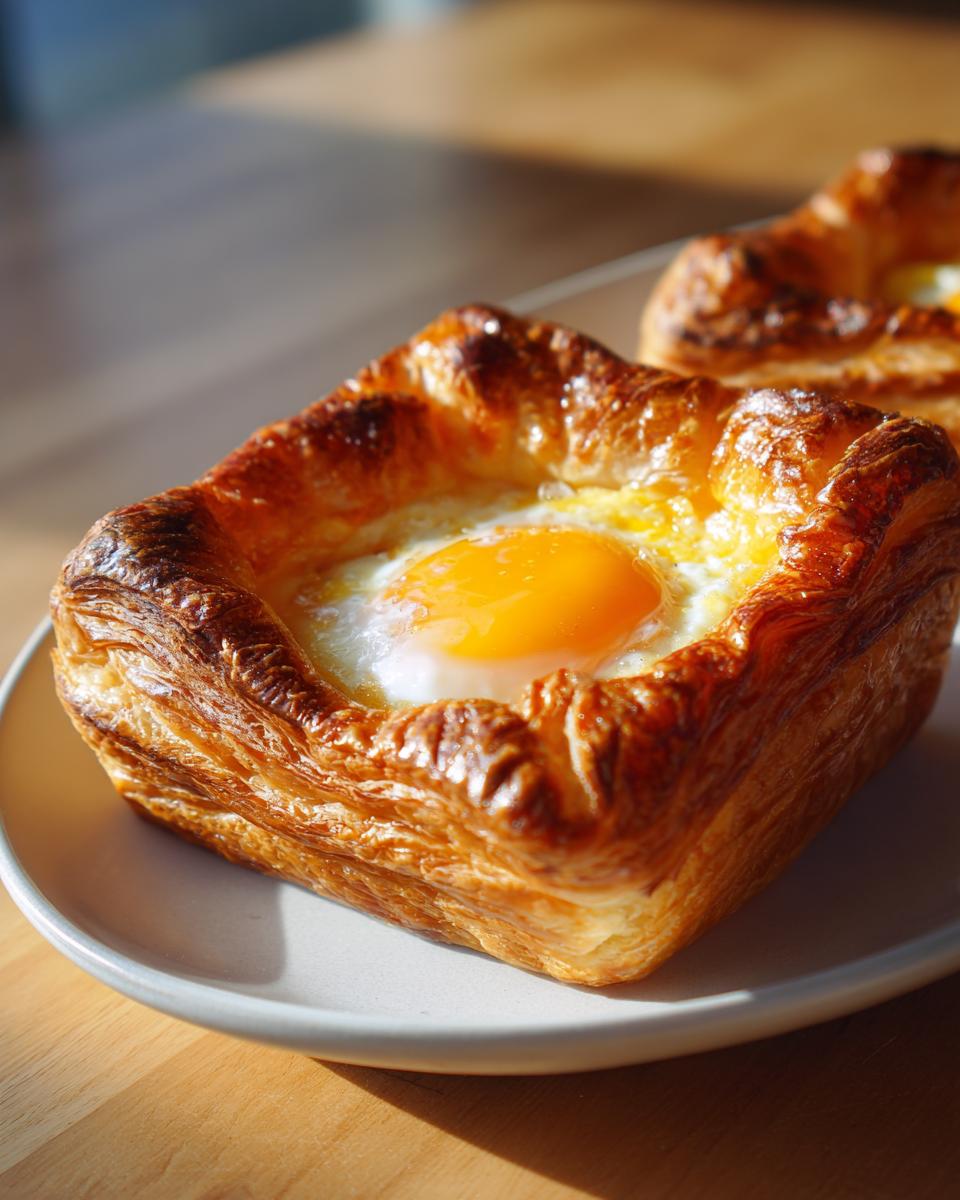
When you need a brunch dish that looks like you spent hours fussing over it but actually came together in under 30 minutes, you need something that screams ‘impressive’ without demanding a culinary degree. That’s exactly where these baked eggs puff pastry cups shine! They are absolutely gorgeous, flaky, and perfect for feeding a crowd or just making a Sunday morning feel special. Here at Rosa’s Tasty Kitchen, we believe the best meals come straight from the heart, and that means taking smart shortcuts so you can focus on enjoying your family. This recipe proves you don’t need fancy skills to turn simple store-bought puff pastry into an elegant, golden centerpiece for your table. If you’re looking for more quick morning wins, check out some of my other favorite easy breakfast recipes!
- Why This Baked Eggs Puff Pastry Recipe is a Brunch Staple
- Ingredients for Perfect Baked Eggs Puff Pastry Cups
- Equipment Needed for Your Baked Eggs Puff Pastry
- Step-by-Step Instructions: How to Bake Eggs in Pastry
- Tips for Success with Individual Egg Bakes Savory
- Serving Suggestions for Your Flaky Pastry Brunch
- Storage and Reheating Instructions for Leftover Baked Eggs Puff Pastry
- Frequently Asked Questions About Baked Eggs Puff Pastry
- Nutritional Estimates for This Savory Pastry Breakfast Idea
Why This Baked Eggs Puff Pastry Recipe is a Brunch Staple
There are so many reasons I keep reaching for this simple recipe, especially when company drops by unannounced! It just hits all the right notes for a truly successful weekend meal.
- It’s incredibly fast! From the fridge to the oven, we’re looking at less than 30 minutes total when making these baked eggs puff pastry creations.
- The visual payoff is huge—that golden-brown puff pastry screams gourmet.
- You control the texture. Runny or jammy? You decide!
Achieving Flaky Pastry Brunch Perfection
The secret weapon here is, quite frankly, the store-bought puff pastry. Don’t feel guilty! It gives you that amazing, airy lift and that signature shatter you want in your flaky pastry brunch without an hour of folding butter into dough. It makes serving something stunning totally accessible.
Ingredients for Perfect Baked Eggs Puff Pastry Cups
This is where we talk about keeping things easy, because remember how I told you Rosa’s kitchen is all about achievability? You can find everything on this list at your regular grocery store, no specialty trips needed. You only need seven core components to create these incredible baked eggs puff pastry creations!
- 1 sheet frozen puff pastry, making sure it’s completely thawed
- 2 large eggs
- 1 tablespoon heavy cream
- 1/4 teaspoon salt
- 1/8 teaspoon black pepper
- 1 egg yolk, beaten really well (this is for our wash!)
- 1 teaspoon sesame seeds or everything bagel seasoning (totally optional, your choice!)
Ingredient Notes and Substitutions for Your Baked Eggs Puff Pastry
Listen, I know everyone likes their yolk a little differently. If you hate runny yolks, don’t worry! Those 15 minutes are your magic window. For a firmer bite, you might add 3 extra minutes in the oven; just watch those edges so the pastry doesn’t burn.
If you don’t have sesame seeds, the flavor boost from the salt and pepper in the egg wash itself is still great. However, if you’ve got fresh chives or maybe some dried herbs like thyme or even a dash of smoked paprika, sprinkle those on the edges instead. They look so fancy and add a subtle flavor that just shouts ‘gourmet’ without any extra effort on your part!
Equipment Needed for Your Baked Eggs Puff Pastry
I always tell folks that having the right tools makes cooking feel less like a chore. Luckily, for these beautiful baked eggs puff pastry cups, you don’t need anything complicated. Just grab a sturdy baking sheet, make sure you have that parchment paper ready to go (trust me on the parchment!), and find a really sharp, small knife for scoring the dough. That’s honestly it!
Step-by-Step Instructions: How to Bake Eggs in Pastry
Okay, deep breath, it’s time to actually bake! Don’t let the pastry intimidate you; this process is surprisingly straightforward. We are aiming for that perfect golden brown pastry breakfast look while keeping the inside soft and lovely. Remember that high oven heat is your friend here, especially when dealing with laminated dough like this. If you’ve ever found yourself craving a beautiful crusty loaf, you know the importance of a hot start, much like how I approach my quick crusty French bread.
Preparing the Puff Pastry for the Baked Eggs Puff Pastry
First things first, get that oven cranked up to 400 degrees Fahrenheit. You need it hot! Unfold your thawed sheet of pastry. I use a pizza cutter to slice it into four even squares—it’s faster and cleaner than a knife, honestly. Lay those four squares onto your parchment-lined baking sheet.
Now for the crucial bit that makes these look like individual nests: Use a sharp little knife—don’t push too hard!—to gently score a border about half an inch in from the edge on all four sides of each square. You want to mark where the edge will rise, but you absolutely cannot cut all the way through, or you’ll end up with four flat cookies instead of pastry cups! Then, use your finger to gently press down that center area inside the score line. That creates the little well for your egg.
Baking Times for Perfect Yolk Consistency in Baked Eggs Puff Pastry
Carefully crack one egg right into the center well of each pastry square. Then, drizzle just a tiny bit of that cream mixture over the white, and give those scored edges a nice brush-over with your egg yolk wash. Sprinkle on your seeds if you are using them, and slide them into that hot oven! This is where the magic happens for your baked eggs puff pastry.
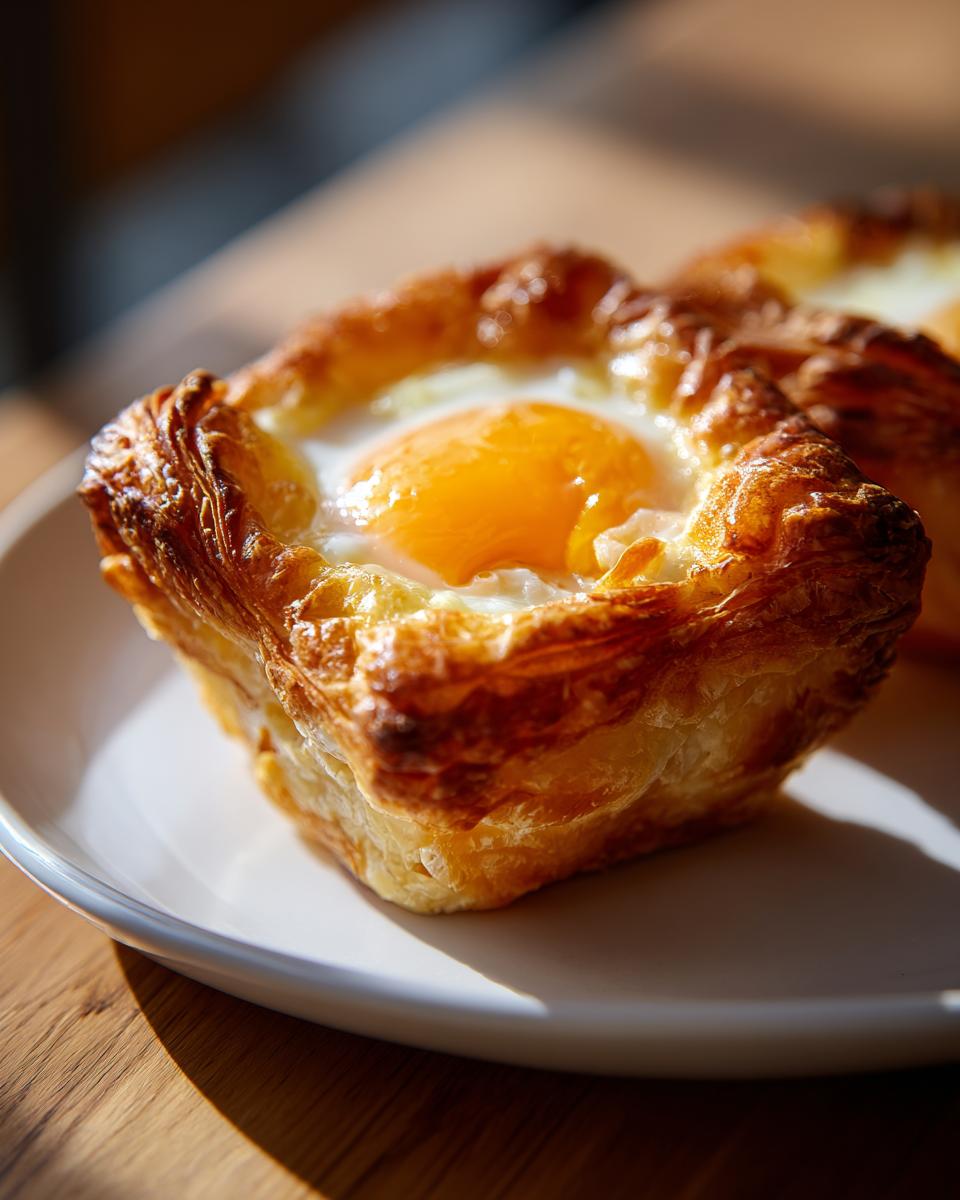
Bake them for 15 to 18 minutes. This timing window is vital for achieving your ideal texture among these popular runny yolk pastry ideas. Fifteen minutes gives you a beautiful, fully set white with a gloriously runny yolk—perfect for dipping! If you prefer it slightly firmer, maybe approaching jammy, let them go the full 18 minutes. You want that pastry crust to look deeply golden brown and super flaky when they come out!
Tips for Success with Individual Egg Bakes Savory
I’ve made this recipe more times than I can count, usually when I’m trying to squeeze an impressive meal into a tight schedule. The best advice I can give you about these individual egg bakes savory is to respect the pastry’s temperature! If your dough is too warm when it goes into that hot oven, it won’t puff up properly; it’ll just get oily.
My absolute favorite trick is pre-baking the pastry cups. If you like a really crisp base, give those empty squares about 4 or 5 minutes in the oven *before* you crack the egg inside. Then, pull them out, quickly add the egg and cream, and pop them back in. That little head start guarantees a shatteringly crisp bottom for your make ahead pastry breakfast.

And yes, you can absolutely prepare these ahead of time! Just cut your dough and store the squares, covered, in the fridge for up to four hours. Just remember the golden rule: add the egg right before the baking step, not hours before!
Serving Suggestions for Your Flaky Pastry Brunch
These crispy little parcels are pretty much perfect on their own, but why stop there? For a full-on weekend celebration, serve them alongside some lightly dressed arugula or microgreens—the peppery bite cuts through the richness of the yolk beautifully. We love a side of crispy bacon or maybe some sliced avocado for brunch.
If you are serving these as *easy baked egg appetizers* at a party, skip the greens and just have a couple of high-quality hot sauces nearby. Guests can drizzle them right over the top. Honestly, any way you serve your flaky pastry brunch, they disappear faster than you can believe!

If you need some ideas for lighter fare to balance out all this delicious pastry, take a peek at my quick healthy lunch ideas for inspiration!
Storage and Reheating Instructions for Leftover Baked Eggs Puff Pastry
Even though these baked eggs puff pastry cups are best eaten right out of the oven, sometimes life happens! If you have leftovers, you need to store them correctly. Wrap the entire cooled pastry with the egg inside tightly in plastic wrap, or place them in an airtight container and keep them in the fridge for up to two days.
Here’s the microwave warning: Don’t you dare microwave these! The pastry will turn into sad, chewy rubber. Instead, reheat them on a baking sheet at 350 degrees for about 8 minutes. That little pop of dry heat will crisp the pastry right back up. I promise, it works like magic!
Frequently Asked Questions About Baked Eggs Puff Pastry
Every time I post photos of these beautiful things online, I get flooded with questions! It’s totally normal, especially when you are dealing with the drama of puff pastry and egg yolks. Since I want you to feel totally confident making these, let’s tackle a few of the most common queries I get about these fantastic baked eggs puff pastry creations.
Can I make the pastry cups ahead of time for a Quick Puff Pastry Brunch Recipe?
Yes, you absolutely can! This is part of why I love them for entertaining. You can go ahead and thaw your pastry, cut those four squares, and even score the borders just like we talked about. Keep them covered and pop them in the fridge for up to four hours. But here’s the critical point for your quick puff pastry brunch recipe: Do NOT add the egg yet! Keep the egg separate until you are ready to slide the tray into the oven. That way, when company arrives, you are only 18 minutes away from serving!
What if I want firm yolks instead of runny yolks in my Puff Pastry Egg Recipe?
Ah, the eternal debate! If you are making these for picky eaters or just prefer them fully set, you have two great options for your puff pastry egg recipe. The easiest way is just to leave them in the oven for the full 18 minutes, maybe even sneak them toward 20, always checking that the pastry edges look deeply golden brown. My preferred method, though, especially if you want that super crispy bottom, is to pre-bake: Pop those empty, scored pastry squares into the 400-degree oven for 5 minutes first. Pull them out, crack the egg in, and then bake for another 12 to 15 minutes. That pre-bake ensures that even if you bake a bit longer, you won’t have a soggy bottom!
If you’re looking for other dependable recipes that save time for busy evenings, you should definitely check out my thoughts on weeknight dinner ideas—sometimes we need the shortcuts all week long!
Nutritional Estimates for This Savory Pastry Breakfast Idea
Now, I always tell people that once you start cooking with butter and pastry, you should probably stop worrying too much about the precise numbers, but here’s the ballpark estimate for one of these fantastic savory pastry breakfast ideas. This is based on one serving (one pastry cup) and remember, these are just estimates!
- Calories: 280
- Total Fat: 20g
- Protein: 9g
- Carbohydrates: 18g
- Sodium: 250mg
I always have to put a little disclaimer on this—the exact brand of puff pastry or the size of your egg can change things! But this gives you a good general idea for planning your weekend brunch menu.
PrintBaked Eggs in Flaky Puff Pastry Cups

Make impressive baked eggs en croûte using store-bought puff pastry for a quick, golden-brown breakfast or brunch centerpiece.
- Prep Time: 10 min
- Cook Time: 18 min
- Total Time: 28 min
- Yield: 4 servings 1x
- Category: Breakfast
- Method: Baking
- Cuisine: American
- Diet: Vegetarian
Ingredients
- 1 sheet frozen puff pastry, thawed
- 2 large eggs
- 1 tablespoon heavy cream
- 1/4 teaspoon salt
- 1/8 teaspoon black pepper
- 1 egg yolk, beaten (for egg wash)
- 1 teaspoon sesame seeds or everything bagel seasoning (optional)
Instructions
- Preheat your oven to 400 degrees Fahrenheit (200 degrees Celsius). Line a baking sheet with parchment paper.
- Unfold the thawed puff pastry sheet onto a lightly floured surface. Cut the sheet into four equal squares.
- Place the four pastry squares onto the prepared baking sheet. Score a border about 1/2 inch from the edge of each square using a sharp knife, being careful not to cut all the way through the pastry. This border will help the edges puff up around the filling.
- Gently press down the center area inside the scored border of each square to create a well for the egg.
- In a small bowl, whisk together the heavy cream, salt, and pepper.
- Carefully crack one egg into the center well of each pastry square. Pour about one teaspoon of the cream mixture over each egg.
- Brush the scored edges (the border) of the pastry lightly with the beaten egg yolk wash. Sprinkle the egg wash border with sesame seeds or seasoning, if using.
- Bake for 15 to 18 minutes. Check the eggs after 15 minutes; the pastry should be golden brown and flaky. Adjust baking time based on your preferred yolk consistency: 15 minutes for a runny yolk, 18 minutes for a jammy yolk.
- Remove from the oven and let cool on the baking sheet for 2 minutes before serving.
Notes
- For a firmer yolk, you can bake the pastry cups for 5 minutes before adding the egg, then proceed with the recipe.
- If you want to make these ahead, you can cut the pastry squares and store them covered in the refrigerator for up to 4 hours before baking. Add the egg and bake just before serving.
- Use a small cookie cutter to cut circles instead of squares for individual egg appetizers.
Nutrition
- Serving Size: 1 pastry cup
- Calories: 280
- Sugar: 1
- Sodium: 250
- Fat: 20
- Saturated Fat: 10
- Unsaturated Fat: 10
- Trans Fat: 0
- Carbohydrates: 18
- Fiber: 1
- Protein: 9
- Cholesterol: 185