
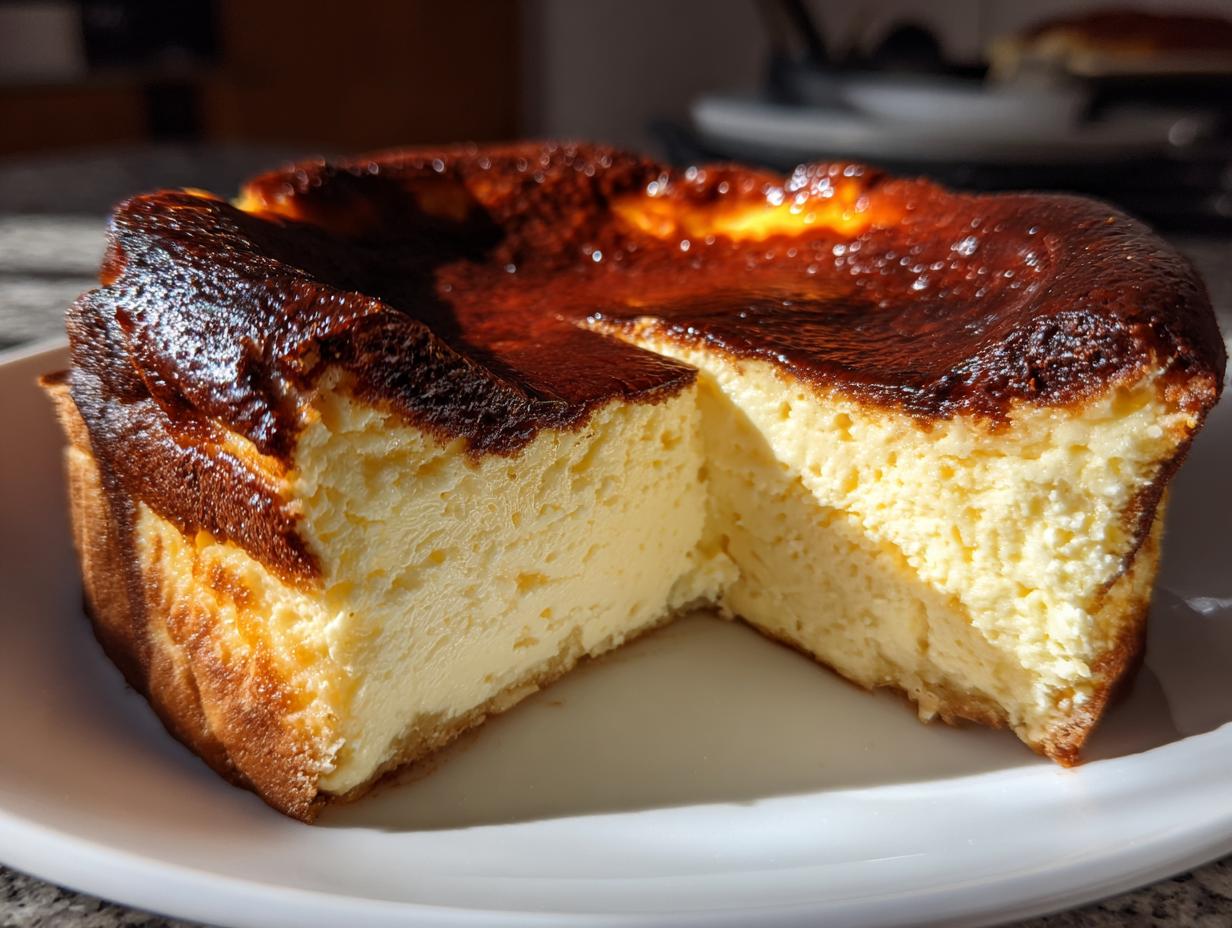
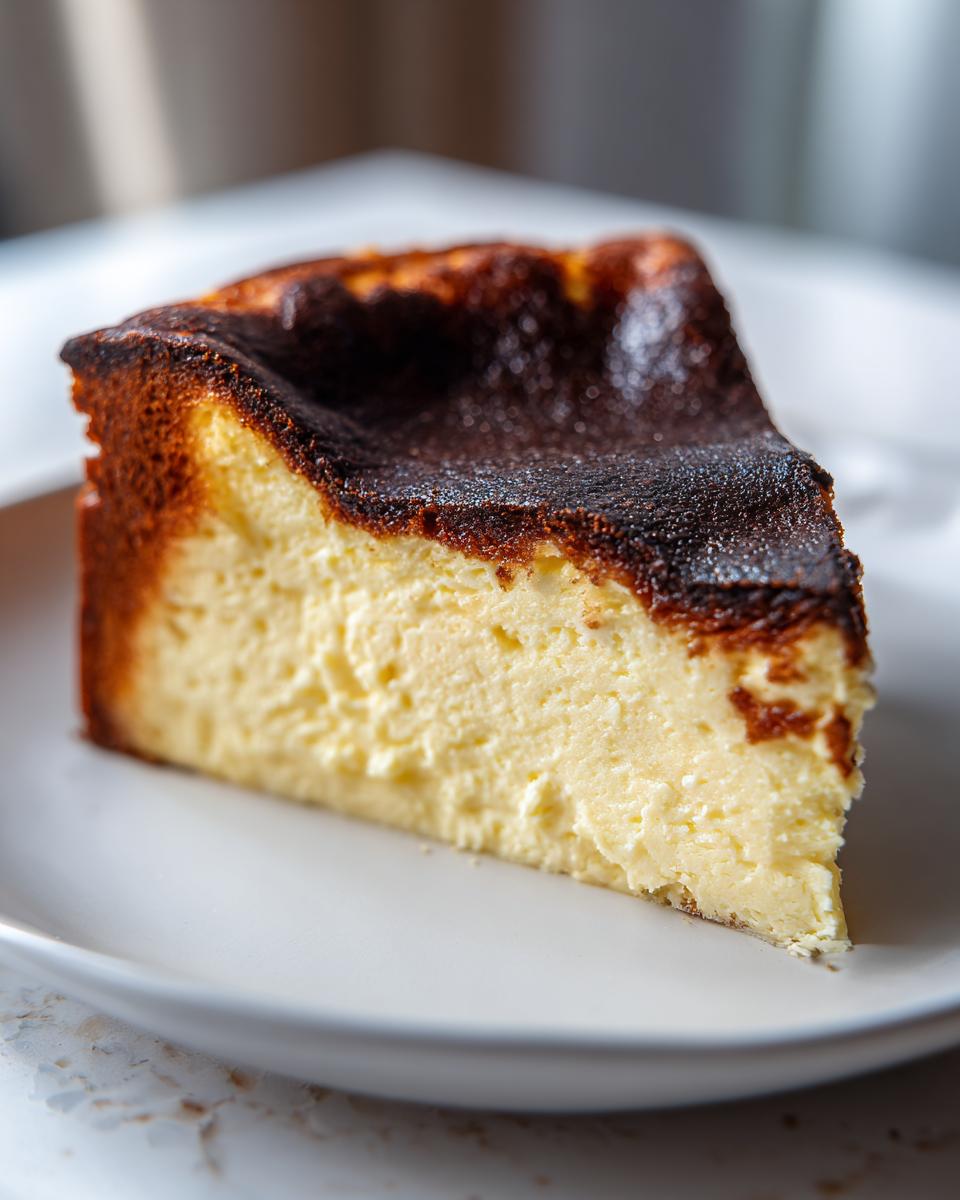
If you’ve been scrolling online at all lately, you have absolutely seen that stunning, almost dramatically charred dessert that looks both perfectly messy and completely luxurious. I’m talking about the famous **Basque Burnt Cheesecake**! When I first saw it, I thought, “This must involve tricky techniques and maybe even a water bath.” But Rosa Sterling’s philosophy is all about making the impressive achievable right here in your busy home kitchen. Trust me, we skip the fussy water bath entirely! This recipe is designed to deliver that iconic contrast—a deeply caramelized, beautifully burnt top that cracks open to reveal a rich, velvety, custard-like center. It’s simple to prepare, uses accessible ingredients, and is the kind of showstopper that makes everyone think you worked twice as hard as you actually did. We’re keeping it straightforward for you, just like we do with all the best homemade desserts.
- Why This Basque Burnt Cheesecake Recipe is a Home Baker Favorite
- Gathering Ingredients for Your Basque Burnt Cheesecake
- Step-by-Step: How to Make Basque Cheesecake
- Tips for Success with Your Basque Burnt Cheesecake Recipe
- Storage and Reheating Instructions for Creamy Cheesecake
- Variations on the Basque Burnt Cheesecake
- Frequently Asked Questions About This Viral Cheesecake Recipe
- Estimated Nutritional Data for Your Homemade Cheesecake
- Share Your Perfect Basque Burnt Cheesecake Creation
Why This Basque Burnt Cheesecake Recipe is a Home Baker Favorite
I get it—you see a dessert trending everywhere, and you hesitate because it looks too complicated. That’s why I developed this version of the **Basque Burnt Cheesecake**. It’s the perfect marriage of rustic charm and decadent flavor, but it’s sneaky easy. I want you to have success every time you pull something from the oven. It’s all about reliable results!
- It’s naturally crustless! No fussy blind baking or dealing with soggy bottoms here.
- There is absolutely no water bath required, which is a huge time saver and stress reliever.
- The ingredient list is short and uses items you probably already have on hand.
- The contrast between the dark exterior and the silky center is just breathtaking.
Achieving the Signature Creamy Cheesecake Texture
The secret to that mousse-like, almost custard center isn’t some fancy ingredient; it’s all in the preparation. We are using room temperature dairy—and I mean truly soft—so everything blends without any lumps trying to fight you. When mixing, we are gentle once the eggs go in. We only want the ingredients combined, not whipped. Too much air means a soufflé that collapses or rises too high; we want that beautiful, dense, velvety interior that melts in your mouth.
The Secret to the Perfect Caramelized Top Dessert
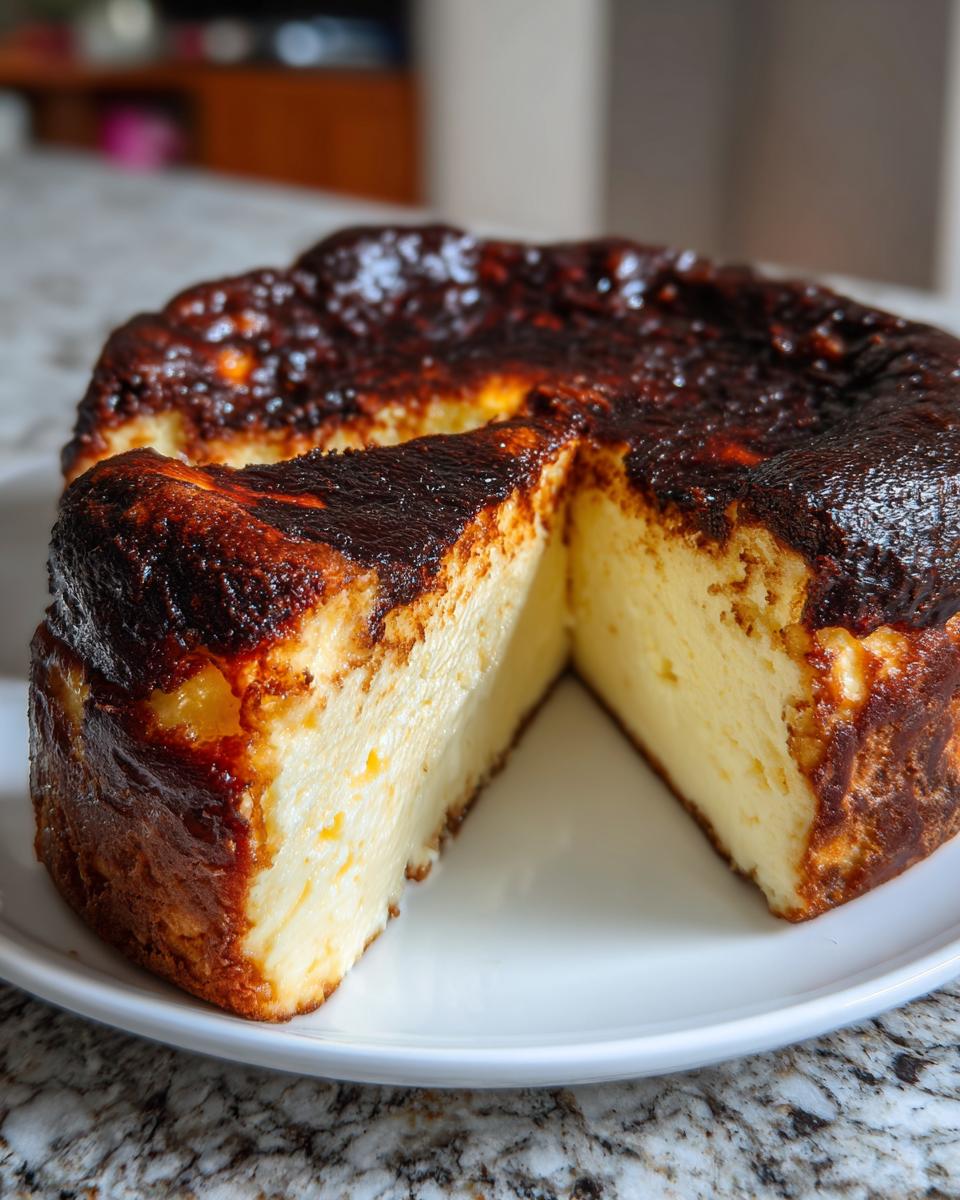
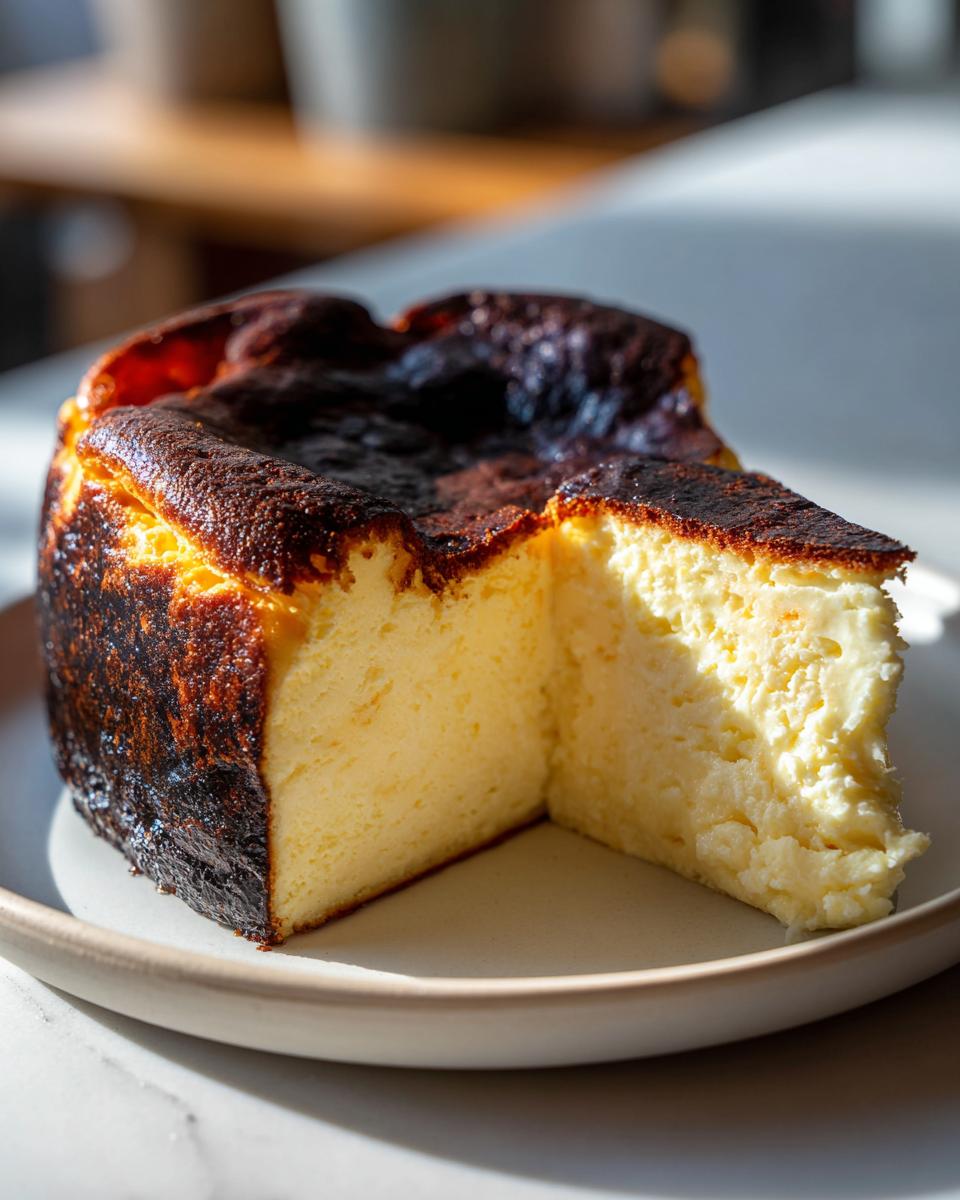
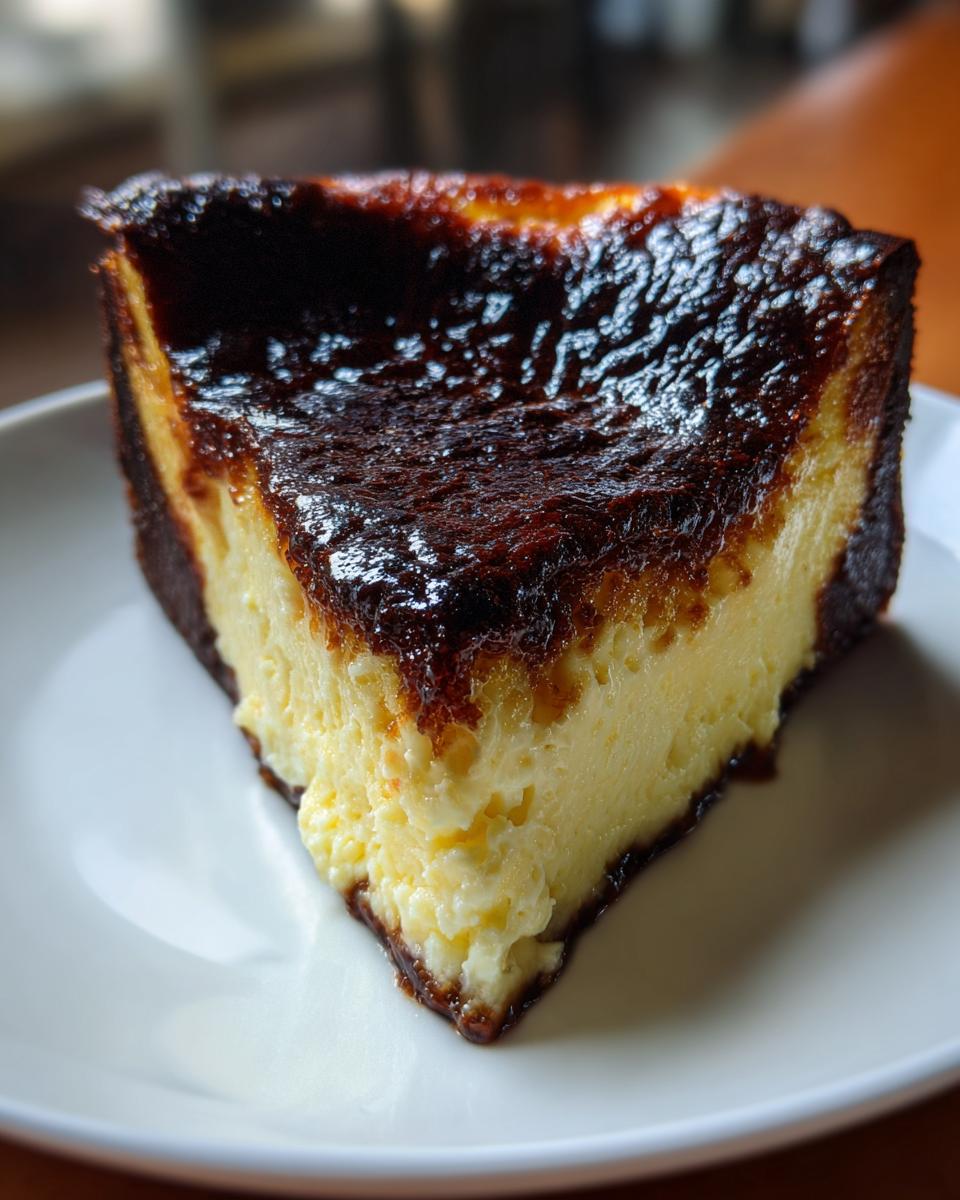
That gorgeous, almost black top is the hallmark of this cake, and honestly, people are usually afraid to go dark enough! The magic happens because we use a very high initial oven temperature. This blast of heat scorches the top rapidly, creating that distinct caramelized flavor crust while simultaneously setting the outside edges of the cake. Meanwhile, the inside stays wobbly and underbaked, which is exactly what we want for a true San Sebastian style **Basque Burnt Cheesecake**.
Gathering Ingredients for Your Basque Burnt Cheesecake
One of the reasons this dessert blew up in popularity is how few ingredients you actually need to create something so dramatic. It’s not about fancy flours or exotic spices; it’s about the quality and state of your dairy! To get that beautiful, smooth batter that bakes up like liquid silk, you absolutely must respect the temperature of your main components. Don’t rush this part, because soft ingredients mean a lump-free cheesecake. You can check out my favorite apple cheesecake bars for another easy bake, but for this Spanish favorite, setting things out is crucial.
Essential Components for This Crustless Cheesecake
Make sure everything listed below has had plenty of time to come to room temperature—at least two good hours on the counter. This makes mixing so much easier!
- 1.5 lbs cream cheese, room temperature
- 8 oz mascarpone cheese, room temperature
- 1 1/4 cups granulated sugar
- 4 large eggs, room temperature
- 2 large egg yolks, room temperature
- 1 3/4 cups heavy cream
- 1 tablespoon all-purpose flour
- Pinch of fine sea salt
Step-by-Step: How to Make Basque Cheesecake
Alright, let’s get baking! This is where the magic happens, and honestly, it’s easier than wrestling with a fiddly water bath! My focus here is getting that beautiful, rustic look that everyone loves when they see a true **Basque Burnt Cheesecake**. We need to be intentional with our initial setup and gentle during the mixing, which helps us avoid those big cracks when cooling. You can find my no-crack guide for regular cheesecakes here, but this rustic style has its own rules!
Prep Work: Pan Lining and Oven Setup for Basque Burnt Cheesecake
First things first: the pan. Grab a 9-inch springform pan—it’s sturdy. You need two big sheets of parchment paper. You’re going to line them criss-cross style, crinkling them up and pressing them firmly into the pan corners. Don’t smooth them out too much! Those high, crinkly edges are crucial because they let the cake climb way up the sides and get that signature burnt top. Once the paper is in, crank that oven up to 400°F (200°C). We need serious heat for the next step.
Mixing the Velvety Cheesecake Batter
Remember those room-temperature ingredients? Now’s when they pay off! Start with your softened cream cheese in a large bowl and beat it until it’s impossibly smooth—you want zero lumps clinging to the sides. Now, add your sugar and beat until it’s mostly combined. Next come the eggs and yolks, one by one. This is important: mix just until each egg disappears before adding the next. Do NOT overbeat once the eggs are in! Finally, gently fold in the heavy cream, flour, and salt. You’re done! The batter will be quite thin; don’t panic, that’s just right for a **creamy cheesecake**.
Baking and Cooling the Easy Burnt Cheesecake
Pour that thin batter into your parchment-lined pan and slide it into that hot 400°F oven. Bake this beauty for about 50 to 60 minutes. You are looking for a top that is deeply, beautifully caramelized—borderline black in spots. When you wiggle the pan, the edges must look set, but the very center should have a serious, jiggly wobble, like soft custard. When it’s done, pull it out! Resist the urge to cut it. Let it cool completely on a rack for at least three hours on the counter. Then, it *must* chill in the fridge for six hours, or better yet, overnight. That resting time is what transforms it from a warm batter into the perfect **easy burnt cheesecake**.
Tips for Success with Your Basque Burnt Cheesecake Recipe
Look, making a recipe for the first time can be tricky, but I promise these little nuggets of wisdom I’ve picked up will make your **Basque Burnt Cheesecake Recipe** foolproof. When I first started baking, I learned the hard way that rushing the setup just means trouble later on. These tips are the difference between a good cake and the show-stopping, viral-worthy dessert you are aiming for. Trust me on these crucial final touches!
Ingredient Temperature Matters for Smooth Batter
I cannot stress this enough: if you want that velvety, luxurious bake that everyone craves, your cream cheese, mascarpone, eggs, and cream have to be completely relaxed. I mean fully room temperature, soft to the touch. Why? Because cold cream cheese has firm internal bonds that won’t incorporate smoothly with the sugar. If you try to beat cold cream cheese, you end up with little tiny white lumps peppered throughout your beautiful batter. Even a quick zap in the microwave won’t truly mimic the smoothness you get when you let things sit out for a couple of hours. Smooth start equals smooth finish!
Serving Temperature Guide for Texture Control
This one is fun because you get to decide your favorite texture! The cooling process after baking is critical—we let it rest on the counter for hours, then we chill it overnight minimum. If you serve this immediately after chilling, it will be dense, firm, and sliceable, almost like a New York style cheesecake but richer. However, if you pull it out of the fridge about an hour before serving, it warms up just slightly, and the center turns incredibly mousse-like and decadent. It becomes almost soufflé-like right in the center. I usually aim for that room temperature magic when I serve it with my snickerdoodle cheesecake topping—it’s just heavenly.
Storage and Reheating Instructions for Creamy Cheesecake
Now, if you manage to have leftovers of this decadent **Basque Burnt Cheesecake**—which, let’s be honest, is a huge accomplishment—storage is simple. Keep it covered tightly in the refrigerator. Because it’s crustless and so rich, it keeps beautifully for up to five days. The most important part is the reheat! Don’t serve it straight from the fridge if you want that signature velvety texture. Pull it out at least an hour before you plan to eat it. Letting it warm up just a little on the counter lets those fats soften and brings back that incredible, soft melt factor.
Variations on the Basque Burnt Cheesecake
Because this **Basque Burnt Cheesecake** recipe relies on just a few high-impact ingredients, it’s surprisingly adaptable! While the classic deep caramelization is my favorite, you can certainly customize the final presentation. Once it’s fully chilled, it looks gorgeous simply dusted with powdered sugar, or you can serve big slices alongside fresh, tart berries to cut through the richness. If you are planning a smaller gathering, I have a great hack for turning this into a beautifully portioned loaf cake—perfect for mailing or gifting! If you ever decide to branch out into fruit fillings later, you can check out my strawberry rhubarb pie recipe for inspiration, but for now, let’s focus on keeping this cheesecake rustic!
Making the San Sebastian Cheesecake in a Loaf Pan
If you don’t have a 9-inch springform pan handy, or maybe you just want to bake something a bit taller and narrower, the loaf pan variation is brilliant. You still need to use parchment paper, making sure it extends high above the rim—seriously, don’t skimp on that part! The technique remains identical: same batter, same temperature setting. The main change is the baking time. Because the batter is deeper in a loaf pan, it might take 5 to 10 minutes less time, so keep an eye on it after about 45 minutes. You still want that wobbly center when you pull out this rustic cheesecake version.
Frequently Asked Questions About This Viral Cheesecake Recipe
When this **Basque Burnt Cheesecake** blew up, I got tons of emails asking for clarification, which is totally normal when trying a new technique like high-heat baking! I’ve gathered the most common things folks ask me about so you can bake with total confidence. Seriously, don’t let a few simple questions stop you from making this incredibly **easy burnt cheesecake**. If you ever need quick inspiration for savory bakes, you can peek at my French onion dip recipe, but right now, let’s focus on this incredible dessert!
Why didn’t my top get dark enough?
If your top looks golden brown instead of deeply caramelized, chances are your oven temperature wasn’t quite high enough, or you peeked too much! This cake needs that initial heat shock at 400°F to really encourage the sugars on top to char quickly. If your oven runs cool, you might need to bump it up 10 degrees for the first 20 minutes. Also, make sure your sugar is fully incorporated, as that’s what helps create that beautiful, dark crust.
Can I substitute the mascarpone cheese?
I strongly suggest using the mascarpone if you can find it when making this **creamy cheesecake**. It adds a wonderful, subtle richness that regular cream cheese alone doesn’t give you. If you absolutely must substitute, you can use all cream cheese, but you might want to add an extra tablespoon of heavy cream to compensate for the slightly different fat content. Don’t substitute the main cream cheese brand, though; stick to full-fat brick style for the best results in this **homemade cheesecake**.
Can I freeze the Basque Burnt Cheesecake?
This is actually a great question for meal prepping! Yes, you can freeze it, but you have to be careful about the texture change. Once fully chilled, wrap your cheesecake tightly in plastic wrap and then foil. Freeze for up to a month. When you want to eat it, thaw it overnight in the refrigerator. It will still be delicious, but remember that thawing can sometimes make the custard center release a little extra moisture. If you’re making it for a party, chilling overnight is always best for perfection!
Does this need to be perfectly smooth before baking?
For this specific **viral cheesecake recipe**, we actually *don’t* want it perfectly smooth like a standard New York cheesecake. Remember how I said not to overmix once the eggs go in? That’s because a few tiny air bubbles are okay; they help create that rustic, slightly puffed look. We just need the *cream cheese* portion to be lump-free before we add the eggs. Aim for smooth, but not aggressively whipped!
Estimated Nutritional Data for Your Homemade Cheesecake
Okay, my friends, when we’re baking something as rich as this Spanish stunner, we know the indulgence is real! I always tell people the beauty of Rosa’s recipes is that we focus on flavor first. Since everyone’s measuring spoons and pouring techniques are a little different, these numbers are our best educated guess based on the recipe. Think of this as a happy estimate for your **homemade cheesecake** slice!
Nutritional Snapshot (Per Serving Estimate)
- Calories: 450
- Fat: 35g
- Carbohydrates: 30g
- Protein: 8g
- Sugar: 35g
Share Your Perfect Basque Burnt Cheesecake Creation
Wow, I hope you loved making this rich, rustic dessert! The best part of sharing recipes from my kitchen to yours is seeing what you create. When you make this perfect **Basque Burnt Cheesecake**, I truly want to see it!
Don’t be shy about that dark top! That’s the flavor talking! Once you’ve let it chill and set, please snap a picture and share it online. Tagging me means I get to see your gorgeous, wobbly masterpiece. And if you have a few minutes, leaving a rating right here on the recipe page helps other home bakers feel confident enough to try this treat for themselves.
If you run into any questions while you’re baking, or if you just want to share how big a hit it was at your next gathering, please reach out! I love hearing from everyone who tries something new. You can always get in touch with me over on the contact page. Happy baking, friends!
PrintEasy Basque Burnt Cheesecake Recipe: Creamy Center and Caramelized Top

Make the best Basque Burnt Cheesecake with this straightforward recipe. You achieve a rich, creamy, custard-like center and the signature deeply caramelized, almost burnt exterior without needing a water bath. This crustless cheesecake is simple to prepare and always impressive.
- Prep Time: 15 min
- Cook Time: 60 min
- Total Time: 7 hours 15 min
- Yield: 10 servings 1x
- Category: Dessert
- Method: Baking
- Cuisine: Spanish
- Diet: Vegetarian
Ingredients
- 1.5 lbs cream cheese, room temperature
- 8 oz mascarpone cheese, room temperature
- 1 1/4 cups granulated sugar
- 4 large eggs, room temperature
- 2 large egg yolks, room temperature
- 1 3/4 cups heavy cream
- 1 tablespoon all-purpose flour
- Pinch of fine sea salt
Instructions
- Prepare your pan: Take a 9-inch springform pan. Line it with two large sheets of parchment paper, pressing them into the pan so the paper extends well above the edges. This rustic look is part of the charm.
- Preheat your oven to 400°F (200°C). High heat is key for the burnt top.
- In a large bowl, beat the room temperature cream cheese until it is completely smooth. Scrape down the sides.
- Add the sugar to the cream cheese mixture. Beat until just combined and smooth, ensuring no sugar granules remain.
- Beat in the mascarpone cheese until incorporated.
- Add the eggs and egg yolks one at a time, mixing only until each is just combined before adding the next. Do not overmix the batter once the eggs are added.
- Slowly mix in the heavy cream, flour, and salt until the batter is uniform and velvety.
- Pour the batter into the prepared pan. The batter will be thin.
- Bake at 400°F (200°C) for 50 to 60 minutes. The top should be deeply caramelized, almost black in spots, and the edges should look set. The center should still have a significant wobble, like a soft custard.
- Remove the cheesecake from the oven. Let it cool completely on a wire rack at room temperature for at least 3 hours. The center will continue to set as it cools.
- Chill the cheesecake in the refrigerator for at least 6 hours, or preferably overnight, before serving.
- To serve, carefully remove the sides of the springform pan and peel away the parchment paper. Serve at room temperature for the creamiest texture.
Notes
- Use room temperature ingredients. This is essential for a smooth, lump-free batter.
- Do not use a water bath; this recipe relies on high heat to achieve the signature texture contrast.
- For a denser finish, chill the cheesecake longer. For a more mousse-like, soufflé texture, serve after it has rested at room temperature for one hour after chilling.
- If you want to make a Basque Burnt Cheesecake loaf, use a standard loaf pan lined with parchment paper and reduce the baking time slightly.
Nutrition
- Serving Size: 1 slice
- Calories: 450
- Sugar: 35g
- Sodium: 250mg
- Fat: 35g
- Saturated Fat: 22g
- Unsaturated Fat: 13g
- Trans Fat: 0g
- Carbohydrates: 30g
- Fiber: 0g
- Protein: 8g
- Cholesterol: 180mg