

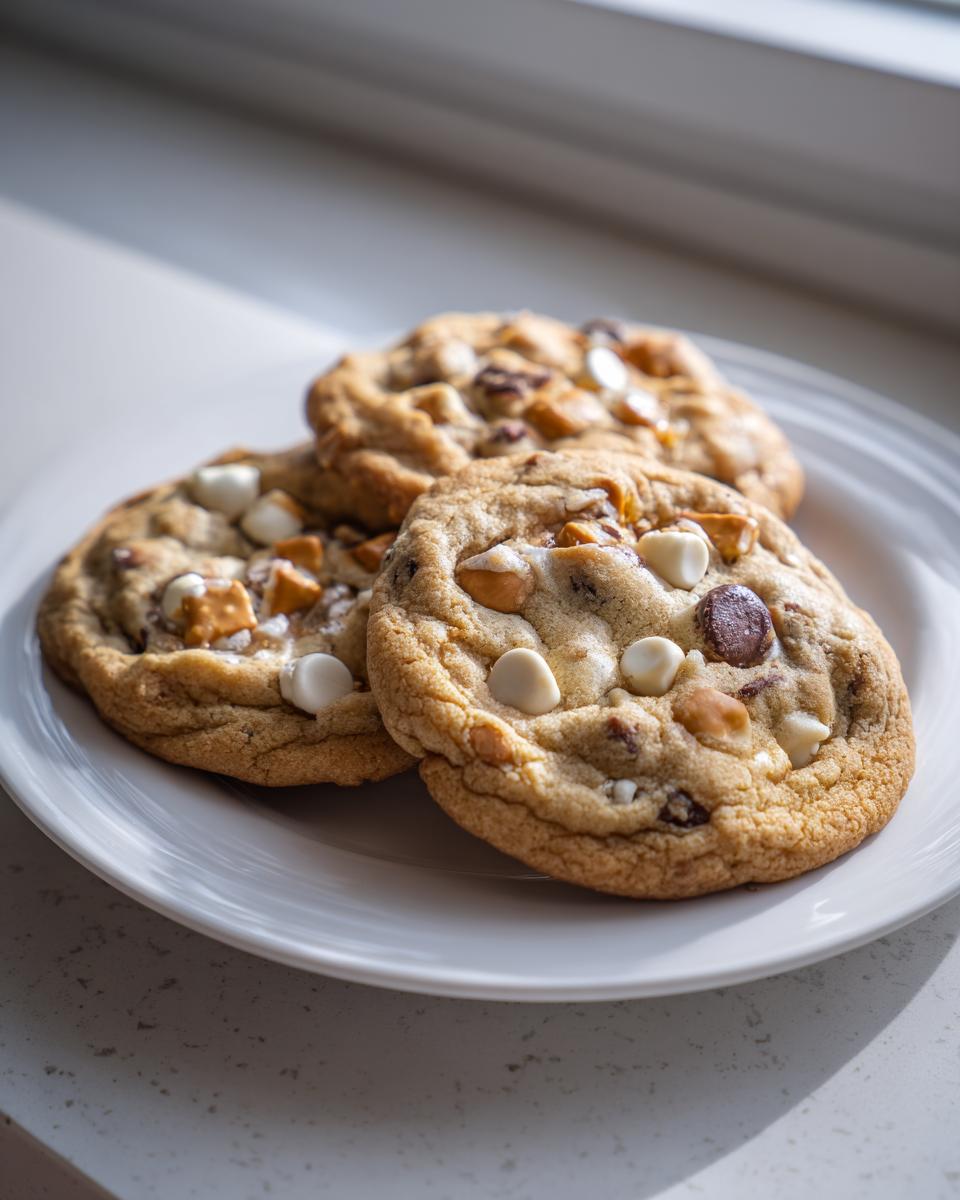
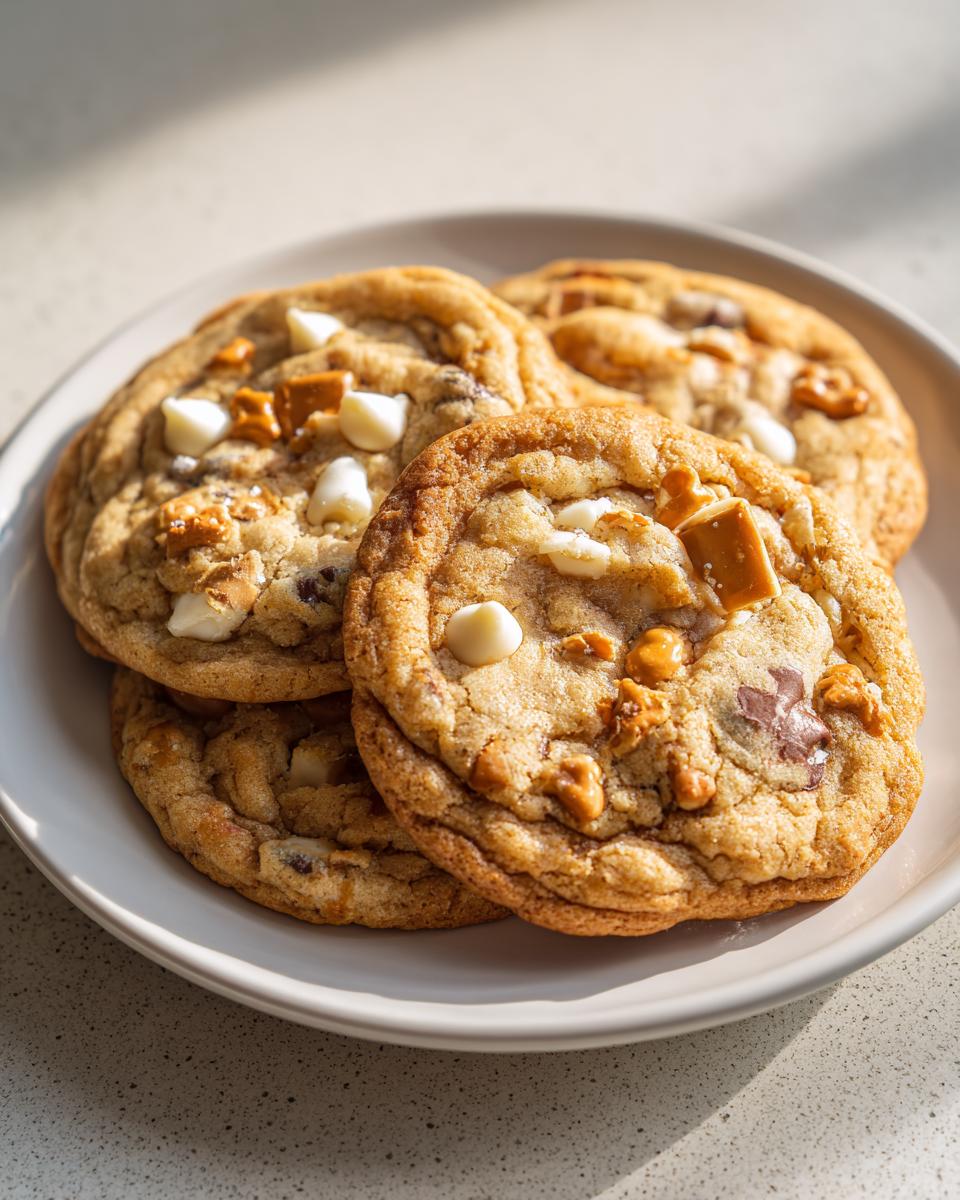
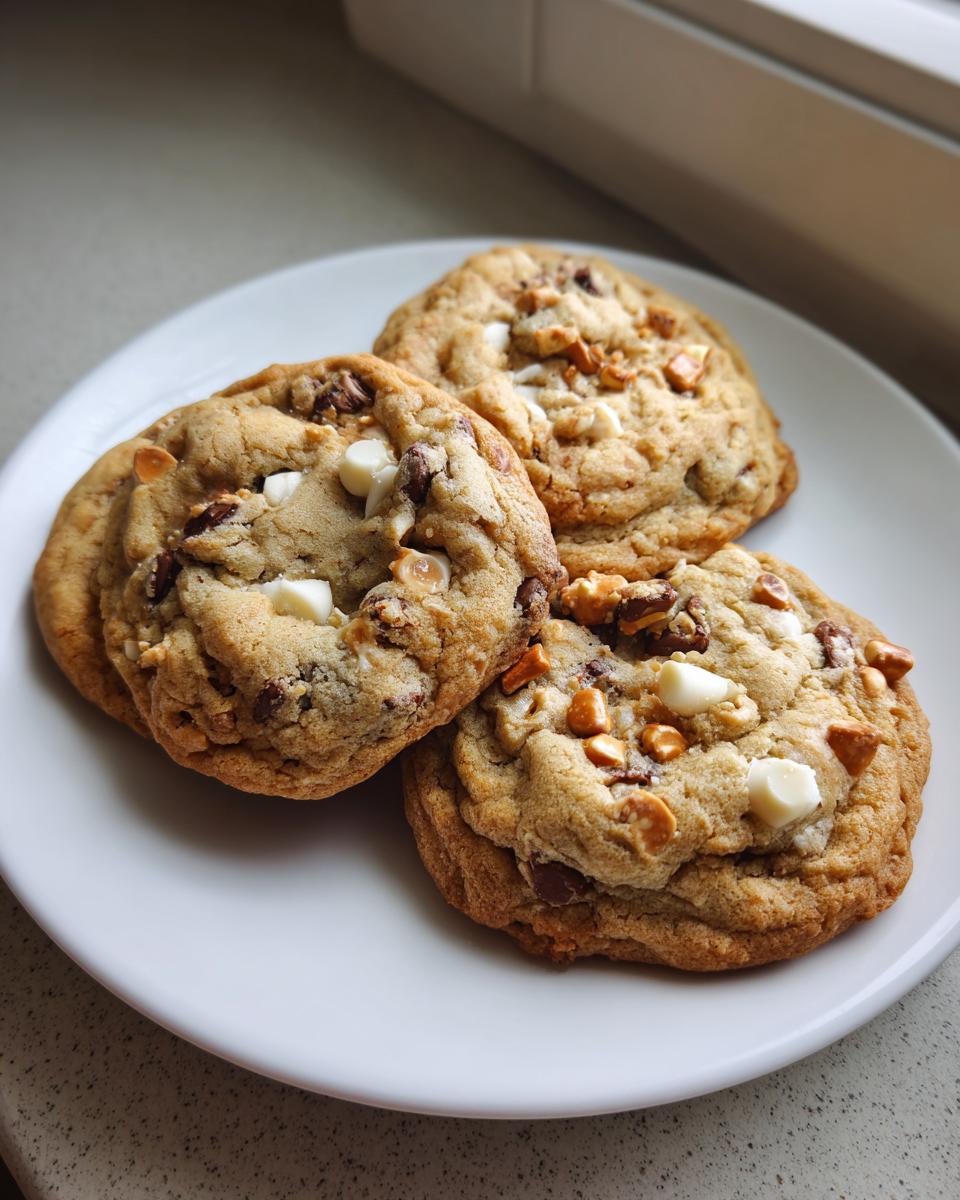
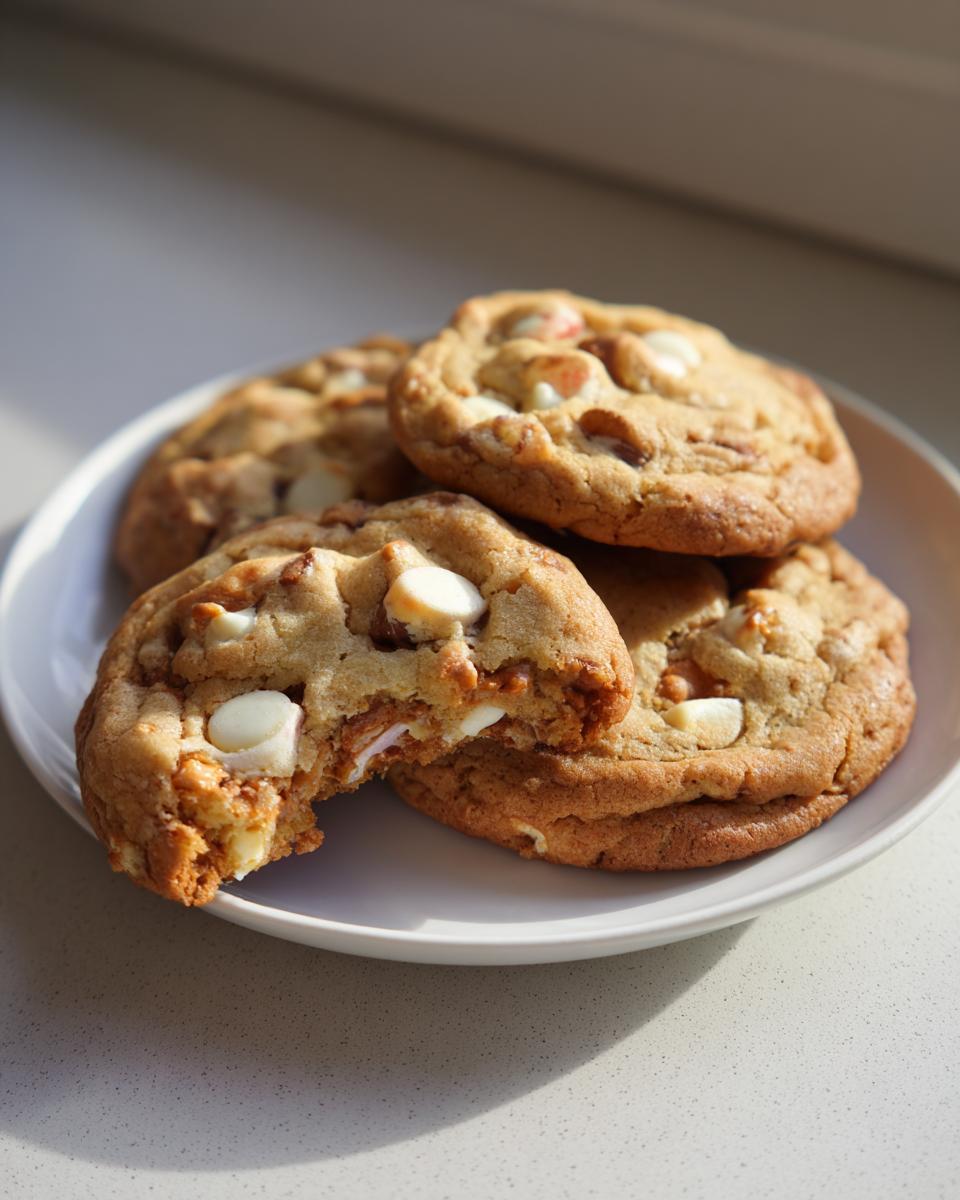
Sometimes, you just need a cookie that has *everything*, right? Forget boring, single-flavor treats! When I was teaching all day and then rushing home to feed my own crew, I learned that the best baking comes from using what you have and making it count. That’s why I absolutely adore **kitchen sink cookies**. They are the ultimate customizable treat because you load them up with every delicious leftover chip, candy, or crunch you can find! Trust me, as a mom who knows the dinner rush well, this recipe is my secret weapon for wrapping up the day. We aren’t just making cookies here; we’re making perfectly chewy, irresistible sweet and salty cookies that always disappear first at any gathering. I think you’re going to love how easy this homemade dessert is!
- Why This Kitchen Sink Cookies Recipe is a Must-Try (The Ultimate Cookies)
- Gathering Your Mix-Ins for Everything But the Kitchen Sink Cookies
- Step-by-Step Guide to Making Chewy Cookies
- Tips for the Best Cookie Recipes: Achieving Perfect Kitchen Sink Cookies
- Making Your Kitchen Sink Cookies Festive for Holiday Baking Cookies
- Storage and Reheating Instructions for Your Loaded Cookies
- Serving Suggestions for These Party Cookies
- Frequently Asked Questions About Kitchen Sink Cookies Recipe
- Nutritional Estimate for Your Kitchen Sink Cookies
Why This Kitchen Sink Cookies Recipe is a Must-Try (The Ultimate Cookies)
When you’re looking for the best cookie recipes that truly wow people, you land here. This isn’t just another chocolate chip variation; it’s the peak of loaded cookie perfection! I developed this to be a completely no fail cookie recipe, even when you’re juggling a million things. You get that amazing textural contrast every single time.
Here’s why this specific approach to ultimate cookies needs to be in your rotation:
- They are fantastically chewy cookies because of the way I handle the sugars and butter—no rock-hard results here!
- That incredible sweet and salty cookies profile thanks to the pretzels and chips. It’s addictive, I promise.
- They are truly easy drop cookies. You mix the dough, scoop, and bake. That’s it!
- They look amazing piled high on a platter, making them instant stars for any potluck or gathering.
If you want something that is easy to get ready but looks like you spent hours on detailed decorating, you have found your match. For more tips on keeping cookies soft long after they’ve cooled, check out my secrets for cookies made with pudding over here.
Gathering Your Mix-Ins for Everything But the Kitchen Sink Cookies
Okay, the real fun starts here! This is where the magic happens, turning a great chocolate chip dough into something truly over-the-top. We start with a solid base, but the name says it all—we throw in everything we can find! As I taught my own kids, knowing how to work with what you have is half the battle in the kitchen. These everything but the kitchen sink cookies are built on versatility, but consistency in the dough itself is key.
The Essential Base Ingredients for Kitchen Sink Cookies
Before we start going wild with extras, you need a sturdy foundation. Make sure your butter is perfectly softened butter—not melted, just nicely pliable. You’ll also want about ¾ cup of packed light brown sugar; that molasses brings so much depth! We need exactly two large eggs to hold everything together nicely. These core elements ensure your final cookie has that perfect chewy structure we are aiming for.
Ideas for Your Sweet and Salty Mix-Ins
This recipe calls for a mix of chocolate chips—I like using semi-sweet, but throw in some white chocolate chips too! The crunch is what makes these shine, so crush up about a cup of pretzels; don’t crush them into dust, though, you want texture! I also love adding a half cup of potato chips, lightly crushed. It sounds wild, but trust me, that salty pop elevates everything. Also, toss in whatever candy pieces you have—M&M’s are my go-to.
If you loved the concept of loading up a recipe, you absolutely have to see how I stuff my Magic Cookie Bars! It’s similar chaos, but in bar form!
Step-by-Step Guide to Making Chewy Cookies
Getting that perfect texture in these loaded cookies is all in the technique, not just the mix-ins. We’re aiming for soft centers and chewy edges, and it all starts when the oven is warming up! First things first, make sure your oven is set to 375 degrees Fahrenheit. I always line my baking sheets with parchment paper right away; trust me, clean-up is so much easier later, which means less time scrubbing and more time eating!
Mixing the Wet and Dry Components
This is where we get our texture locked in for those chewy cookies. Take that softened butter, granulated sugar, and brown sugar and cream them together until they look genuinely light and fluffy—I mean, you need some arm work here! Beat in those eggs one by one, making sure they incorporate fully, then stir in your vanilla. Next, whisk your flour, baking soda, and salt in a separate bowl. Now, the most important part: add the dry stuff to the wet stuff gradually, mixing only on low speed until you see *just* combined. Seriously, stop the mixer when you still see a hint of flour streaks! If you overmix, you’ll toughen them up, and we want tenderness!
Folding in the Goodies and Dropping the Dough
Once the base is mixed just right, get your spatula out. We fold in all of our treasures now—chocolate chips, pretzels, potato chips, whatever you chose! Fold gently until everything is evenly distributed throughout the dough. Scoop rounded tablespoons onto your prepared sheets, leaving about two inches between them since they spread a bit. For a showstopper look, grab a few extra candy pieces or chips and press them right onto the top of the dough balls before they go into the oven. That little trick makes these look fantastic on a dessert tray!
They bake for about 9 to 12 minutes. Watch the edges for that golden brown color, but remember, you want the centers to still look a touch soft when you pull them out. After 5 minutes on the pan, carefully move them to a wire rack to cool completely. If you want even chewier cookies, check out my favorite recipe for Snickerdoodles, which uses a similar creaming method here!
Tips for the Best Cookie Recipes: Achieving Perfect Kitchen Sink Cookies
Even though this is a forgiving, highly customizable cookie recipe, I have a couple of tricks up my sleeve that bump these from ‘good’ to ‘the absolute best cookie recipes you’ll ever make,’ making this truly a no fail cookie recipe.
First up: chilling the dough! I know, I know, waiting is hard when you have cookies staring you down, but it’s essential for that chewy texture. If you can manage it—and really, try to squeeze this in for the best result—stick the whole bowl of dough in the fridge for at least 30 minutes. This slows down the spread while baking, concentrating the flavor and density.
When you’re pulling these out of the oven, remember they look a little underdone in the center; that’s done cooking on the hot pan is what locks in soft centers. If you’re prepping for other times of the year, you can easily freeze balls of this dough too! For more tips on making sturdy, yet soft, cookies, take a look at how I handle my classic sugar cookie base here.
Making Your Kitchen Sink Cookies Festive for Holiday Baking Cookies
So many people search for these cookies right around the holidays, and I totally get why! These loaded cookies are the perfect vehicle for injecting some extra cheer into your holiday baking. While the pretzels and potato chips give that year-round sweet and salty kick, a little tweak turns them into amazing Christmas cookies recipes.
The easiest way to make them festive is by being intentional with your candy choices. Swap out regular M&M’s for the bags of red and green ones you see everywhere, or use festive sprinkles mixed into the dough. You might even swap out some of the semi-sweet chips for white chocolate chips for an extra snowy look!
If you’re making these for a big Christmas party, don’t forget to check out my recipe for Chocolate Peppermint Cookies for another festive option. If you want more ideas for transforming regular recipes into holiday treats, I saw some fantastic inspirations over at Cooking Whisper!
Storage and Reheating Instructions for Your Loaded Cookies
These **loaded cookies** are so rich, you probably won’t eat them all in one sitting—but if you do, I won’t judge! To keep them tasting fresh for up to five days, toss them into an airtight container. Store them at room temperature, making sure they aren’t stacked too tightly if you can help it, or they might stick together.
If you’re a planner like me, these freeze beautifully! Place the cooled cookies in a freezer-safe bag or container, separating layers with parchment paper so they don’t merge into one giant cookie brick. You can freeze them for about three months. When you need a quick treat, you can reheat them for just 10 seconds in the microwave, or let them thaw on the counter for an hour. For more excellent ways to preserve delicious homemade goodies, check out my guide on freezer jam, which uses similar storage tricks!
Serving Suggestions for These Party Cookies
These cookies are naturally designed to be showstoppers at any gathering because they bring that sweet and salty element all on their own! For casual get-togethers, just piling them high on a simple white platter is enough, honestly. Everyone will grab two or three before you even sit down!
If you want to elevate them just a touch for a guaranteed hit as homemade treats for parties, I love serving them slightly warm. You can pop a plate in the microwave for about 15 seconds right before you put them out. Perfect pairings include a tall glass of cold milk, naturally, or something slightly rich to cut the salt, like my spicy Bourbon Hot Chocolate during the cooler months. They are certainly my favorite stress-free party cookies!
Frequently Asked Questions About Kitchen Sink Cookies Recipe
You know how it is; once you get an amazing recipe, your mind immediately starts racing with possibilities! I get so many questions about swapping things out or keeping that perfect texture once they’re baked. I’ve gathered the ones I hear most often right here. Don’t you worry about tweaking things; that’s the whole point of these cookies!
Can I substitute ingredients in this customizable cookie recipe?
Absolutely! That’s practically the rule for kitchen sink cookies; if you don’t have it, swap it! If you don’t like white chocolate chips, use butterscotch or peanut butter chips instead. Dried fruit like apricots or craisins works great if you want something chewier. Since the base recipe is so solid, it handles almost any mix-in you throw at it. Think of this as your go-to template for the best chocolate chip cookie variation your pantry can handle!
How do I make sure my kitchen sink cookies stay chewy?
Chewiness comes down to two main things, and both are super easy to manage. First, don’t skip the chilling! If you can chill that dough for 30 minutes, you’ll lock in the moisture and density. Second, watch your bake time like a hawk. You want golden brown edges, but the centers should still look slightly soft and slightly underbaked when you pull them out. They finish cooking on the warm pan itself, keeping them perfectly soft for days.
What is the best way to store these sweet and salty cookies?
For the absolute best texture, you want to store these sweet and salty cookies in an airtight container at room temperature. Always let them cool completely first, or the steam will make them sticky! If you are storing them longer than four days, consider layering them between pieces of parchment paper inside the container. It keeps the different mix-ins from sticking together, and they taste just as fresh when you reach for that hidden stash later on. For more general baking tips, check out some of my thoughts on my melt-in-your-mouth lemon cookies!
Nutritional Estimate for Your Kitchen Sink Cookies
Now, listen up, because this is important! When you’re making something as loaded as these kitchen sink cookies, the nutrition facts can swing wildly depending on whether you used dark chocolate or milk chocolate, or if you tossed in a secret stash of peanut butter chips. So, consider this just a friendly ballpark guess based on the main ingredients we used.
Because this is such a maximalist cookie, the numbers are certainly higher than a plain sugar cookie, but wow, is the payoff worth it! I always say, if you eat three of these, you’ve had a serving of joy and half your daily chocolate intake!
Here is a rough breakdown per cookie, assuming our standard mix-ins:
- Calories: Around 180
- Fat: About 10 grams (that’s where the flavor lives!)
- Carbohydrates: About 22 grams
- Protein: Around 2 grams
- Sodium: That salt from the pretzels and chips creeps up to about 120mg.
I want to be crystal clear: these numbers are an estimate based on standard ingredient brands. If you load yours up with twice the toffee bits or use super-salty chips, your numbers will change! This is just a guide, not a guarantee, because my goal is always for you to enjoy the baking process first and foremost. It’s all about that homemade goodness!
PrintUltimate Kitchen Sink Cookies: Easy Sweet and Salty Recipe

Make these easy, customizable Kitchen Sink Cookies. This recipe packs in your favorite mix-ins for a chewy, sweet and salty treat perfect for any party.
- Prep Time: 15 min
- Cook Time: 12 min
- Total Time: 27 min
- Yield: About 2 dozen cookies 1x
- Category: Dessert
- Method: Baking
- Cuisine: American
- Diet: Vegetarian
Ingredients
- 1 cup (2 sticks) unsalted butter, softened
- ¾ cup granulated sugar
- ¾ cup packed light brown sugar
- 2 large eggs
- 1 tablespoon vanilla extract
- 2 ¼ cups all-purpose flour
- 1 teaspoon baking soda
- ½ teaspoon salt
- 1 cup chocolate chips (milk, semi-sweet, or dark)
- ½ cup white chocolate chips
- 1 cup crushed pretzels
- ½ cup potato chips, lightly crushed
- ½ cup M&M’s or other candy pieces
- ½ cup chopped nuts (optional)
- Any other mix-ins you have on hand (e.g., toffee bits, sprinkles)
Instructions
- Preheat your oven to 375 degrees Fahrenheit. Line baking sheets with parchment paper.
- In a large bowl, cream together the softened butter, granulated sugar, and brown sugar until the mixture is light and fluffy.
- Beat in the eggs one at a time, mixing well after each addition. Stir in the vanilla extract.
- In a separate medium bowl, whisk together the flour, baking soda, and salt.
- Gradually add the dry ingredients to the wet ingredients, mixing on low speed until just combined. Do not overmix.
- Fold in all your chosen mix-ins: chocolate chips, white chocolate chips, crushed pretzels, potato chips, and candy pieces. Use a spatula to distribute them evenly.
- Drop rounded tablespoons of dough onto the prepared baking sheets, spacing them about 2 inches apart. For a festive look, press a few extra mix-ins onto the tops of the dough balls.
- Bake for 9 to 12 minutes, or until the edges are golden brown and the centers are set but still look slightly soft.
- Let the cookies cool on the baking sheets for 5 minutes before transferring them to a wire rack to cool completely.
Notes
- For the chewiest cookies, chill the dough for at least 30 minutes before baking.
- This is a customizable cookie recipe; feel free to substitute any mix-in you prefer. Use your favorite chocolate chip cookie variation as a base.
- If you are making these for a holiday gathering, use festive colored M&M’s or sprinkles for a holiday baking look.
Nutrition
- Serving Size: 1 cookie
- Calories: 180
- Sugar: 15g
- Sodium: 120mg
- Fat: 10g
- Saturated Fat: 6g
- Unsaturated Fat: 4g
- Trans Fat: 0g
- Carbohydrates: 22g
- Fiber: 1g
- Protein: 2g
- Cholesterol: 25mg