
When your family gathers for the holidays, you want a dessert that stops everyone mid-sentence, right? Forget fussy plates and tiny servings! We need a showstopper that tastes like childhood magic and looks like it came straight out of a festive magazine. That’s why I bring you the absolute *best* **yule log cake** you’ll ever attempt. Believe me, my life has been a whirlwind balancing teaching and wrangling three kids, so if I can make this classic Bûche de Noël look stunning, you absolutely can too. This isn’t just cake; it’s the centerpiece of your entire Christmas table, and we’re making it achievable!
Though this looks like a gourmet undertaking, I’ve broken down every single step to guarantee that light, chocolate sponge and beautiful bark frosting. You deserve a stunning holiday without adding stress to your busy schedule. If you’re looking for more approachable deliciousness after this log, check out my guide to the best homemade desserts for simpler treats!
- Why This Classic Chocolate Yule Log Cake is Your Best Holiday Centerpiece Dessert
- Essential Ingredients for Your Yule Log Cake (Bûche de Noël Recipe)
- How to Prepare the Chocolate Sponge Roll Recipe for Your Yule Log Cake
- Assembling Your Traditional Christmas Cake: Filling and Rolling the Yule Log Cake
- How to Decorate a Yule Log: Creating the Showstopper Holiday Baking Finish
- Tips for Success with Your Yule Log Cake (Bûche de Noël)
- Storage and Make-Ahead Tips for Your Festive Centerpiece Desserts
- Frequently Asked Questions About Making a Yule Log
- Serving Suggestions for This Traditional Christmas Cake
Why This Classic Chocolate Yule Log Cake is Your Best Holiday Centerpiece Dessert
Honestly, nothing screams “cozy Christmas gathering” quite like a perfectly decorated **yule log cake**. This isn’t just a dessert; it’s a narrative on your serving platter! People often think creating a traditional Christmas cake this beautiful is reserved for pastry chefs, but that’s simply not true. This recipe delivers rich chocolate flavor and that must-have spongy texture, making it one of the very best holiday cake recipes you’ll find.
Achieving the Rustic Wooden Log Cake Design
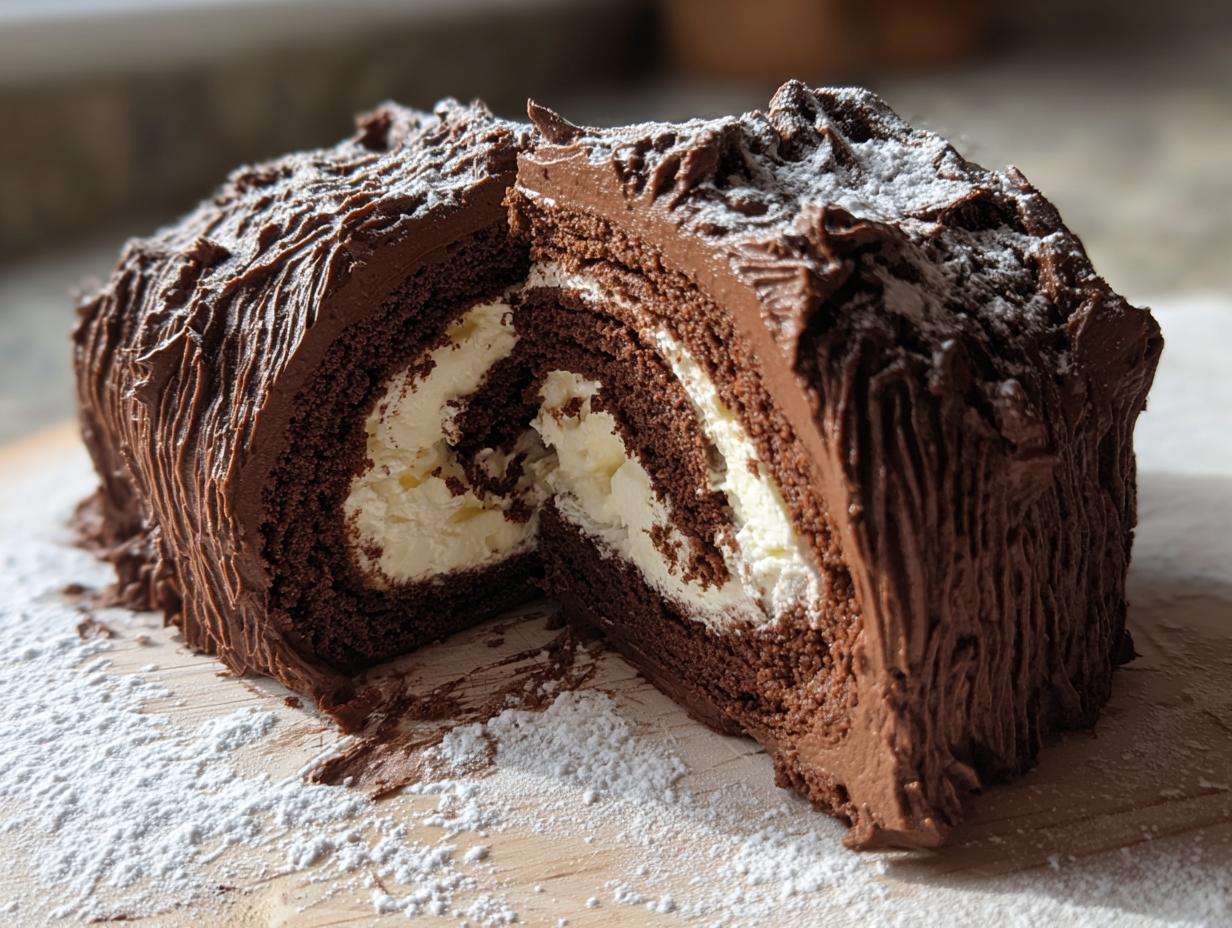
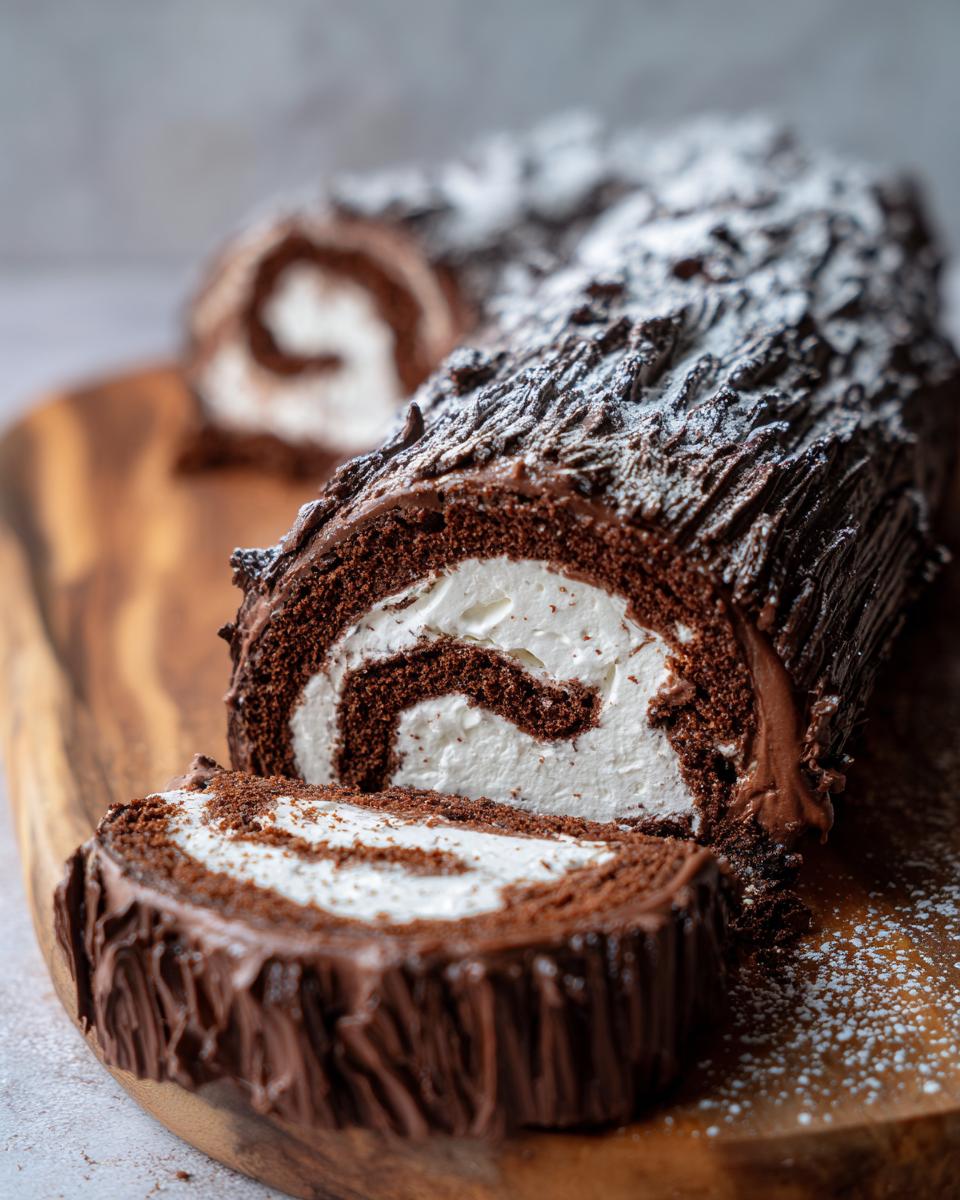
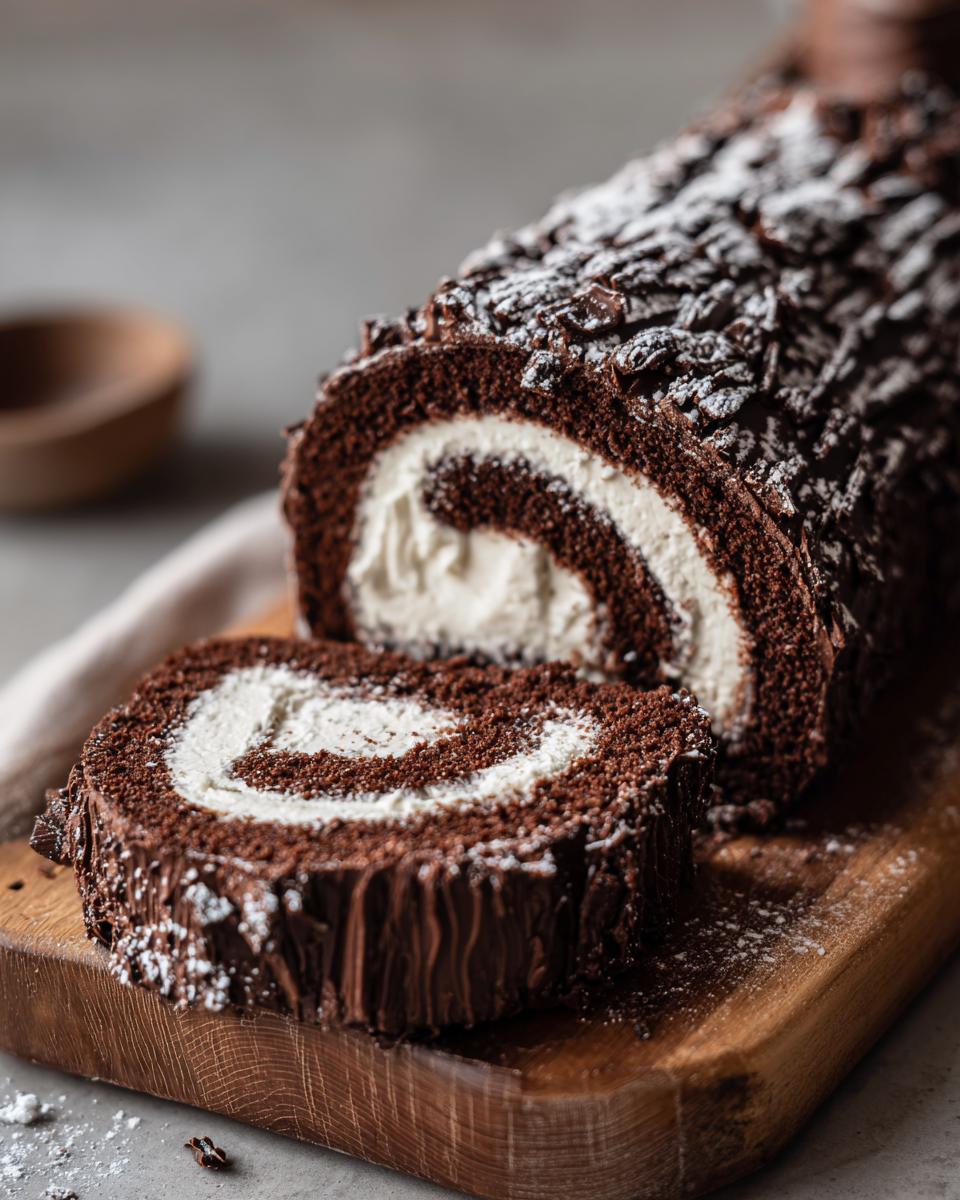
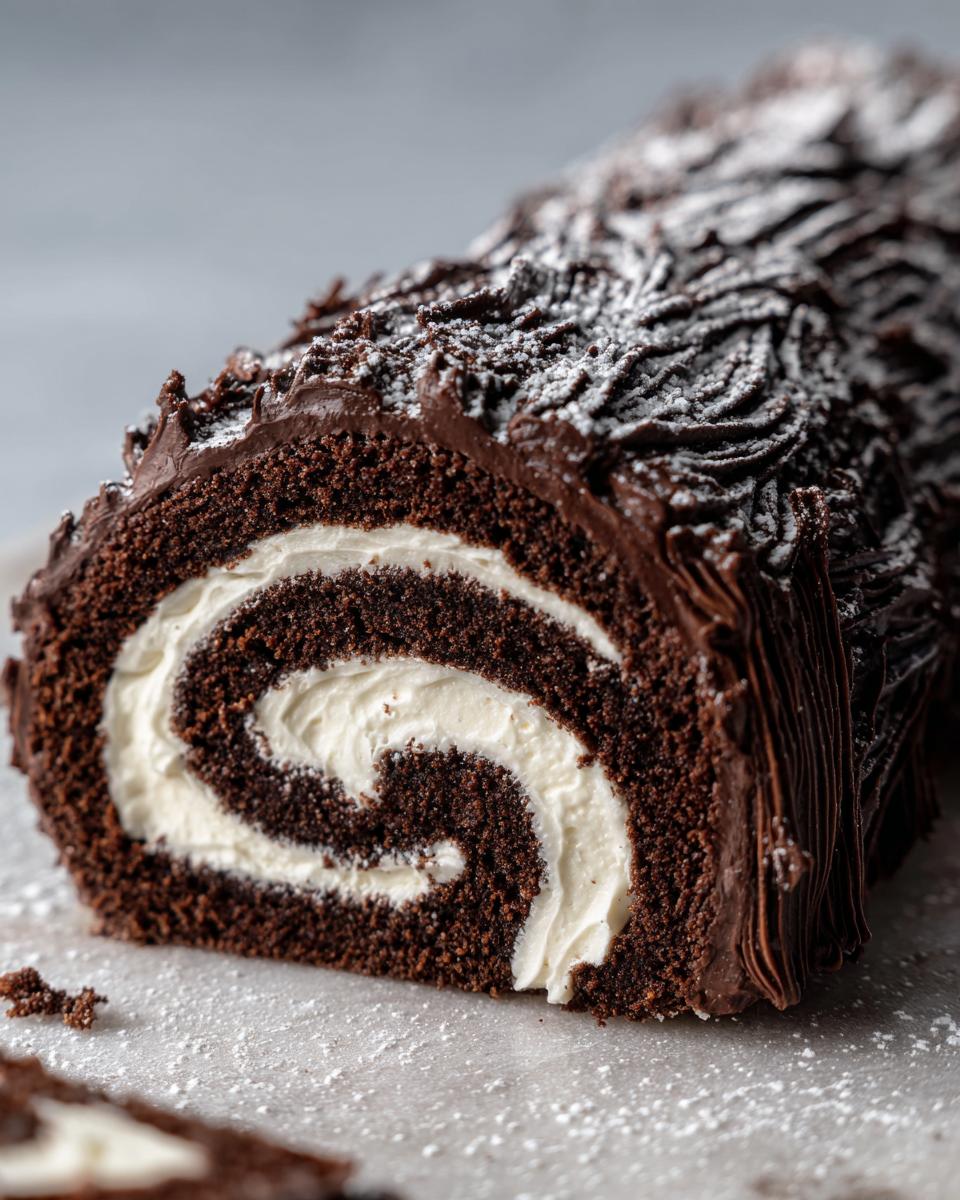
The visual payoff here is just incredible. We use a simple fork technique to create that fantastic, rustic wooden log cake design in the chocolate ganache. Then, a final dusting of powdered sugar looks exactly like fresh snow has fallen on your winter dessert centerpiece. It takes minutes, but it looks like you spent hours!
Beginner Friendly Log Cake Techniques for Success
Trust me when I say this is the ultimate easy Yule Log how to guide. I’ve made sure the sponge recipe is forgiving, and the most intimidating part—the rolling—is practiced while the cake is warm, which is a total game-changer. If you’re a novice baker, this beginner friendly log cake will give you a huge confidence boost this holiday season.
Essential Ingredients for Your Yule Log Cake (Bûche de Noël Recipe)
When we talk about nailing this classic **yule log cake**, the secret isn’t complexity—it’s using the right building blocks. You’ll need to gather a few things, but stick to this list, and you’re halfway there. We are using 4 large eggs, which you absolutely need to separate, 1/2 cup of granulated sugar (plus two extra tablespoons for the whites), 1/4 cup of flour, and that essential 1/4 cup of rich, unsweetened cocoa powder. Don’t forget the salt and vanilla extract to round out the sponge flavor for this cookie icing recipe favorite!
For the creamy filling and that gorgeous chocolate shell, you’ll grab 1 cup of cold heavy cream for whipping, half a cup of powdered sugar, and 8 ounces of good quality semisweet chocolate, chopped finely. Remember, the better the chocolate, the richer your final **Bûche de Noël recipe** will taste!
Ingredient Notes and Substitutions for This Creamy Filling Cake Roll
Listen closely on the eggs: separating them is non-negotiable! Whipping those egg whites until stiff creates all the lift we need since we aren’t using much baking powder, keeping our sponge light and rollable. As for the chocolate choice—use a bittersweet or semisweet bar, not chips! Chips have stabilizers that make the ganache grainy rather than smooth. We want that light, creamy filling cake roll texture, and the right chocolate delivers that velvety richness every time.
How to Prepare the Chocolate Sponge Roll Recipe for Your Yule Log Cake
Okay, folks, this is where we build the foundation for our gorgeous **yule log cake**. Don’t let this step intimidate you; it’s all about being gentle, especially when folding in those egg whites. First things first: get your oven preheated to 375°F (190°C). You’ll need a 15×10 inch jelly roll pan lined with parchment paper—make sure that paper sticks up a little over the sides! Beat your yolks with the sugar until they’re pale and thick, just fluffy enough to hold a shadow. Then, gently fold in that dry mix of flour and cocoa powder, but only until you can’t see any more streaks. Seriously, put the whisk down; gently mixing with a rubber spatula is your friend here!
The magic ingredient for lightness is the meringue—those stiff, glossy peaks of egg white. Fold them in carefully to keep all that beautiful air trapped. Bake this thin layer for just 10 to 12 minutes. That’s it! It cooks fast, so keep an eye on it. Overbaked sponge equals cracked logs later, and trust me, we want that smooth texture for our angel-food-cake-light-airy-recipe dream.
The Crucial Holiday Rolling Cake Tutorial Step
Once it’s out of the oven, we immediately address the rolling—this is the key to every successful **holiday rolling cake tutorial**. Lay out a clean kitchen towel and dust it *generously* with powdered sugar. Right away, flip the hot cake onto that towel and peel off that parchment. Now, starting from a short end, roll the cake up tight *with* the towel inside; keep that roll snug! This step is absolutely vital because it trains the delicate chocolate sponge to remember the log shape as it cools. If you skip this, your **yule log cake** will crack the second you try to fill it later, and nobody wants that crack during Christmas dinner!
Assembling Your Traditional Christmas Cake: Filling and Rolling the Yule Log Cake
Now that our chocolate sponge has cooled—remember, rolled up tightly in that soft towel—it’s time to bring this **yule log cake** to life! This is exciting because we finally get to add the luxurious interior. First, focus on the filling, which is just simple whipped cream. Take that 1 cup of heavy cream, add a touch of powdered sugar for sweetness, and whip it until you get stiff peaks—nice and dreamy. Don’t go past stiff peaks here, or the filling will fight you when you try to spread it.
Next, let’s look at the chocolate ganache that becomes our outer ‘mud’ or ‘bark.’ You want to melt that chopped semisweet chocolate with the half-cup of heavy cream until it’s velvety smooth. The trick is letting it cool just enough so it gets thick but is still totally spreadable, like a very thick, amazing creamy filling cake roll consistency.
Carefully unroll your cooled cake. Spread that glorious whipped cream filling evenly across the whole thing, leaving about an inch border clear on one narrow end. Remember, we want this **Traditional Christmas cake** to be evenly layered! Then, reheat your ganache *very* gently if it’s too firm. Reroll the cake smoothly, this time without the towel, ensuring the seam is on the bottom side where it rests on your serving platter. Take your time here; this is where that training from the warm roll really pays off!
How to Decorate a Yule Log: Creating the Showstopper Holiday Baking Finish
This is my absolute favorite part of making the **yule log cake**—the transformation! Once that log is rolled and settled seam-side down, you need to cover it in the chocolate ganache coating we prepared. It should be thick enough to hold a shape, but still manageable enough to spread easily. If your ganache has stiffened up too much, give it a quick 10-second zap in the microwave or warm it slightly over a double boiler; we want spreadable goodness, not concrete!
The key to answering that burning question, How to decorate a Yule Log, is using a simple dinner fork. Hold the tines lightly against the surface and gently pull across the cake, dragging the frosting to create deep, realistic ridges that look exactly like tree bark. Don’t aim for perfection here; the more rustic, the better! I remember my first attempt—I used a butter knife and it looked like smeared mud! The fork works so much better for that classic, textural look.
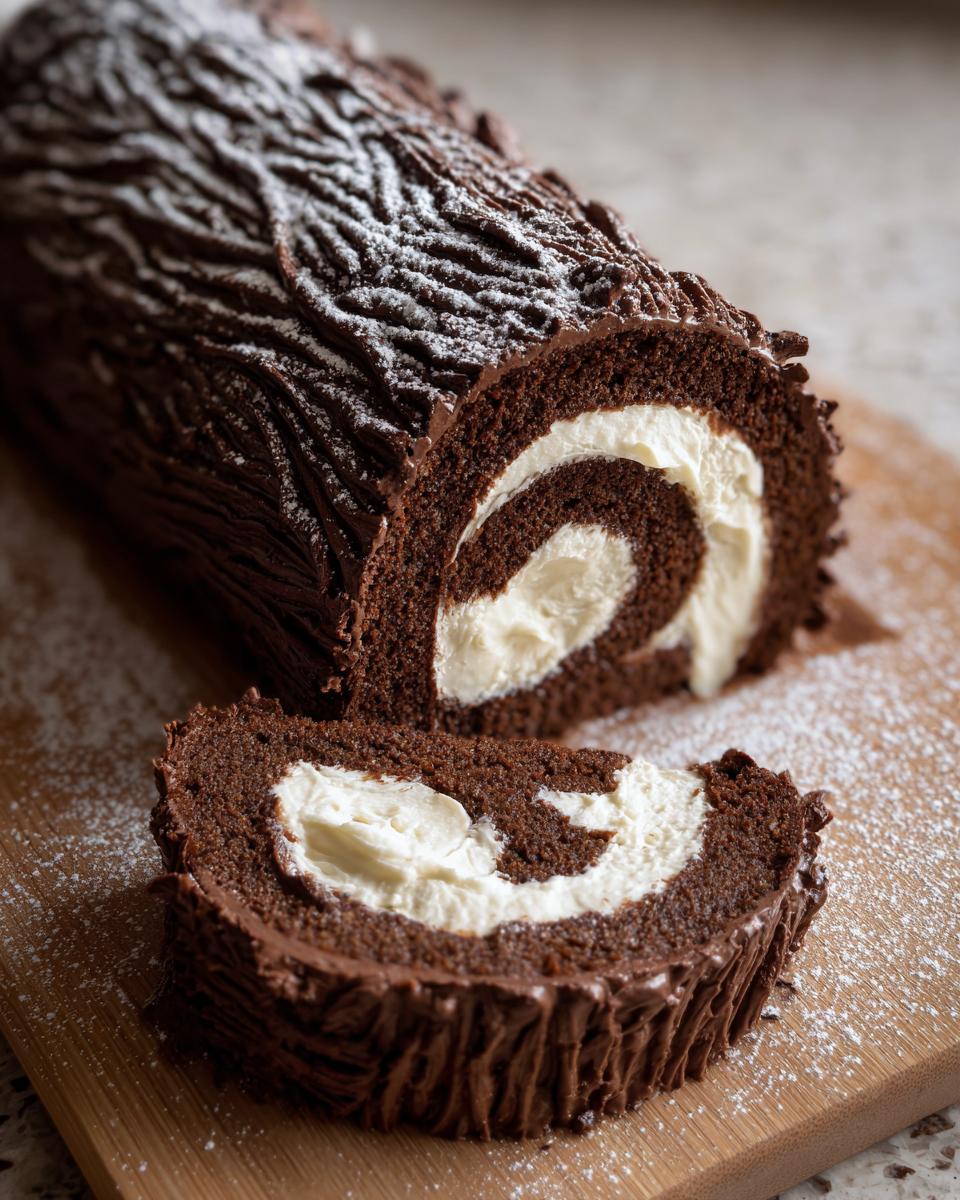
For that final professional touch, trim those ends off at an angle so they look like charming little branches tacked onto the main log. Frost those ends too! Before serving, don’t forget to dust the whole thing heavily with powdered sugar—it’s the perfect, cozy snow effect. If you’re looking for other frosting ideas for Christmas treats, check out my guide on sugar cookie icing recipe hardens fast; sometimes a bright white frosting contrast is nice on a different style of dessert!
Tips for Success with Your Yule Log Cake (Bûche de Noël)
Even with the best recipe, sometimes a little extra guidance helps turn a good cake into one of the **best holiday cake recipes** out there. My biggest tip for this **yule log cake** is chilling time. Don’t rush it! Once you’ve frosted that log and created your bark, it needs at least an hour in the fridge for that ganache to set up properly. This makes your final cuts clean and neat.
Remember what I said about the ganache consistency earlier? If it seems too runny while you’re frosting, just wait five minutes. If it’s too stiff—which happens if you step away too long—gently warm just a small amount over a bowl of hot water. Patience while handling the sponge is key, too. We want those airy qualities from the separated eggs, so stop mixing as soon as the flour disappears. If you practice these little checkpoints, you’ll get the perfect tender sponge every time. For more tips on keeping things moist, check out my easy moist pumpkin bread recipe—the moisture principles are similar!
Storage and Make-Ahead Tips for Your Festive Centerpiece Desserts
One of the best things about making a showstopper like this **yule log cake** ahead of time is that it actually tastes better the next day! I try to get the rolling, filling, and frosting done the day before the party. This gives the flavors time to settle into that soft chocolate sponge, and honestly, it keeps me calmer on Christmas morning. You can store your finished, frosted log right in the refrigerator, covered loosely with plastic wrap, for about three days.
Now, about freezing? I usually don’t recommend freezing a cake that has a pure whipped cream filling like ours does. Cream tends to get a little watery or grainy when thawed, which ruins that lovely mouthfeel we worked so hard for. If you absolutely must freeze it, try to save the powdered sugar dusting for the very end. Wait until the cake is fully thawed and ready to serve before you dust it with that final snow-like coating!
Speaking of that dusting, never put the powdered sugar on the day before! That sugar absorbs moisture right out of the frosting, leaving you with a slightly sticky, dull-looking log instead of a beautiful snowy scene. I always wait until the **Bûche de Noël** is on the serving tray, maybe 20 minutes before we cut into it, to give it that last, beautiful shimmer. This same principle applies to storing any jam you might make ahead for a different batch; you can check out my tips on easy freezer jam recipe no canning for making fresh fruit preserves without the fuss!
Frequently Asked Questions About Making a Yule Log
I know when you look at a beautiful **yule log cake**, you might have a few burning questions, especially if this is your first time trying a rolled dessert. It looks impressive, but sometimes those little details trip us up. Don’t worry, I’ve answered the big ones that always pop up in my kitchen when I’m making this **traditional Christmas cake**!
Can I use buttercream instead of whipped cream for the filling?
Oh, you certainly can, but you’ll change the character of the cake! The classic French **Bûche de Noël recipe** calls for whipped cream because it’s light and airy; it complements the delicate chocolate sponge perfectly. If you choose to use buttercream, remember it’s much heavier. If you go that route, make sure your sponge is extra moist so it doesn’t fight the denser filling. You might end up with a much sturdier **dessert roll for Christmas**, which some people actually prefer!
How do I stop my sponge from cracking when I roll it?
This is the stress point for so many bakers, but I promise, we solved this in the instructions! The two big secrets are: Don’t overbake it—it should be slightly tender when pressed—and you must roll it while it is still warm using that generous dusting of powdered sugar on the kitchen towel. If you follow that initial warm roll, your sponge memory stays set. If it still cracks a little bit when you unroll it later, don’t panic! That’s what the ganache frosting is for. A little crack looks just like a knot in the wood when you do your finishing touches on the **holiday rolling cake tutorial**!
What flavors work well besides chocolate for a yule log?
Chocolate is my go-to, but there are so many wonderful options! If you’re aiming for something seasonal but different, you could absolutely adapt this sponge recipe. Think about a light gingerbread sponge cake instead of chocolate—that would pair brilliantly with a spiced cream cheese filling. Or, if you want something lighter but still festive, skip the cocoa powder and focus on something bright like a **white chocolate log cake**. I even saw a great post about a Tiramisu version over at The Schmidty Wife that looked incredible for those coffee lovers out there!
How far in advance can I make the chocolate ganache frosting?
The ganache is fantastic because it’s actually better when made the day before! You’ll cook the cream and pour it over the chopped chocolate, whisking until smooth. Let it cool slightly on the counter to reach that thick, spreadable “bark” consistency. If you make it too far in advance and it gets too stiff, don’t rush to microwave it all at once. I suggest keeping my recipe for easy Thai coconut soup recipe on hand for another night, but for this cake, just warm a small amount in a bowl placed over simmering water—a double boiler works wonders!
Serving Suggestions for This Traditional Christmas Cake
Once your beautiful **yule log cake** is chilled and ready to serve, thinking about pairings can really elevate the whole experience. Since this classic chocolate version is wonderfully rich—all that sponge, cream, and dark ganache—you don’t want to weigh your guests down with equally heavy sides. I find that simple, bright flavors are the best way to cut through that richness.
My go-to pairing is always a strong, hot cup of coffee or even a simple, classic black tea. The slight bitterness makes the chocolate flavor pop right off your tongue. If you’re serving this after a big dinner, a little palate cleanser is a great idea.
If you want something fresh on the side, think light fruit elements. Maybe a small scattering of fresh raspberries or even a spoonful of a light, tart homemade sauce. Have you ever considered trying a winter fruit salad alongside? It adds that necessary brightness! I know some folks adore the idea of a Gourmet Tiramisu Yule Log Cake, which obviously pairs perfectly with espresso, but even our chocolate version sings with a good brew.
For presentation as your ultimate **Winter dessert centerpiece**, remember that dusting of powdered sugar is your snow effect. If you’re plating individual slices, try dragging a little extra powdered sugar across the plate edge like a trail of fresh powder. Keep the plate simple; this cake already does all the heavy lifting visually. You want the log to shine as the beautiful star of your holiday table!
PrintClassic Chocolate Yule Log Cake (Bûche de Noël)

Create a stunning, rustic centerpiece dessert for your holiday table with this classic Chocolate Yule Log Cake. This recipe guides you through making a moist chocolate sponge roll with a creamy filling, finished with chocolate frosting to look like real bark. It is a showstopper holiday baking project that is achievable for home bakers.
- Prep Time: 40 min
- Cook Time: 12 min
- Total Time: 1 hour 52 min
- Yield: 10 servings 1x
- Category: Dessert
- Method: Baking and Rolling
- Cuisine: French
- Diet: Vegetarian
Ingredients
- 4 large eggs, separated
- 1/2 cup granulated sugar, plus 2 tablespoons for egg whites
- 1/4 cup all-purpose flour
- 1/4 cup unsweetened cocoa powder
- 1 teaspoon vanilla extract
- 1/4 teaspoon salt
- 1 cup heavy cream, cold
- 1/2 cup powdered sugar
- 8 ounces semisweet chocolate, chopped
- 1/2 cup heavy cream, for ganache
- Powdered sugar, for dusting
- Optional: Fresh cranberries or meringue mushrooms for decoration
Instructions
- Preheat your oven to 375°F (190°C). Line a 15×10 inch jelly roll pan with parchment paper, letting the paper extend slightly over the edges. Lightly grease the paper.
- In a large bowl, beat the egg yolks with 1/2 cup of granulated sugar until the mixture is pale yellow and thick. Beat in the vanilla extract.
- In a separate clean bowl, beat the egg whites with the salt until soft peaks form. Gradually add the remaining 2 tablespoons of sugar and beat until stiff, glossy peaks form.
- Gently fold one-third of the beaten egg whites into the yolk mixture to lighten it. Then, gently fold in the remaining egg whites until just combined. Do not overmix.
- Sift the flour and cocoa powder together over the batter. Gently fold the dry ingredients into the batter until no streaks remain.
- Spread the batter evenly into the prepared pan. Bake for 10 to 12 minutes, or until the top springs back lightly when touched. Do not overbake.
- While the cake bakes, lay a clean kitchen towel on your counter and dust it heavily with powdered sugar.
- As soon as the cake comes out of the oven, invert it onto the prepared towel. Carefully peel off the parchment paper. Starting from a short end, roll the cake and towel together tightly. Place the roll seam-side down on a wire rack to cool completely.
- Prepare the filling: Whip the 1 cup of cold heavy cream with the powdered sugar until stiff peaks form. Set aside.
- Prepare the ganache: Place the chopped chocolate in a heatproof bowl. Heat the 1/2 cup of heavy cream in a small saucepan until it just simmers. Pour the hot cream over the chocolate and let it sit for 5 minutes. Whisk until smooth. Let the ganache cool slightly until it is thick but still spreadable.
- Once the cake is cool, carefully unroll it. Spread the whipped cream filling evenly over the surface, leaving a 1-inch border on one short end.
- Reroll the cake tightly, without the towel, placing it seam-side down on a serving platter. Trim the ends if necessary to look like log cuts.
- Use an offset spatula or fork to spread the slightly cooled ganache over the entire outside of the cake, dragging the tines across the frosting to create a bark texture.
- Chill the Yule Log Cake for at least 1 hour to set the frosting. Before serving, dust generously with powdered sugar to mimic snow. Add decorative elements like meringue mushrooms if desired.
Notes
- For the best rolling results, make sure the cake is still warm when you roll it with the towel. This trains the sponge to hold the log shape.
- If your ganache sets too hard before you can frost the cake, gently warm it over a double boiler for a few seconds to restore spreadability.
- To create realistic log ends, cut off a 1-inch slice from each end of the finished log at an angle and place these pieces next to the main log. Frost them to look like branches.
Nutrition
- Serving Size: 1 slice
- Calories: 380
- Sugar: 30g
- Sodium: 120mg
- Fat: 22g
- Saturated Fat: 13g
- Unsaturated Fat: 9g
- Trans Fat: 0.5g
- Carbohydrates: 40g
- Fiber: 2g
- Protein: 6g
- Cholesterol: 110mg