
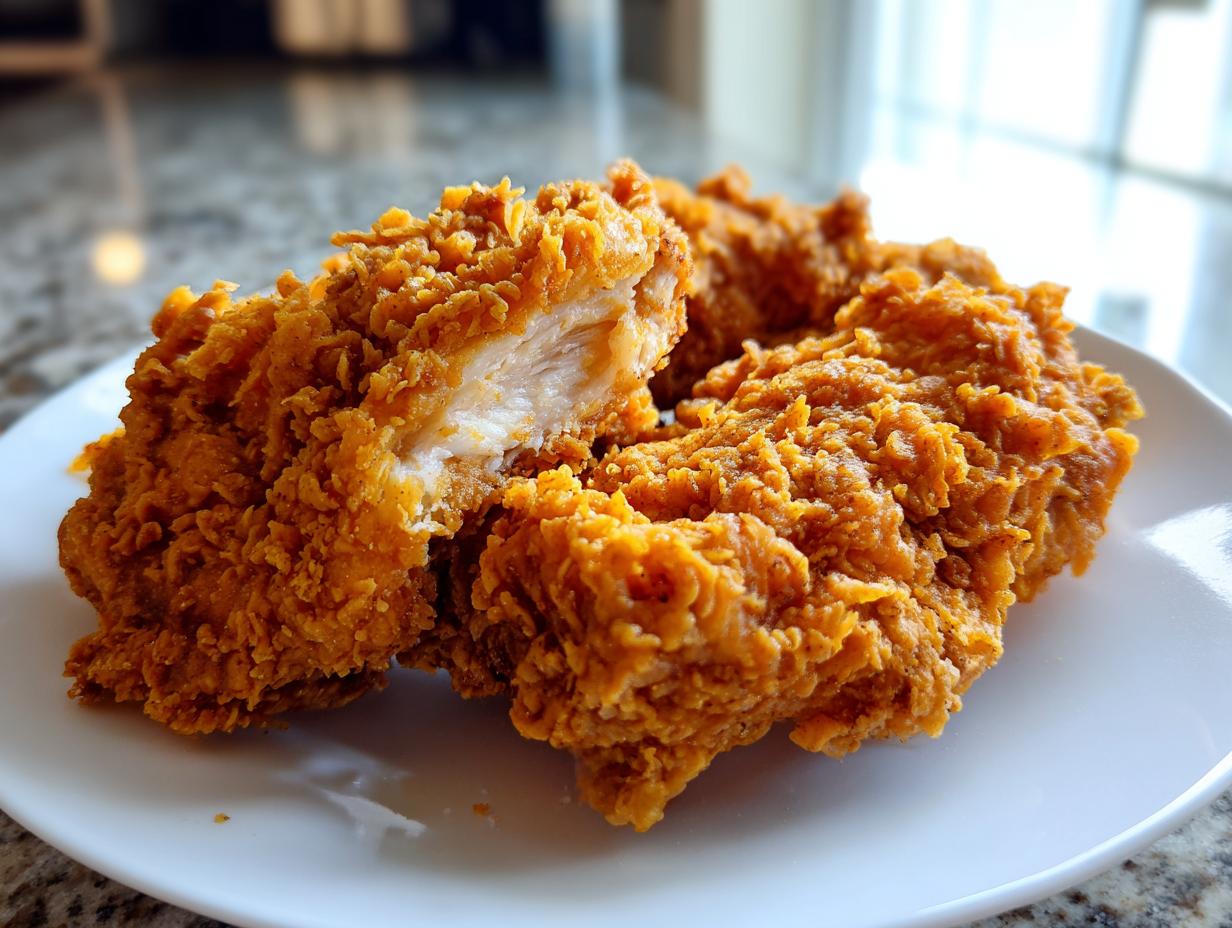
When I think about proper, soul-satisfying American cooking, my mind immediately goes to that sound—the sizzle of chicken hitting hot oil. It’s the ultimate classic comfort food, isn’t it? But so often, we end up with chicken that’s either dry on the inside or soggy on the outside. Not today! After years of rushing dinner for my own kids while teaching full-time, I perfected this exact method. I promise you, this tutorial for crispy buttermilk fried chicken delivers that stunning contrast: unbelievably juicy meat encased in a thick, craggy, golden crust every single time. Forget the restaurant versions; this is the family secret I am finally sharing with you today, straight from the test kitchen. You can read more about my journey perfecting these reliable recipes on my About Page!
- Why This is the Best Fried Chicken Recipe (The Secret to Crispy Buttermilk Fried Chicken)
- Ingredients for Perfect Crispy Buttermilk Fried Chicken
- Step-by-Step Homemade Fried Chicken Tutorial for Juicy Inside Crispy Outside Chicken
- Deep Frying Chicken Guide: Oil Temperature and Color Control
- Tips for Success with Southern Style Fried Chicken
- Serving Suggestions for Classic American Comfort Food
- Storage and Reheating Instructions for Leftover Crispy Buttermilk Fried Chicken
- Frequently Asked Questions About Crispy Buttermilk Fried Chicken
- Share Your Experience Making This Recipe
Why This is the Best Fried Chicken Recipe (The Secret to Crispy Buttermilk Fried Chicken)
Now, you might have other fried chicken recipes saved, but trust me when I say that this is the best fried chicken recipe you’ll ever make at home. The real magic isn’t just in the seasoning; it’s in the two-part system we use. First, we create an unbelievably tender bird, and second, we build a crust that actually stays stuck to that bird! If you want that hallmark juicy inside crispy outside chicken, you have to respect the marinade and the dredge process. This is why my method delivers those amazing, flavorful results that mimic my fondest memories of southern style fried chicken.
Understanding Buttermilk Chicken Marinade Benefits
The buttermilk does so much more than just moisten the chicken; it’s a natural tenderizer! The mild acid works on the proteins, breaking them down just enough so that when we go to fry them, the meat stays incredibly tender. You absolutely must marinate for at least four hours—I aim for overnight if I can swing it—to get the full benefit of this incredible buttermilk chicken marinade. Don’t skimp on this step!
Achieving the Extra Crispy Chicken Coating
The secret to getting those craggy, shatteringly crisp bits clinging to the chicken is what I call the ‘wet-flour-wet-flour’ hug. We are doubling down on the dredge! By dipping the floured piece back into the buttermilk quickly and then reapplying the flour mix, you build those thick layers. We also mix in cornstarch and a tiny bit of baking powder—it reacts in the hot oil to create maximum surface area for crunch. This is how we guarantee that extra crispy chicken coating on our crispy buttermilk fried chicken.
If you want to read more about how I approach tenderizing other proteins, check out my deep-dive on juicy marinades here.
Ingredients for Perfect Crispy Buttermilk Fried Chicken
Okay, here’s where we keep things beautifully simple. You don’t need a million fancy things to make this taste like true southern style fried chicken. We’re relying on quality cuts and a heavy hand with the seasoning in that marinade. I stick to bone-in, skin-on pieces because that dark meat stays juicier, but feel free to use breasts if that’s what your family prefers!
The real flavor powerhouse comes from the spice blend we toss right into the buttermilk. Mixing salt, pepper, paprika, and garlic powder ensures every single crevice gets that perfectly seasoned chicken flavor infused. Don’t forget that optional cayenne if you like a little subtle heat kicking in!
- 4 lbs bone-in, skin-on chicken pieces (thighs, drumsticks, breasts)
- 4 cups buttermilk
- 2 tablespoons salt
- 1 tablespoon black pepper
- 1 tablespoon paprika
- 1 tablespoon garlic powder
- 1 teaspoon cayenne pepper (optional)
For the dredge, we keep it straightforward but strong. The cornstarch and baking powder are non-negotiable for that max crunch factor we talked about earlier. This is what you’ll use to coat everything before frying!
- 4 cups all-purpose flour
- 1/2 cup cornstarch
- 1 tablespoon baking powder
- Vegetable oil or shortening, for frying (about 3-4 inches deep)
Step-by-Step Homemade Fried Chicken Tutorial for Juicy Inside Crispy Outside Chicken
Alright, ditch those boring instructions—it’s time for the real action! This homemade fried chicken tutorial will walk you through exactly how I get that reliably moist interior and rock-solid crust. I’ve broken it down into two main stages: tenderizing and coating. Follow these steps closely, and you’ll achieve that perfect juicy inside crispy outside chicken every time. It seems like a lot of steps, but trust me, the downtime (marination) is where the magic happens.
Marinating and Seasoning the Chicken
First things first, take that seasoned buttermilk mixture and stir it up so the salt dissolves. Then, tuck your chicken pieces into that thick marinade. They have to be totally submerged; if they aren’t swimming in it, they won’t get that flavor penetration! Cover it up and put it in the coldest part of the fridge. Seriously, four hours is the bare minimum, but if you are planning this right, let it sit overnight. That long soak in the buttermilk chicken marinade is what guarantees tenderness.
The Double-Dip Technique for Crispy Buttermilk Fried Chicken
Time to coat! About 30 minutes before it’s time to fry, whisk together your flour, cornstarch, and baking powder. Now, take a piece of chicken out of the milk—don’t shake it dry, you want it dripping a little! Coat it heavily in the flour, pressing down hard with your hands. Then, do the quickest dip imaginable back into the buttermilk—maybe two seconds total! This wet second layer is essential. Immediately throw it back into the flour and press, press, press! That second coat is what forms those beautiful, crunchy nooks and crannies that make crispy buttermilk fried chicken so good.
Once you have a piece perfectly flaky, put it on a wire rack for 20 minutes while you finish the rest. This rest period ensures the crust adheres like glue when it hits the oil. I have a technique for making a killer gravy that uses leftover drippings, and you can find that tutorial right here!
Deep Frying Chicken Guide: Oil Temperature and Color Control
We’ve done the hard work with the marinade and the coating; now we have to respect the heat! The frying stage is where so many people panic and end up with burnt outside/raw inside chicken. We are aiming for that perfect, beautiful, golden brown fried chicken finish, and stability is your best friend here. Whether you are using a dedicated deep fryer or a good, heavy cast iron skillet chicken setup, you must have a thermometer. I cannot stress this enough!
We want our oil at exactly 325°F when the chicken goes in. Crowding the pan is the fastest way to drop that temperature, which leads to oily, sad chicken instead of crispy perfection. Work in small, manageable batches—usually 3 or 4 pieces maximum—so that the oil temperature doesn’t dip below 315°F. If it drops, the crust soaks up oilinstead of crisping up. Keep that heat steady, and you are golden!
Maintaining Perfect Frying Temperature
You have to watch that thermometer constantly while you are frying. If the chicken bits start darkening too fast, turn the heat down immediately. If the oil cools too much from adding the cold chicken, bump it back up slightly between batches. Remember, we need sufficient heat to cook the meat all the way through to that safe 165°F internal temperature without scorching that beautiful crust we worked so hard to build. Patience right here pays off big time for the texture!
If you are looking for a quicker weeknight meal that skips the deep frying entirely, I still have some great options, like my easy skillet chicken and green beans.
Tips for Success with Southern Style Fried Chicken
We covered the big steps—the marinade and the deep fry—but just like Grandma taught me, the little habits make the difference between good cooking and truly great southern style fried chicken. The most crucial tip I can give you, which I mentioned in the steps, is that 20-minute rest period after your double-dip coating is complete. Don’t skip it! Letting that coated chicken sit on the rack at room temperature lets the flour mixture hydrate and effectively glue itself to the meat. It prevents that coating from shedding off prematurely when it hits the hot oil.
Also, when the chicken is done cooking, resist the urge to pile it onto a plate lined with paper towels. Paper towels steam the bottom of the crust, and we definitely don’t want that! Always drain your perfectly cooked pieces on a clean wire rack set over a baking sheet. This lets air circulate all the way around, keeping the bottom crispy while the excess oil drips away. If you want something amazing to pour over the top, check out my recipe for homemade brown gravy!
Serving Suggestions for Classic American Comfort Food
There’s nothing better than pulling that perfectly seasoned, crispy buttermilk fried chicken out of the oil! But let’s be honest, you can’t eat fried chicken all by itself. This is pure classic American comfort food, and it demands the right side dishes!
For me, it has to be creamy mashed potatoes—you need something to soak up those juices. I love pairing mine with my recipe for ultimate creamy mashed potatoes. A crunchy, vinegar-based coleslaw cuts through the richness beautifully. And baked right alongside the chicken? Nothing beats a slightly sweet, tender cornbread. Try my sweet potato cornbread—it’s amazing!
Storage and Reheating Instructions for Leftover Crispy Buttermilk Fried Chicken
I sincerely hope you have leftovers, because this chicken is still good the next day, but you have to handle it gently! Store any remaining crispy buttermilk fried chicken in an airtight container in the fridge. Don’t try to keep it too long; I find Day 3 is its absolute limit before the crust really starts losing its grip.
Now, the reheating part is crucial. Do not, under any circumstances, microwave this! That’s how you turn perfection into rubbery sadness. The best way to restore that crunch is either in a moderate oven (about 375°F) spread on a wire rack, or speed things up in your air fryer for about 5 to 7 minutes. That blast of dry heat brings the crust right back to life!
Frequently Asked Questions About Crispy Buttermilk Fried Chicken
It is only natural to have a few questions when you’re trying a brand new technique for something as important as crispy buttermilk fried chicken! I get asked these all the time as people start trying out this best fried chicken recipe for the first time. I’ve gathered a few of the topics that pop up most often right here for quick reference.
Can I make this recipe using chicken breasts?
Oh, absolutely! You can certainly use chicken breasts, but you need to be more mindful of the cooking time since they are leaner and generally thicker than thighs or legs. Because we are deep frying, chicken breasts might cook through closer to the 12-14 minute mark instead of the 6-8 minutes for thighs. Start checking the internal temperature earlier—we still want that perfect 165°F—and remember that resting on the rack helps carry the heat through!
What is the ideal oil temperature for frying?
If you take away only one thing from this whole guide on how to make crispy fried chicken, let it be this: temperature stability is everything! We are aiming for 325°F right when the chicken enters the oil. If you let it slip too low, you end up with greasy, sad chicken. If it gets too high, the outside crust burns to a crisp before the middle is even cooked. I use my thermometer religiously to keep it in that 315°F to 330°F sweet spot throughout the entire process. This is the secret to that beautiful golden brown fried chicken crust!
If you are looking for a quicker weeknight meal that skips the deep frying entirely, I still have some great options, like my easy skillet chicken and green beans.
How much is too much buttermilk marinade time?
While I love telling everyone to go for overnight marination for the full tenderizing effect of the buttermilk chicken marinade, you really shouldn’t push it past 24 hours. After a full day, the acid can start to break down the muscle fibers too much, resulting in chicken that turns mushy rather than tender when you fry it. Four to twelve hours is fantastic, but don’t walk away and forget it for three days!
Share Your Experience Making This Recipe
Now that you’ve mastered the art of crispy buttermilk fried chicken, I just have to know how it turned out! Did you manage that perfect craggy crust? Drop a rating below and tell me what you served with this classic American comfort food masterpiece. I love seeing your kitchen successes, so feel free to tag me in your photos! If you have any last-minute questions, you can always reach me through my contact form!
PrintCrispy Buttermilk Fried Chicken: The Best Southern Style Recipe

Follow this straightforward tutorial to make incredibly juicy inside crispy outside chicken using a classic buttermilk marinade for tenderizing and a seasoned flour dredge for maximum crunch.
- Prep Time: 30 min
- Cook Time: 35 min
- Total Time: 4 hours 5 minutes
- Yield: 4 servings 1x
- Category: Dinner
- Method: Deep Frying
- Cuisine: American
- Diet: None
Ingredients
- 4 lbs bone-in, skin-on chicken pieces (thighs, drumsticks, breasts)
- 4 cups buttermilk
- 2 tablespoons salt
- 1 tablespoon black pepper
- 1 tablespoon paprika
- 1 tablespoon garlic powder
- 1 teaspoon cayenne pepper (optional)
- 4 cups all-purpose flour
- 1/2 cup cornstarch
- 1 tablespoon baking powder
- Vegetable oil or shortening, for frying (about 3-4 inches deep)
Instructions
- In a large bowl, combine the buttermilk, salt, pepper, paprika, garlic powder, and cayenne pepper if using. Mix well.
- Add the chicken pieces to the buttermilk mixture, ensuring they are fully submerged. Cover the bowl and refrigerate for at least 4 hours, or preferably overnight, to tenderize the chicken with buttermilk.
- About 30 minutes before frying, prepare the flour mixture. In a separate shallow dish, whisk together the flour, cornstarch, and baking powder.
- Remove the chicken pieces from the buttermilk, letting excess drip off, but do not wipe them dry.
- For extra crispy chicken coating, perform a double dip: Dredge each piece thoroughly in the flour mixture, pressing the flour onto the chicken. Dip the floured piece back into the remaining buttermilk for a quick second dip (about 2 seconds).
- Immediately return the piece to the flour mixture and press firmly to create a thick, craggy coating. Place the coated chicken on a wire rack set over a baking sheet. Let the chicken rest at room temperature for 20 minutes; this helps the coating adhere during frying.
- Heat the oil in a deep fryer or a heavy cast iron skillet to 325 degrees Fahrenheit. Use a thermometer to maintain this temperature for consistent results.
- Carefully place 3-4 pieces of chicken into the hot oil, ensuring you do not overcrowd the pan, which lowers the oil temperature.
- Fry for about 6-8 minutes per side, turning gently with tongs, until the chicken is deep golden brown and reaches an internal temperature of 165 degrees Fahrenheit. Adjust heat as necessary to prevent burning the exterior before the inside is cooked.
- Remove the cooked chicken and place it on a clean wire rack set over paper towels to drain excess oil. Allow the chicken to rest briefly before serving.
Notes
- For the best results when cast iron skillet chicken frying, maintain the oil temperature between 315°F and 330°F throughout the process.
- If you prefer a spicier flavor, increase the cayenne pepper or add a teaspoon of hot sauce to the buttermilk marinade.
- Resting the coated chicken before frying is key to achieving a juicy inside crispy outside chicken texture.
Nutrition
- Serving Size: 1 piece (thigh)
- Calories: 450
- Sugar: 3
- Sodium: 650
- Fat: 28
- Saturated Fat: 8
- Unsaturated Fat: 20
- Trans Fat: 0
- Carbohydrates: 15
- Fiber: 1
- Protein: 32
- Cholesterol: 110