
When you’re staring down a weeknight that feels too long or planning a last-minute gathering and realize you have no dessert, you need a miracle. That’s why I am so excited to share what has become my signature quick fix: this incredibly easy, **no-bake Butterfinger Pie**! I know what it’s like when the evening rush hits. Back when I was teaching and managing the kids, simplicity that tasted amazing was everything. This recipe cuts out all the oven time but keeps all the decadent, satisfying flavor. It truly is the fastest way to win dessert night.
- Why This Easy Butterfinger Pie is Your New Go-To Dessert
- Gathering Ingredients for Your No Bake Butterfinger Pie
- Step-by-Step Instructions for the Easiest Butterfinger Pie
- Tips for Success Making the Best Butterfinger Pie
- Serving Suggestions for This Potluck Desserts Favorite
- Storage and Reheating Instructions for Your Butterfinger Dessert
- Frequently Asked Questions About This Butterfinger Pie Recipe
- Estimated Nutritional Data for This Indulgent Dessert
- Share Your Experience Making This Easy Butterfinger Pie
Why This Easy Butterfinger Pie is Your New Go-To Dessert
Seriously, I keep this recipe card tucked right up front because I use it so often! It hits every single marker when you need something fantastic without the fuss. It’s the perfect solution for those nights when you need a stunning dish for a potluck or just a dreamy treat for the family watching a movie.
Here’s why you absolutely need to try this on your next busy night:
- It’s a genuine **simple no bake** wonder. No turning on the stove or heating up the kitchen—that’s always a win in the summer!
- You can finish the entire mixing stage in about **20 minute dessert** time. Imagine that!
- It uses flavors everyone already loves—rich peanut butter, sweet chocolate, and that signature Butterfinger crunch.
Quick Prep Time for Your Butterfinger Pie
You read that right—twenty minutes of actual work! That’s how Rosa Sterling wanted things: fast, dependable, and delicious. Since this is one of those fantastic **no oven recipes**, you get all the satisfaction of a rich, cold dessert without spending an hour standing over a hot stove waiting for things to cool down or bake through. We let the fridge do all the heavy lifting!
Achieving the Dreamy Dessert Texture in This Butterfinger Pie
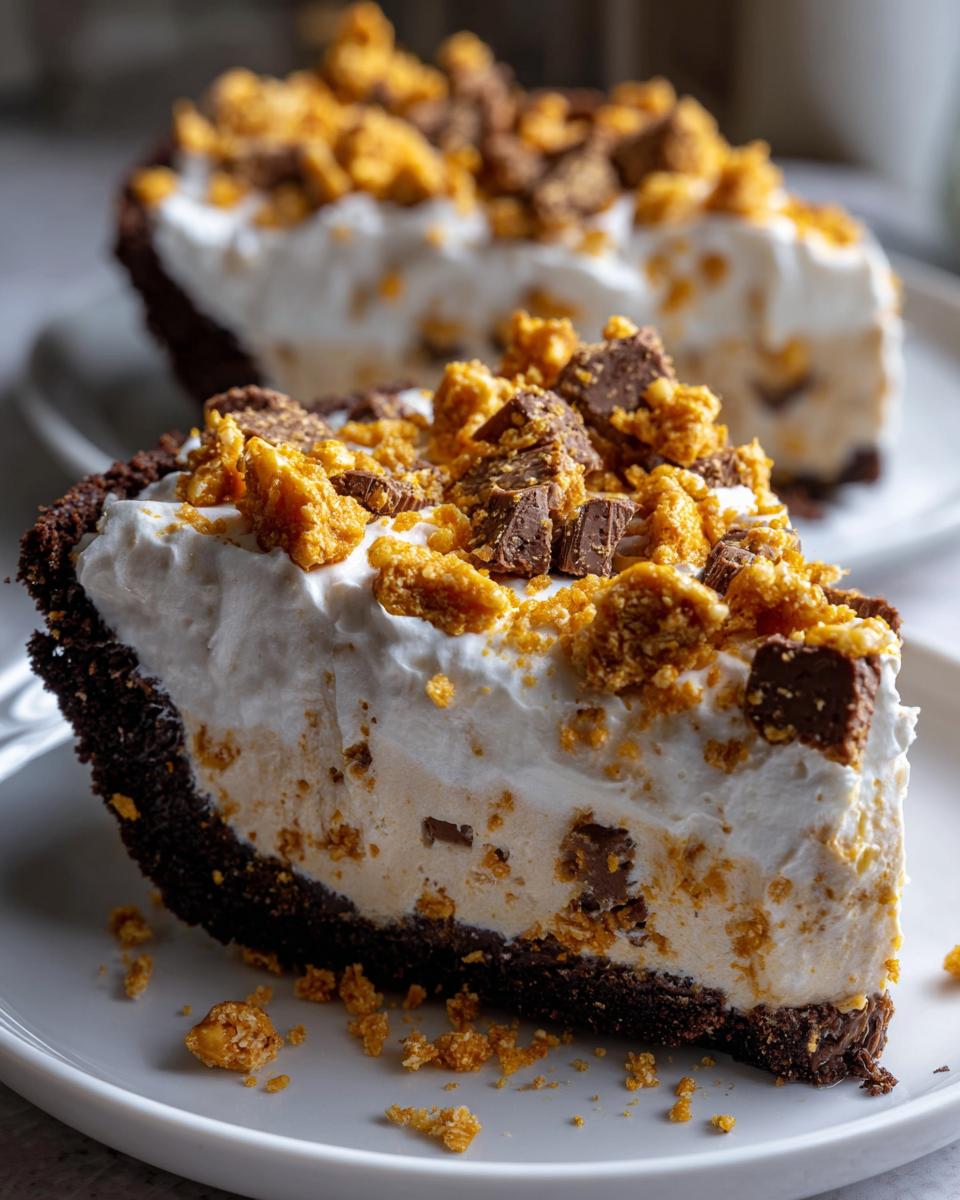
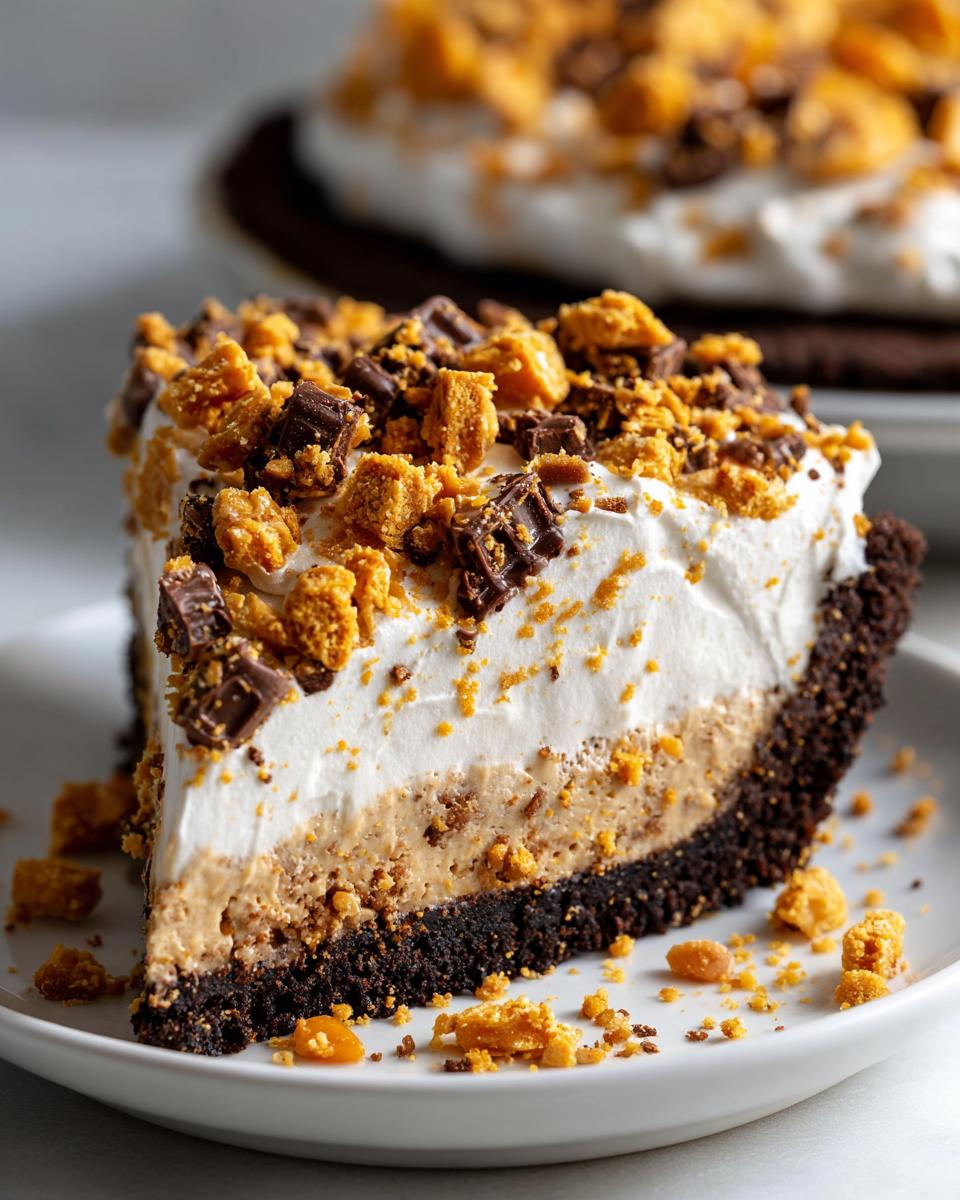
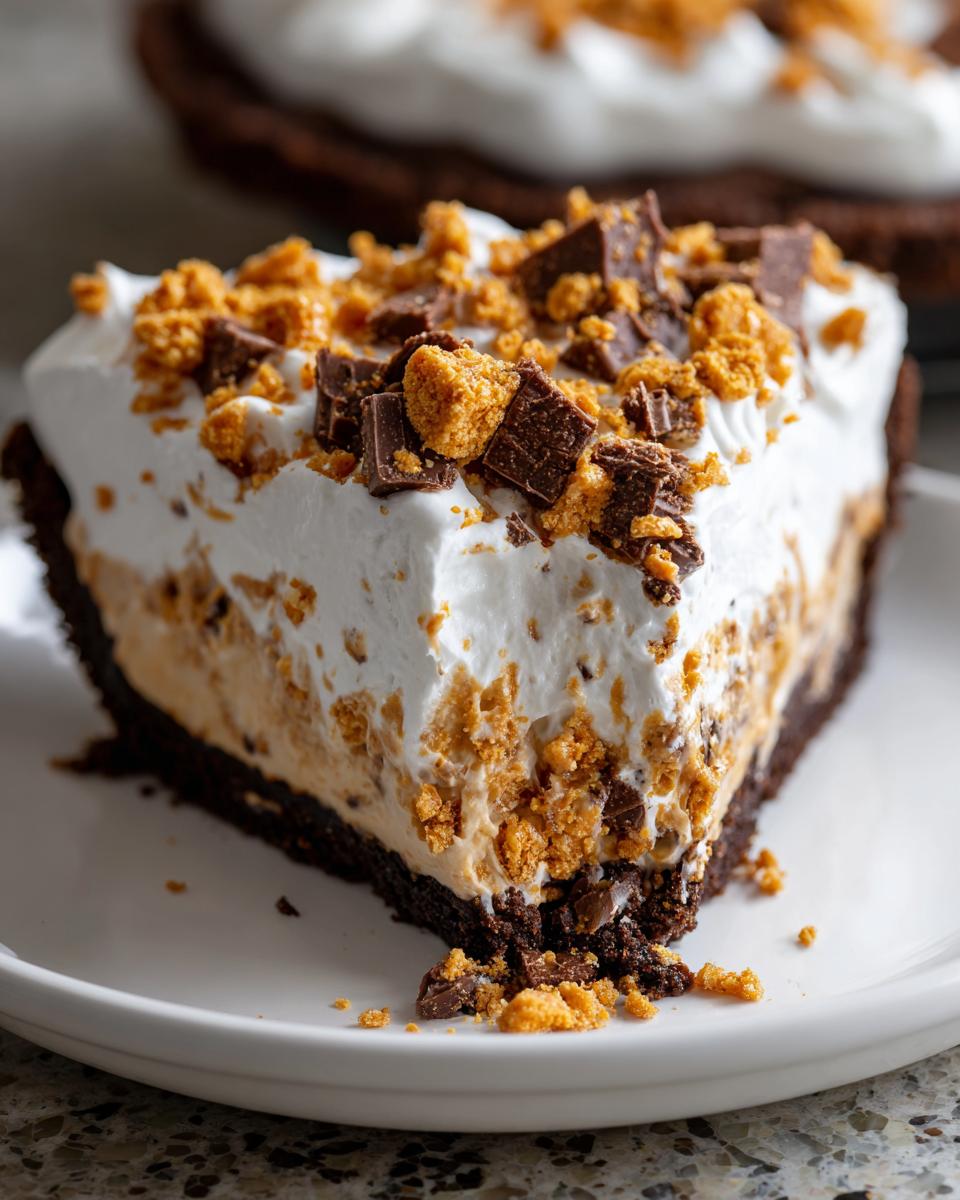
The texture is what makes this pie something special, turning it into a truly **creamy peanut butter pie**. We get that amazing smooth base from creaming the cream cheese and whipping in the heavy cream until it’s light and airy. Then? We fold in the crushed Butterfingers!
That contrast, folks—that’s the magic! You get that cool, velvety filling that melts in your mouth, immediately followed by the sweet, salty crunch of the candy bar. It’s simply perfect, and you don’t have to fuss with raw eggs or complicated setting agents to get it just right.
Gathering Ingredients for Your No Bake Butterfinger Pie
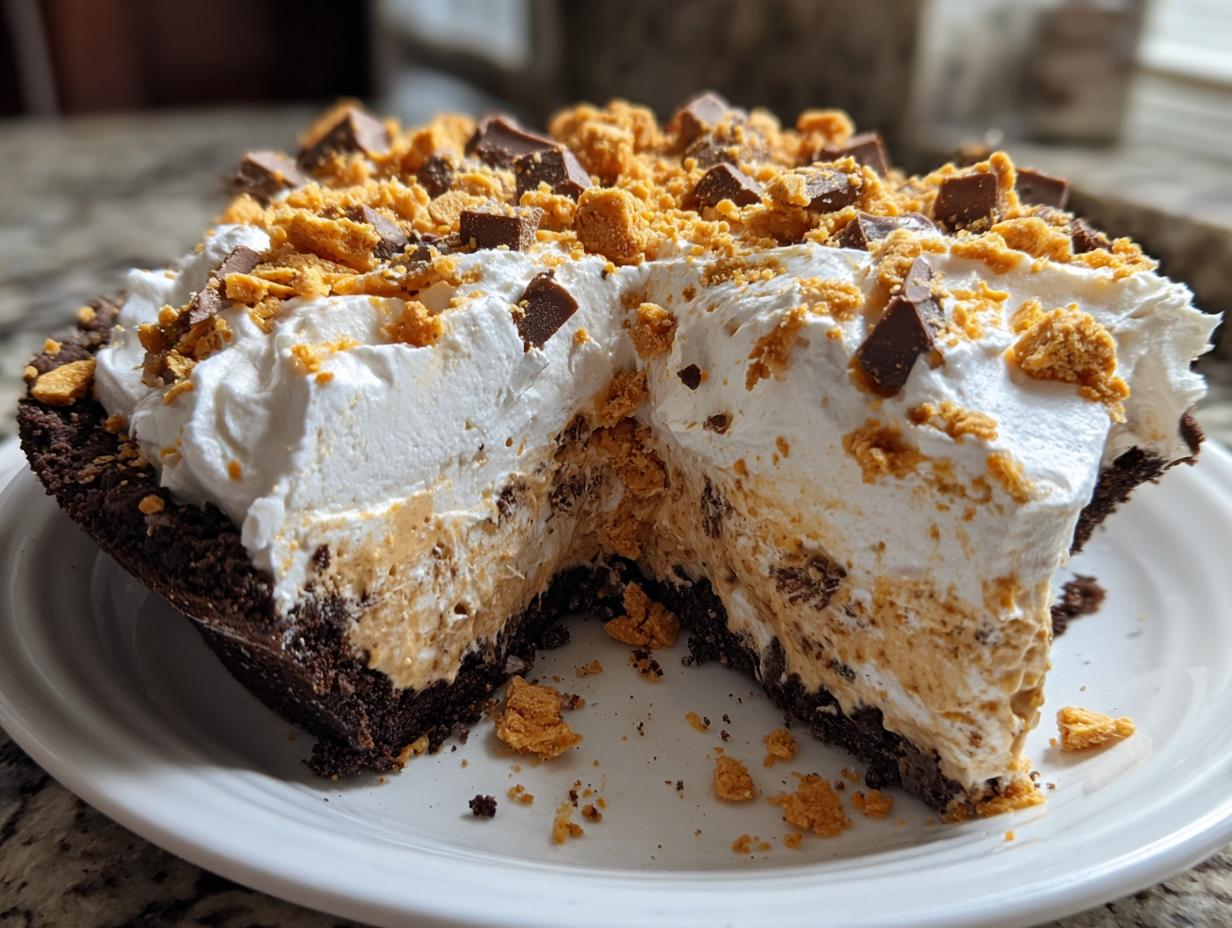
This recipe is built around simplicity, so you won’t need a specialized grocery run, I promise! Everything here is easy to find, making this a last-minute staple. We are leaning into the convenience of a pre-made crust—I always grab a store-bought **chocolate cookie crust** because it’s the fastest route to success, and that chocolate base is just heavenly with the peanut butter filling.
But you’ll need a few pantry buddies to make that incredible filling come together. Don’t skimp on the quality of your peanut butter here; it really shines through! The full list will be in the recipe card, but get ready for cream cheese, powdered sugar, vanilla, heavy cream, whipped topping, and, of course, those beautiful Butterfinger bars.
Ingredient Notes and Substitutions for Your Butterfinger Dessert
Listen, a little note on ingredients makes all the difference between a good pie and the best Butterfinger pie. Make absolutely sure your cream cheese is fully softened. If it’s even a little firm, it will fight you when you try to mix it, and you’ll end up with lumps instead of silky filling. Trust me on that one!
When it comes to the Butterfingers, you don’t want dust! I usually throw the bars into a sturdy zip-top bag, seal it tight, and give them a few good whacks with a rolling pin until I get those nice, crunchy shards. If you’re feeling fancy, pulse them a few times in a food processor, but don’t overdo it! We want those satisfying crunches scattered throughout our **creamy peanut butter pie**.

Step-by-Step Instructions for the Easiest Butterfinger Pie
Ready to see that 20 minutes of work turn into something spectacular? These steps are so clear, you can practically make this **simple no bake** masterpiece while chatting on the phone! Remember, since we aren’t baking, the real key here is layering textures and making sure everything gets cold enough to set up into that dreamy structure we love.
Head over to the official About Us page to see how Rosa Sterling built her philosophy around fast, honest cooking!
Preparing the Creamy Peanut Butter Filling for the Butterfinger Pie
Grab your biggest mixing bowl because here comes the good stuff! First, you MUST beat your softened cream cheese and powdered sugar together until they are perfectly smooth. No little cream cheese lumps allowed on my watch! Once that’s silky, mix in your creamy peanut butter and that little splash of vanilla extract until it’s totally combined and looking rich.
Now for the airy part! In a separate bowl, whip your heavy cream until stiff peaks form—this is what gives us that light fluffiness. Gently, gently, gently fold the whipped cream into that peanut butter base. Use a light hand here; we want to keep all that air we just whipped in! Once everything is just barely combined, fold in half of your crushed Butterfinger pieces. Easy peasy!
Assembling and Chilling Your Quick Candy Bar Pie
Time to bring it all home! Spoon that marvelous filling right into your ready-to-go chocolate cookie crust and spread it out evenly. Try not to dive in with a spoon, though I know it’s tempting!
Next level the decadence: top the pie with your thawed whipped topping. This is your clean canvas. Then, take the remaining half of those crunchy Butterfinger bits and sprinkle them generously all over the top layer. That crunch acts as our final decoration!
Here’s the critical piece: this **quick candy bar pie** needs patience now. Cover it loosely and pop it into the fridge for a minimum of four hours so it can properly set up. If you’re truly desperate, you can freeze it for about an hour or two to speed things along, but that real chill time yields that perfect velvety slice!
Tips for Success Making the Best Butterfinger Pie
Even though this is a **simple no bake** recipe, a few little tricks ensure you get the absolute best Butterfinger pie possible—the one that’s creamy all the way through and doesn’t turn soupy on you. I always refer back to the little suggestions I jot down after making it a few times. It really makes the difference between a passable pie and one people beg for the recipe for!
If you are worried about setting time, remember the notes say freezing for 90 minutes can help it firm up faster than just the fridge, which is a great trick for party prep. For the ultimate indulgence, you could even drizzle some melted dark chocolate over the top before you add that final layer of candy crunch. Check out some other great tips at this reference for more inspiration!
Handling the Whipped Cream for Your Icebox Pie
This is probably the step people rush the most, but handling the heavy cream right is what makes this an icebox pie dream instead of a flat puddle! You need to whip that cold heavy cream until you have genuinely stiff peaks. That means when you lift the whisk, the peaks stand straight up without flopping over one bit.
When you fold it into that dense peanut butter base—and this is the key to keeping that light, **creamy peanut butter pie** texture—use a spatula and cut straight down the middle, then gently sweep up the side of the bowl. Don’t stir aggressively! You are trying to incorporate the two mixtures, not beat the air out of your whipped cream. Keep folding until you see no more streaks of white, stop immediately, and get that filling into the crust!
Serving Suggestions for This Potluck Desserts Favorite
Since this **Butterfinger dessert** is so rich on its own, sometimes less is more when serving it at a big **family gathering dessert**! It honestly stands up perfectly fine all by itself; that chocolate crust and peanut butter combo is a winner.
But if you want to go the extra mile, I love having a tiny drizzle station set up. A light zigzag of good quality melted chocolate over the slices right before serving looks so fancy. A little warm caramel sauce works wonders too, as it plays off that salty peanut flavor. Trust me, when you bring this out at a potluck, it disappears faster than anything else!
Storage and Reheating Instructions for Your Butterfinger Dessert
Okay, so you miraculously have leftovers of this incredible **Butterfinger dessert**—which is rare, let’s be honest! Because this is a no-bake recipe, storage is super important to keep that filling firm. You must cover the pie tightly with plastic wrap or foil. Keep it in the refrigerator; it stays wonderfully creamy and delicious for about three to four days this way.
If you need to make it further ahead for the holidays, good news—it freezes like a dream! Wrap it extra well before freezing it for up to a month. When you want to serve it, just transfer the **no bake butterfinger pie** from the freezer to the fridge a few hours before serving. You can check out some other great tips at this site for making sure your pie sets perfectly!
Frequently Asked Questions About This Butterfinger Pie Recipe
I always get so many questions when I post a new recipe, especially quick ones like this! It makes sense, though; people want to know how to customize things or guarantee that perfect result on the first try. Since this is one of my favorite **butterfinger candy recipes**, I have a few answers ready for you!
Can I make this butterfinger pie without an Oreo crust?
Absolutely! While I love the speed and that intense chocolate flavor from a store-bought Oreo crust, you certainly don’t have to use it. This is an easy **no oven recipe**, so we need a crust that sets up cold. You can whip up a homemade one using graham cracker crumbs or even vanilla wafer crumbs mixed with melted butter.
Just mix about 1.5 cups of crumbs with 6 tablespoons of melted butter, press it into your pie plate, and chill it for about 20 minutes before adding the filling. It works beautifully and keeps that whole dessert feeling light and quick!
How long does this no bake butterfinger pie need to set?
This is the biggest test of patience in this whole **simple no bake** process! The official minimum is four hours in the refrigerator. You need that time so that the cream cheese and the fat from the whipped cream firm up around the peanut butter. If you cut into it too early, you’ll end up with a lovely, runny mess—think pudding, not pie!
If you’re in a real pinch before a party, you can use the freezer trick I mentioned—about 90 minutes is enough to firm it up so you can slice it, but it will definitely be more like a frozen pie recipe that way. For that truly **creamy peanut butter pie** texture, though, trust the four hours in the fridge. You can read more about our guarantee of easy recipes over on the Terms of Use page!
Estimated Nutritional Data for This Indulgent Dessert
Now, I always hesitate to put nutritional facts on things I make with this much happy butter and candy, because, well, it’s an indulgent dessert! But for those of you keeping track, here are the averages. Remember, these are just estimates based on the ingredients listed, and your specific brand of peanut butter or crust can change things up! Please see our Privacy Policy for more details on how we source our information.
- Serving Size: 1 slice
- Calories: 450
- Sugar: 35g
- Fat: 28g
- Protein: 7g
Share Your Experience Making This Easy Butterfinger Pie
Well, that’s it! You now have the roadmap to the easiest, fastest, most decadent **Butterfinger dessert** you will ever make. I truly hope you get to see the look on people’s faces the first time they taste this creamy, crunchy magic.
I’m just dying to know what you think! Did you manage to get the crush just right? Did you add those extra chocolate drizzles I mentioned? Please, please leave a comment down below and give this **easy Butterfinger pie** recipe a star rating. Hearing from you lets me know I’m sharing recipes that genuinely help busy home cooks like me!
If you took a picture of your finished masterpiece—maybe it’s ready for a big **family gathering dessert**—I would absolutely love to see it! Tag me on social media so I can share in your success. If you have any lingering questions, you can always reach out through the contact page. Happy scooping!
PrintEasiest No-Bake Butterfinger Pie (Ready in 20 Minutes!)

Make this easy, no-bake Butterfinger Pie featuring a creamy peanut butter filling, crunchy Butterfinger pieces, and a chocolate cookie crust. It is a quick dessert perfect for potlucks and family gatherings.
- Prep Time: 20 min
- Cook Time: 0 min
- Total Time: 4 hr 20 min
- Yield: 8 servings 1x
- Category: Dessert
- Method: No Bake
- Cuisine: American
- Diet: Vegetarian
Ingredients
- 1 pre-made 9-inch chocolate cookie crust (e.g., Oreo crust)
- 8 ounces cream cheese, softened
- 1 cup powdered sugar
- 1 cup creamy peanut butter
- 1 teaspoon vanilla extract
- 1 cup cold heavy whipping cream
- 1 cup crushed Butterfinger candy bars, divided
- 1 cup whipped topping (like Cool Whip), thawed, plus more for topping
Instructions
- Place the chocolate cookie crust on a serving plate or pie dish.
- In a large bowl, beat the softened cream cheese and powdered sugar together until smooth.
- Add the peanut butter and vanilla extract to the cream cheese mixture. Beat until fully combined.
- In a separate bowl, whip the cold heavy whipping cream until stiff peaks form.
- Gently fold the whipped cream into the peanut butter mixture until just combined.
- Fold in half of the crushed Butterfinger bars into the filling.
- Spread the filling evenly into the prepared chocolate crust.
- Top the pie with the thawed whipped topping. Sprinkle the remaining crushed Butterfinger bars over the top layer.
- Chill the pie in the refrigerator for at least 4 hours, or until firm. For a faster set, you can freeze it for about 1 to 2 hours.
- Slice and serve this quick candy bar pie.
Notes
- You can substitute the pre-made crust with a homemade crust made from crushed chocolate wafers and melted butter.
- For an extra decadent topping, use melted chocolate drizzled over the whipped topping before adding the final layer of candy.
- This recipe sets best when chilled for several hours, but if you are short on time, you can place it in the freezer for 90 minutes to speed up the process.
Nutrition
- Serving Size: 1 slice
- Calories: 450
- Sugar: 35g
- Sodium: 350mg
- Fat: 28g
- Saturated Fat: 12g
- Unsaturated Fat: 16g
- Trans Fat: 0.5g
- Carbohydrates: 45g
- Fiber: 1g
- Protein: 7g
- Cholesterol: 40mg