
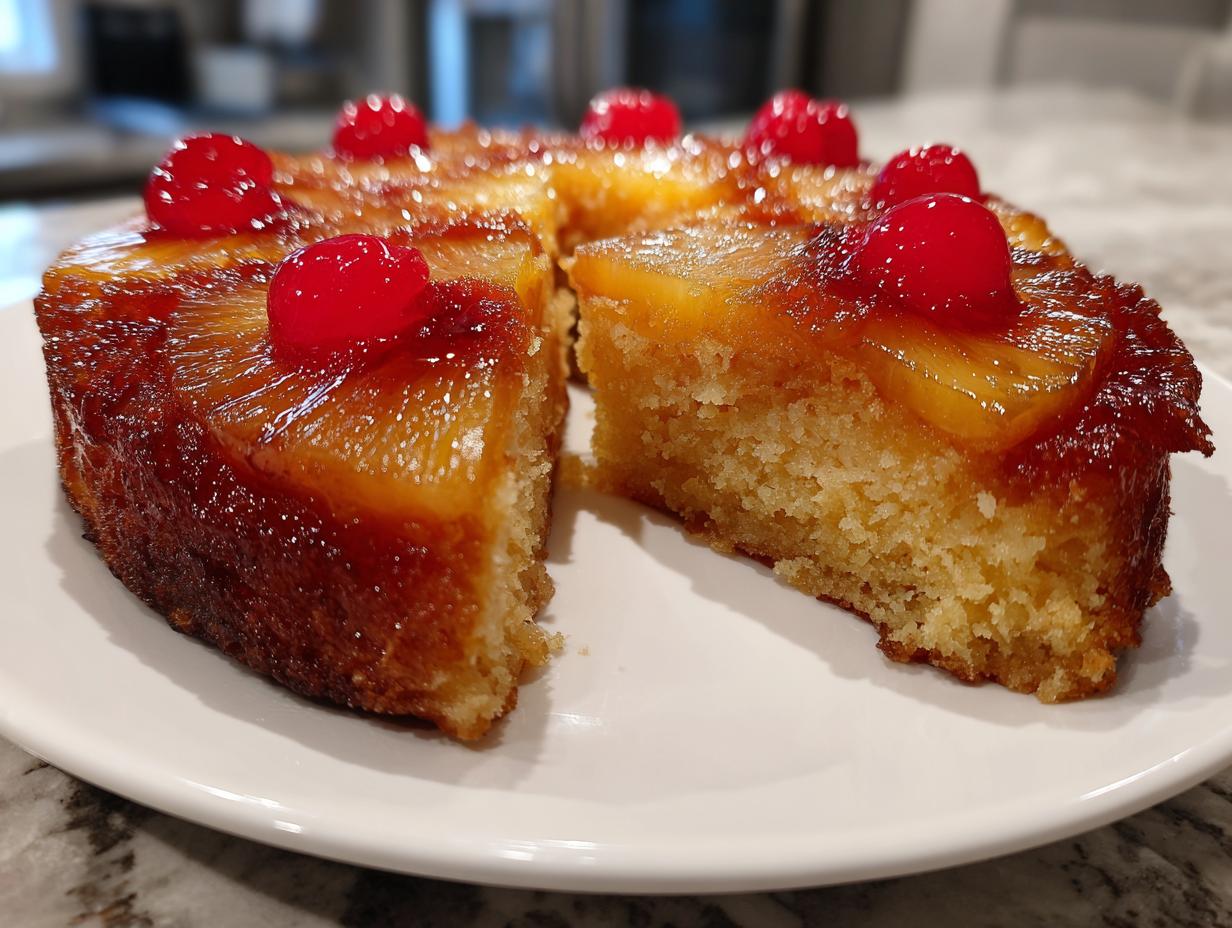
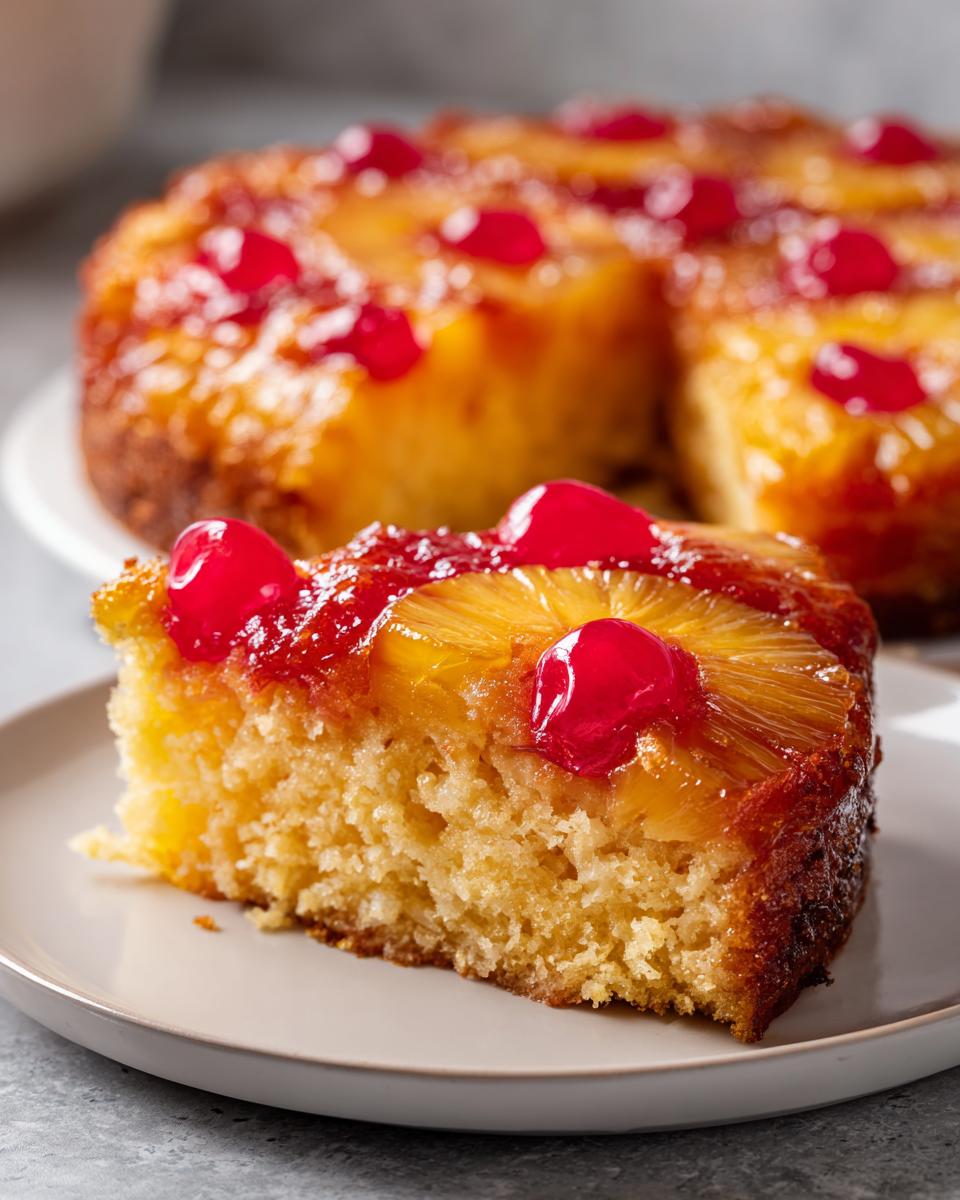
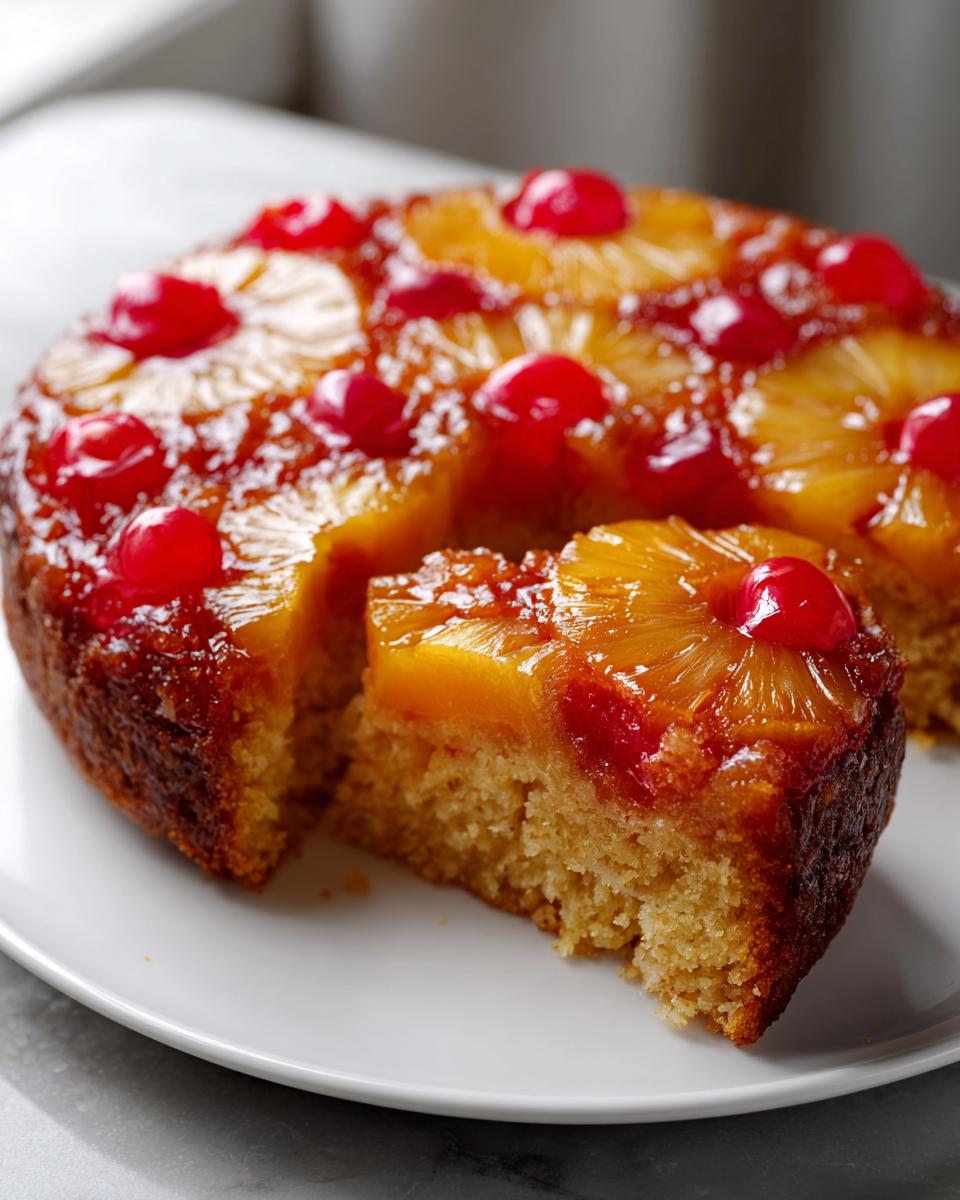
Oh, there is just something about a Pineapple Upside Down Cake that immediately transports you back to that warm, slightly kitschy feeling of a perfect 1950s dessert table, isn’t there? We’re talking pure comfort food magic here. When I set out to perfect this classic for my own family, I knew it had to be easy—because life is busy—but it absolutely had to deliver that gorgeous, gooey, *buttery caramel cake* topping. Folks, after testing batches until the kitchen smelled like a tropical dream, I can confidently say I landed on the best pineapple upside down cake recipe out there. It is unbelievably moist, and the balancing act between the sweet caramelized fruit and the light cake is simply divine. This one’s made with heart, just like my grandmother taught me, proving that the most beautiful desserts don’t have to be the most complicated.
- Why This is the Best Pineapple Upside Down Cake Recipe (EEAT Focus)
- Ingredients for Your From Scratch Pineapple Cake
- How to Make Pineapple Upside Down Cake: Step-by-Step
- Pan Choice for the Perfect Skillet Pineapple Cake
- Tips for Success Making Your Retro Baking Classic
- Variations for Your Pineapple Upside Down Cake
- Serving Suggestions for This Easy Fruit Topping Dessert
- Storage and Reheating Instructions for Pineapple Upside Down Cake
- Frequently Asked Questions About Making Pineapple Upside Down Cake
Why This is the Best Pineapple Upside Down Cake Recipe (EEAT Focus)
I hear so many people overcomplicate this dessert, trying to get fancy with high heat or complicated sauces, and they end up with burnt sugar or a runny mess. Trust me, the secret to the best pineapple upside down cake recipe isn’t complexity; it’s consistency. This recipe is reliable because we cook that topping low and slow just before we add the batter. That specific two-minute bubble time creates a stable, gorgeous buttery caramel cake layer that won’t run all over the plate when you flip it.
Plus, the batter itself is designed for success. We use the exact amount of juice swap that guarantees a wonderfully moist pineapple upside down cake every single time. When I was juggling teaching and my littles, I needed a recipe I could trust blindly, and this is it. It always comes out picture-perfect.
Achieving Perfect Caramelized Pineapple Cake Topping
This is where you have to pay attention, but don’t fret! In Step 2, when you melt the butter and the cup of sugar on medium heat, we are aiming for a gentle, bubbling simmer, not a rolling boil or a deep brown color. You want the sugar crystals fully dissolved so they sit smoothly on the bottom of your pan without scorching.
Keep scraping the sides of the pan as it melts. Once you pour it into the pan and arrange those gorgeous pineapple rings, the mixture should be glossy and translucent. If you see any dark speckles, you’ve gone too far. That small window ensures you get that deep, rich flavor without that bitter, burnt taste!
Ingredients for Your From Scratch Pineapple Cake
Because we are making our from scratch pineapple cake, precision matters, but the ingredient list is pure retro simplicity! You’ll notice we have two different butter measurements—don’t mix those up! One part is for creating that amazing caramel base, and the other is for creaming into the cake batter itself.
Make sure you have your can of pineapple ready and that you drain it, but *promise* me you’ll save those three tablespoons of juice. That reserved liquid is our secret weapon for a truly moist cake crumb. Gather these items up, and we’ll move right into the assembly so you can get to baking!
How to Make Pineapple Upside Down Cake: Step-by-Step
Okay, now for the fun part! Making your **pineapple upside down cake** is actually surprisingly fast once you get your components set up. The key here is preparation and timing. I suggest getting your fruit arranged *before* you even start the cake batter, because once the batter is ready, you need to get it into the oven right away so that beautiful caramel doesn’t harden up too much!
We combine the topping setup and the batter mixing into natural stages, and I’ve linked some great tips for speeding up your weeknight baking over here at my weeknight dinner ideas page if you ever need a quick assist.
Preparing the Caramel Base for Your Pineapple Upside Down Cake
First up, get that oven preheating to 350°F, but focus right away on that caramel in a saucepan—remember, it needs a few minutes to cool slightly before we introduce the cake batter. Once you’ve poured that beautifully melted topping into the bottom of your 9-inch pan or 10-inch skillet, you need to place your pineapple slices. Don’t just drop them! Arrange them nicely so they look pretty when you flip it.
Dot those center holes with the maraschino cherries, and then scatter the extras around the edges. Make sure that layer is snug! Neatly arranged fruit means a guaranteed, show-stopping **pineapple upside down cake** presentation.
Mixing the Moist Pineapple Upside Down Cake Batter
Next, we move to the batter, and this is where we ensure it stays wonderfully moist pineapple upside down cake material. Whisk your dry items—flour, baking powder, salt—in one bowl. In your big creaming bowl, beat that softened butter and sugar until it’s happy and fluffy, then incorporate your eggs one at a time, followed by that vanilla.
Now for the most important instruction here: alternate that dry mix with your milk and the reserved pineapple juice. You start and end with the flour. The magic phrase is: mix until *just combined*. Seriously, stop mixing as soon as those streaks disappear. Overmixing develops gluten, and gluten is the enemy when you’re aiming for that unbelievably tender crumb in your **pineapple upside down cake**!
Once that batter is poured carefully over the fruit, pop it straight into the oven for about 35 to 40 minutes. Remember, the flip is crucial: wait exactly ten minutes out of the oven before you invert your beautiful **pineapple upside down cake**!
Pan Choice for the Perfect Skillet Pineapple Cake
Getting the pan right is almost as important as the caramel itself, and this is one of those moments where you have a choice to make! My mother always used a standard 9-inch round cake pan—greased and floured like crazy, of course.
But if you really want to lean into that gorgeous retro vibe and get that unbelievably even, deep bake, you have to try a cast iron skillet. Seriously, the cast iron baking recipes section of my notes dives deep into this, but cast iron holds heat so beautifully and evenly. It cooks the bottom layer perfectly while the caramel sets up like a dream.
If you go the skillet route, always use a 10-inch size for this recipe—it gives the batter just the right amount of height. If you’re sticking to a regular pan, the 9-inch round is perfect, but give it a good spray with a non-stick baking release. Either way, the flip is what matters most!
Tips for Success Making Your Retro Baking Classic
As a true **retro baking classic**, this cake relies on a few non-negotiable details to shine. The first tip saves you from a sad, dense cake: your butter for the batter absolutely must be softened, not melted! Take it out early enough so you can press your finger into it and leave an indentation. That’s the key to good creaming.
Next, talk about the flipping window. Resist the urge to flip this **pineapple upside down cake** immediately, and definitely don’t wait until it’s fully cold. You wait that crucial 10 minutes after taking it out of the oven. Why? Because that lets the caramel cool just enough so it doesn’t run off the plate like lava, but it stays liquid enough to release the fruit.
If you’re planning your week or looking for more easy baking ideas, check out my thoughts on easy breakfast recipes for inspiration, but trust me on the ten-minute rule here—it’s foolproof!
Variations for Your Pineapple Upside Down Cake
Part of the fun of baking something this classic is making it totally your own! While I absolutely adore the traditional look of the **pineapple upside down cake** with those bright cherries, you’ve got so many ways to play dress-up with this batter.
If you want to really amp up that rich, moist feeling, toss in a handful of chopped pecans or walnuts into the caramel layer right along with the pineapple. They toast up beautifully! Or, if you are hosting adults, try adding a splash of dark rum flavoring to the batter—it gives the whole thing a subtle, delicious kick that sings of **tropical flavor baking**.

Maybe you don’t have rings on hand? Totally fine! You can always chunk up fresh or canned pineapple and just scatter those pieces over the caramel. It won’t look exactly the same, but the flavor explosion in your mouth will be the exact same incredible **pineapple upside down cake** everyone loves. For more nutty inspiration, you should check out my recipe for Sweet Alabama Pecan Bread!
Serving Suggestions for This Easy Fruit Topping Dessert
You’re finally pulling that gorgeous, glowing cake out, and now comes the best part—deciding how to serve this **easy fruit topping dessert**! Truly, this cake is decadent enough on its own, but serving it warm elevates the whole experience.
It’s simply divine alongside a big scoop of good quality vanilla ice cream that starts to melt right into those buttery caramel puddles. If you prefer something lighter, a dollop of freshly whipped cream dusted with a tiny bit of cinnamon makes a perfect pairing. Either way, you’ve made something truly special!
Storage and Reheating Instructions for Pineapple Upside Down Cake
Don’t worry if you have leftovers, because this **pineapple upside down cake** tastes amazing the next day, too! Since the topping is so rich and sugary, you can actually leave this cake covered loosely on the counter at room temperature for about two days. That caramel stays nice and soft.
If you need to keep it longer than that, pop it into an airtight container in the fridge. When you’re ready for a slice, I highly recommend warming it up for about 15 seconds in the microwave. That little burst of heat brings back the fresh-baked softness and makes that buttery caramel luscious again!
Frequently Asked Questions About Making Pineapple Upside Down Cake
It’s totally normal to have questions when you’re making a classic like this **pineapple upside down cake** for the first time! Baking involves a little bit of science, but mostly it’s just paying attention to the details. Here are the things I hear most often from readers when they nail this recipe.
First off, nope, this isn’t strictly a fall dessert recipe—it shines all year long! It’s the perfect bright spot in the winter, but it feels heavenly in the summer too. And about that sticking? If you follow those exact cooling instructions (the 10-minute wait!), you should avoid major issues, but if a piece sticks, don’t panic! Just lift it with a spatula and place it back on top when you flip it over.
Can I use fresh pineapple instead of canned for this pineapple upside down cake recipe?
Oh, yes, you certainly can, but you have to treat fresh pineapple a bit differently! Fresh fruit has way more water. If you use fresh chunks or rings, you should sauté them briefly in a tiny bit of butter and sugar first. This reduces the moisture so your **pineapple upside down cake** batter doesn’t get soggy on the bottom!
My caramel is grainy/too dark. What went wrong?
That usually means one of two things. If it’s grainy, you might have agitated the sugar too much while it was melting, or you added water accidentally. If it’s too dark, your heat was just a hair too high! For the best pineapple upside down cake recipe, we want it light gold, not deep amber. Keep that heat medium and stir gently until it’s just dissolved.
Do I need to use a cast iron skillet for this?
You sure don’t! While I love my cast iron skillet for the amazing even heat it provides for that **buttery caramel cake** layer, a standard greased and floured 9-inch round pan works perfectly fine. Just remember to use that parchment paper liner if you are nervous about peeling it out of a non-stick pan!
PrintRosa’s Classic Pineapple Upside Down Cake

Bake this moist, retro-style pineapple upside down cake featuring a rich, buttery caramelized topping. This recipe uses simple steps for a perfect result every time.
- Prep Time: 15 min
- Cook Time: 40 min
- Total Time: 55 min
- Yield: 8 servings 1x
- Category: Dessert
- Method: Baking
- Cuisine: American
- Diet: Vegetarian
Ingredients
- 1 cup (200g) granulated sugar for topping
- 1/4 cup (57g) unsalted butter, cut into pieces
- 1 (20 ounce) can pineapple slices in juice, drained (reserve 3 tablespoons juice)
- 10 maraschino cherries
- 1 1/2 cups (180g) all-purpose flour
- 1 1/2 teaspoons baking powder
- 1/2 teaspoon salt
- 1/2 cup (113g) unsalted butter, softened
- 3/4 cup (150g) granulated sugar
- 2 large eggs
- 1 teaspoon vanilla extract
- 1/2 cup whole milk
- 3 tablespoons reserved pineapple juice
Instructions
- Preheat your oven to 350°F (175°C). If you are not using a cast iron skillet, grease and flour a 9-inch round cake pan.
- Prepare the topping: In a medium saucepan, melt the 1/4 cup butter over medium heat. Stir in the 1 cup sugar until it dissolves and bubbles slightly, about 2 minutes. Do not let it burn.
- Pour the caramel mixture evenly into the bottom of your cake pan or 10-inch cast iron skillet.
- Arrange the pineapple slices over the caramel layer. Place one maraschino cherry in the center of each pineapple ring, and scatter the remaining cherries around the edges.
- Make the cake batter: In a medium bowl, whisk together the flour, baking powder, and salt. Set aside.
- In a large bowl, cream together the 1/2 cup softened butter and 3/4 cup sugar until light and fluffy. Beat in the eggs one at a time, then stir in the vanilla extract.
- Gradually add the dry ingredients to the wet ingredients, alternating with the milk and reserved pineapple juice, beginning and ending with the flour mixture. Mix until just combined; do not overmix.
- Carefully pour the cake batter over the pineapple and caramel layer in the pan. Spread the batter evenly.
- Bake for 35 to 40 minutes, or until a wooden pick inserted into the center comes out clean.
- Let the cake cool in the pan on a wire rack for exactly 10 minutes.
- Place a serving plate upside down over the cake pan. Carefully invert the cake onto the plate. Lift the pan away slowly. If any topping sticks, gently place the pieces back onto the cake.
- Serve warm or at room temperature.
Notes
- For a cast iron skillet, use a 10-inch size for best results. If using a regular pan, a 9-inch round works well.
- To prevent sticking, ensure the caramel is evenly distributed across the bottom before adding the batter.
- For a tropical flavor variation, substitute 1 tablespoon of the milk with dark rum extract in the batter.
- Serve this buttery caramel cake with vanilla ice cream or fresh whipped cream.
Nutrition
- Serving Size: 1 slice
- Calories: 350
- Sugar: 35
- Sodium: 250
- Fat: 17
- Saturated Fat: 10
- Unsaturated Fat: 7
- Trans Fat: 0
- Carbohydrates: 48
- Fiber: 1
- Protein: 4
- Cholesterol: 75