
Oh, you know those dishes that just scream ‘gathering’? The ones that show up at every church supper, family reunion, and summer picnic looking just as glorious as they did in your grandmother’s day? Well, that’s exactly where the seven layer salad lives in my heart. It’s pure, beautiful, vintage comfort food presented perfectly on a clear glass pedestal. I’m Rosa, and here at my kitchen, we stick to what works. This isn’t some fussy, modern appetizer; this is a recipe I trust implicitly because it’s been tested on generations of hungry folks. When you pull this out, people know they are getting the real deal—a reliably delicious, chilled vegetable salad that requires absolutely no last-minute scrambling. If you loved my recipe for easy chicken and green beans dinner, you are going to adore the timeless reliability of this salad. Trust me, this classic assembly is foolproof and always the very first thing gone!
- Why This Seven Layer Salad Recipe Is a Potluck Favorite
- Gathering Ingredients for Your Seven Layer Salad
- Assembling the Chilled Vegetable Salad Layers
- Preparing the Traditional Seven Layer Salad Dressing
- Step-by-Step Instructions for Your Easy Potluck Salad
- Making Ahead and Storing Your Seven Layer Salad
- Variations on the Retro Salad Recipes
- Frequently Asked Questions About the Creamy Layered Salad Guide
- Nutritional Estimates for Your Seven Layer Salad
Why This Seven Layer Salad Recipe Is a Potluck Favorite
I promise you, this recipe is your secret weapon for any gathering you bring it to. Forget wilting lettuces and sad-looking sides. This seven layer salad is famous for staying crisp and beautiful for hours in the cooler. It’s exactly what you need when you’re rushing out the door but still want to bring something impressive.
- It’s stunning! Who doesn’t love seeing those distinct, colorful layers?
- You really can prepare most of it the day before—hello, stress-free mornings!
- The creamy dressing seals everything in, making it last beautifully.
Key Components of the Best Seven Layer Salad Ingredients
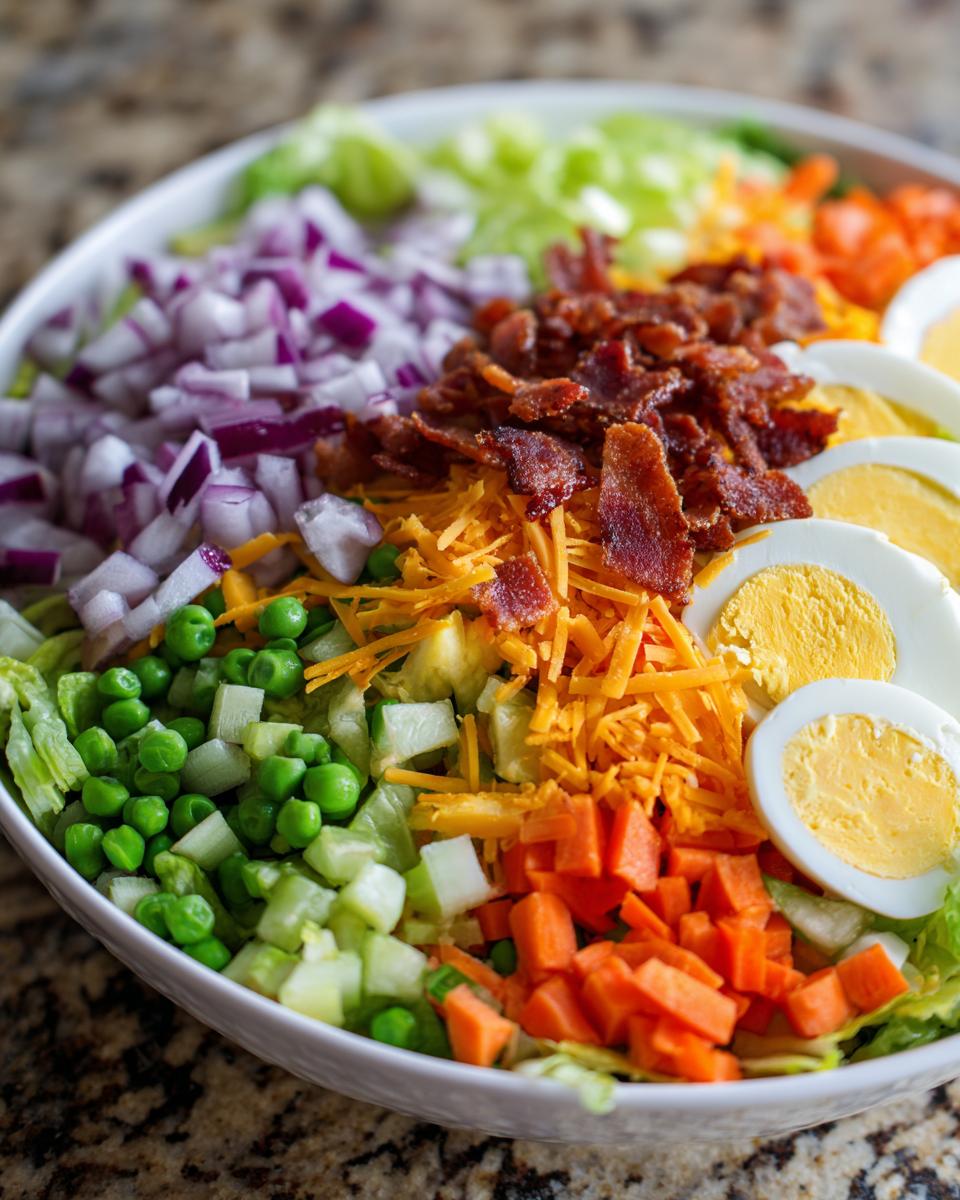
When people rave about this salad, they are usually talking about the combination of textures. For the best seven layer salad ingredients, you need that balance. We stick to the classics: crisp lettuce on the bottom, creamy green peas, sweet carrots, salty bacon, rich eggs, crunchy celery, sharp onion, and a blanket of cheese and dressing right on top. It’s all about that contrast!
Gathering Ingredients for Your Seven Layer Salad
Okay, let’s talk about the specifics. Since this is a layered dish, how you prep the ingredients matters almost as much as what they are! Laying everything out clearly helps you avoid mixing things up when the assembly time comes. We need one big bowl for all those gorgeous layers and one smaller bowl just for that binding dressing. Remember, everything needs to be prepped and cold before stacking begins. If you’re looking to use up some extras, a good place to start is classic deviled eggs for extra hard-boiled joy!
For the main vegetable layers, make sure your peas are fully thawed and patted dry—soggy peas equal a sad salad base. We want crisp celery, finely chopped red onion, shredded carrots, and of course, those beautiful, sliced hard-boiled eggs. The bacon needs to be cooked until perfectly crisp and crumbled small for the top layer.
For the Traditional Seven Layer Salad Dressing
The dressing is what ties this whole party together. For the traditional seven layer salad dressing, we only use real mayonnaise—no substitutes here, please! Whisk it just with a little white vinegar for tang, a touch of sugar to balance it out, and just the basics of salt and pepper. It’s simple, but that creamy texture is the blanket that keeps all those fresh veggies looking amazing until serving time.
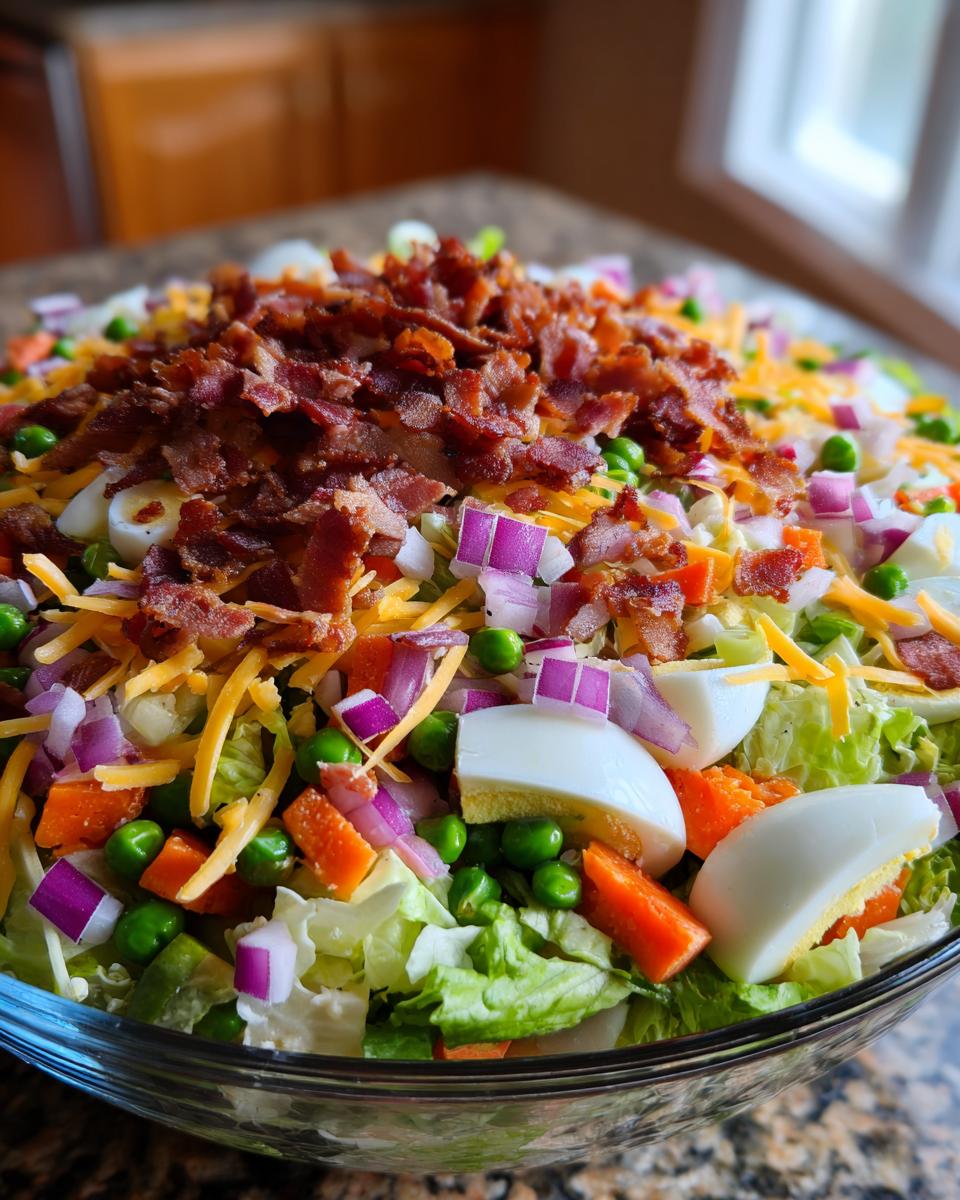
Assembling the Chilled Vegetable Salad Layers
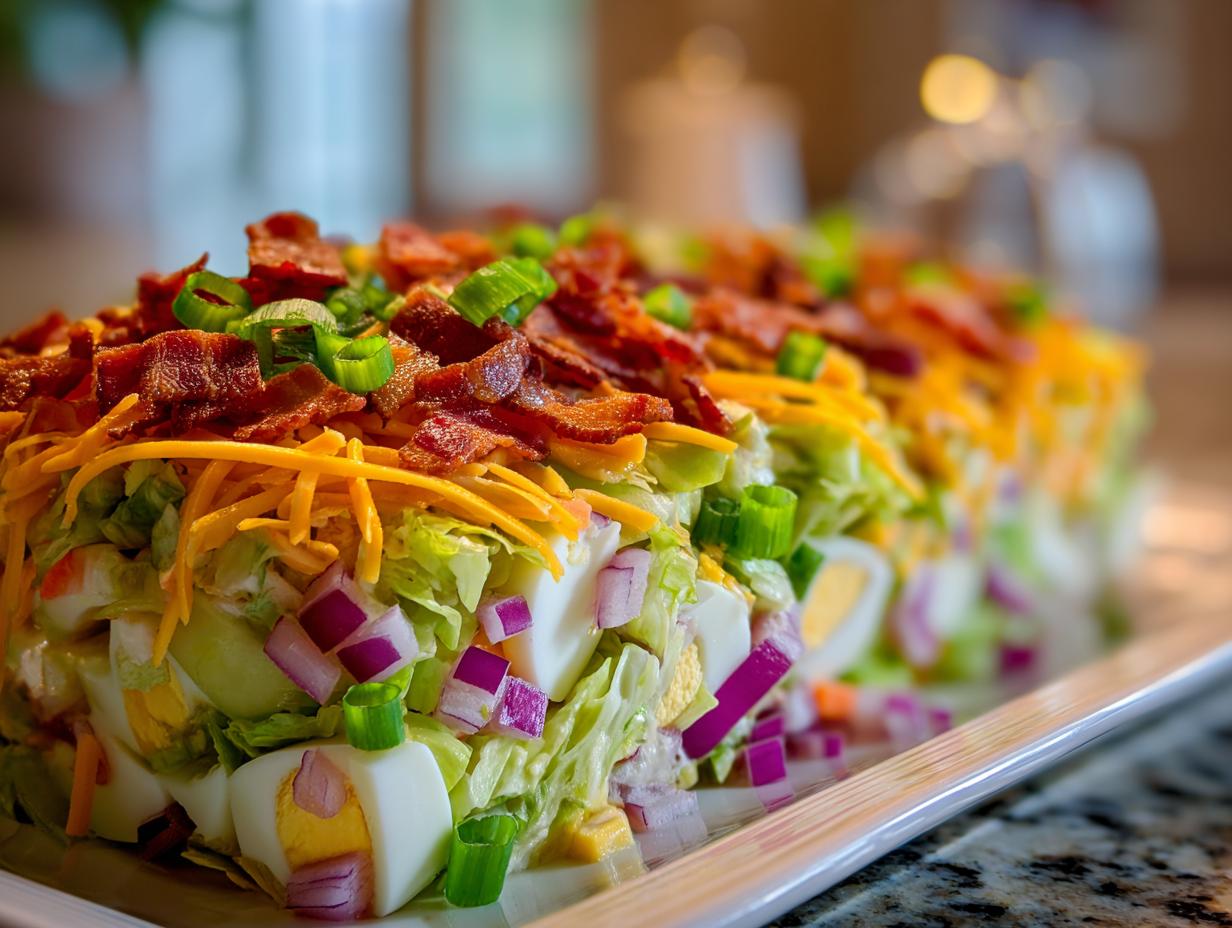
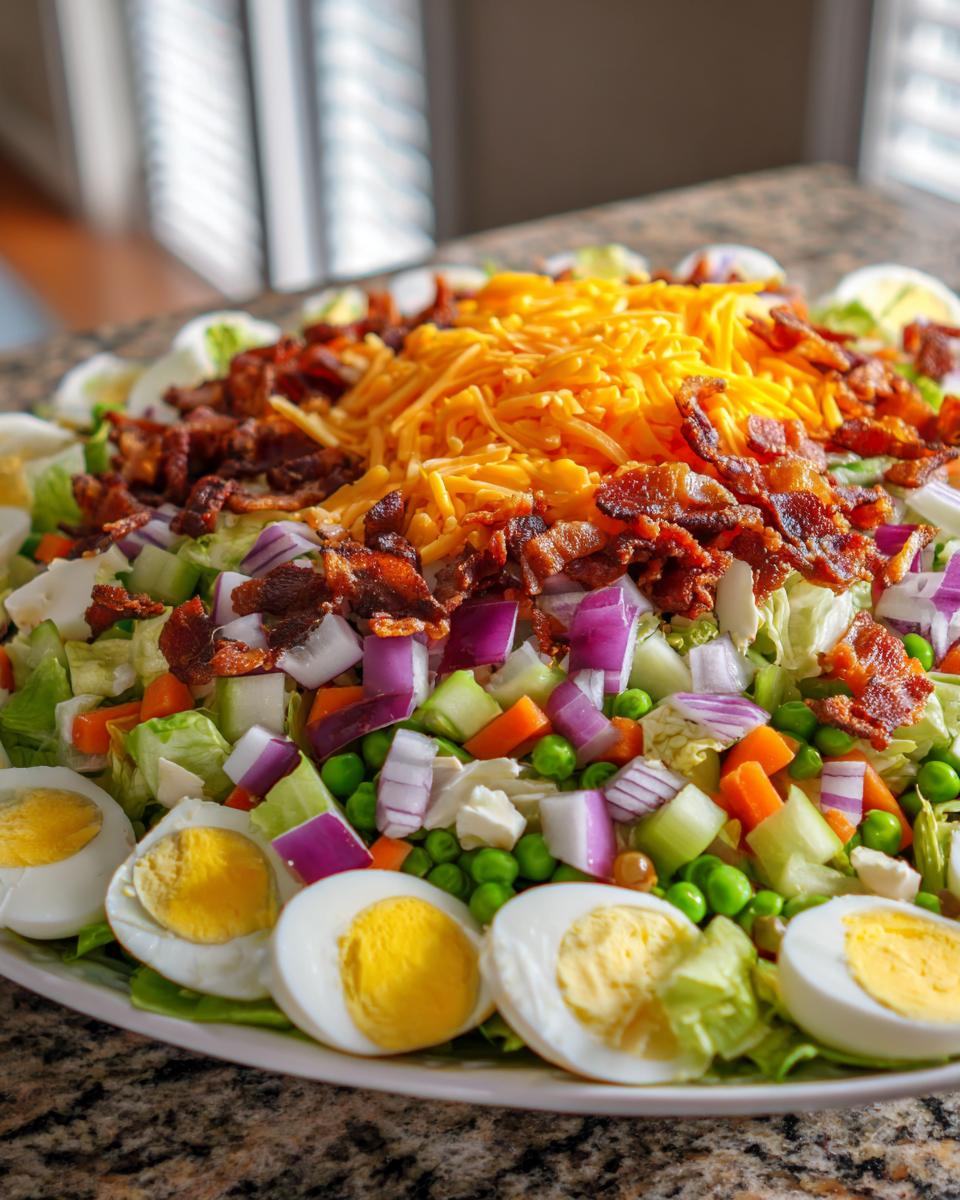
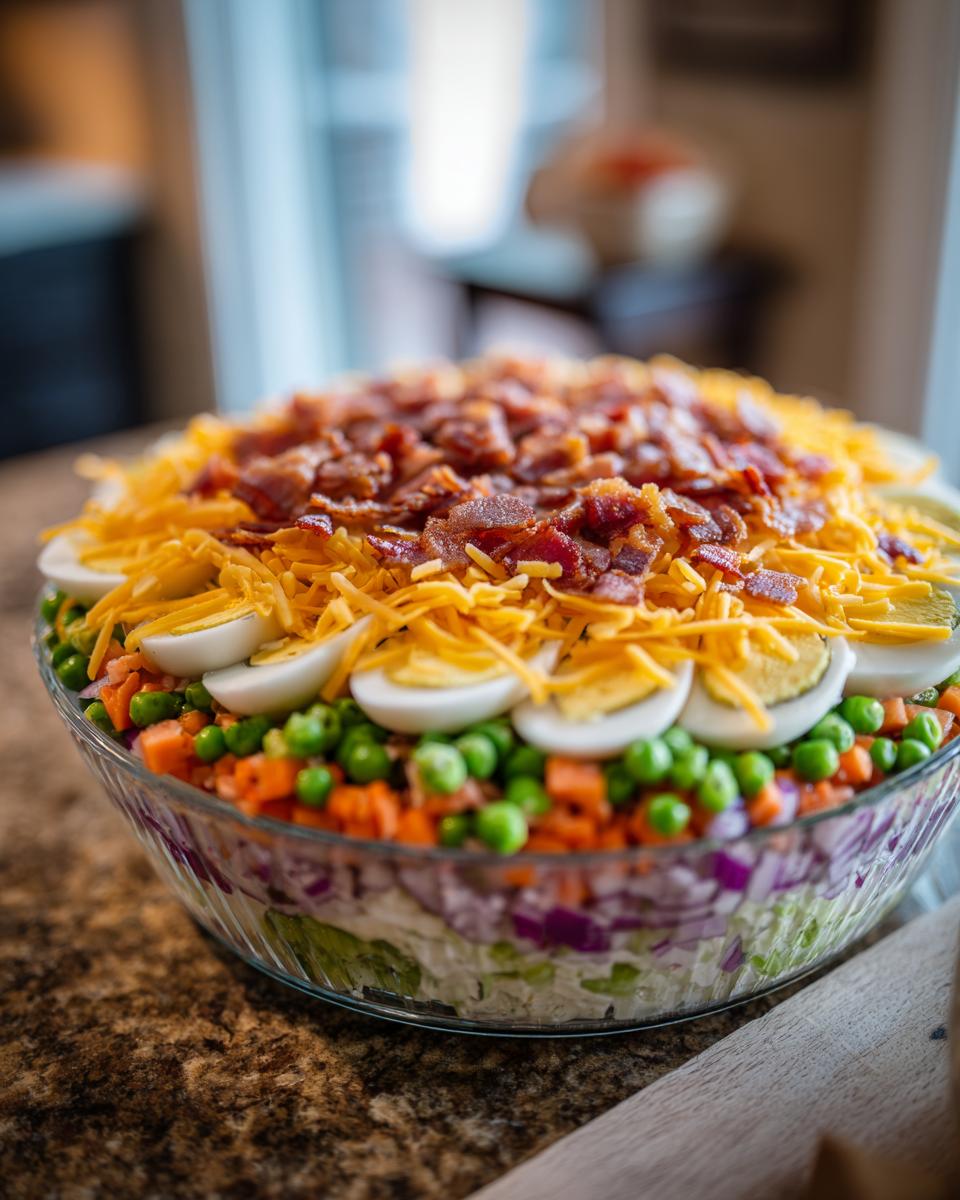
This is the fun part, right? Seeing the definition of the seven layer salad come to life! You absolutely must use a large, clear glass bowl here. If you use a ceramic dish, you lose the whole visual appeal. We want people walking by the buffet to stop and admire the hard work you put into those distinct chilled vegetable salad layers. Think strategically! We need the lettuce on the bottom because it’s the sturdiest layer, and then we carefully build up. The trick here is being gentle so you don’t mash the layers down before they even hit the chilling time.
Tips for Perfect Layering in Your Classic Seven Layer Salad Recipe
When you build this classic seven layer salad recipe, think about density. Put the heaviest, wettest things like lettuce and peas down first. Next, you need to be careful applying the dressing—it must completely seal in the layers below it. That dressing is key because it stops the outside air from wilting the lettuce. Don’t just plop the dressing on; spread it slowly from the center outward so you don’t disturb the carrot or celery layers underneath. That seal prevents the final product from becoming a soggy mess later on!
Preparing the Traditional Seven Layer Salad Dressing
Honestly, if you get the dressing right, you’ve won half the battle with this seven layer salad. This isn’t the time for complicated herbs or fancy mustards, nope. We want pure, creamy binding power! Just grab a small bowl—I usually grab one of my smaller ceramic ones—and toss in that mayo. Then, we whisk in the vinegar, that little bit of sugar to keep things balanced, and the salt and pepper. You gotta whisk it until it’s totally smooth, like silk. If you see lumps of sugar, it won’t seal the salad properly! If you love creamy sauces, you really need to check out my creamy horseradish sauce—it’s made with the same simple whisking technique.
Step-by-Step Instructions for Your Easy Potluck Salad
Alright, let’s put this gorgeous bowl together! Getting this easy potluck salad assembled is just as important as gathering the ingredients. We’re building from the bottom up, and remember, presentation is everything here. I usually assign the bacon-crumbing duty to my husband because I tend to over-crisp it when I’m excited—oops! Grab your big, clear beauty of a bowl and let’s start stacking. You want to go slow on each layer to keep those defined lines. If you need another great salad idea for your next gathering, check out my creamy bacon cheddar broccoli salad!
- First up, pack that chopped crisp iceberg lettuce firmly into the base of your clear dish. This is your sturdy foundation.
- Next, gently distribute your thawed peas, then follow immediately with the shredded carrots, celery, chopped onion, and finally, scatter those lovely hard-boiled eggs over the top of the vegetables.
- Now for the crucial step in making this the perfect seven layer salad: very carefully pour or spread your homemade dressing evenly over the eggs. Make sure it seals the edge to the glass all the way around—no gaps!
- Once the dressing is sealed, sprinkle that shredded sharp cheddar cheese right on top of the dressing layer.
- Finish it all off by scattering the crumbled, crispy bacon evenly across the top layer. Then, cover it tight and get it chilled!
Making Ahead and Storing Your Seven Layer Salad
This is where this salad truly shines as the ultimate make ahead layered salad! You can absolutely prep all the vegetable layers—lettuce, peas, carrots, celery, eggs, and onion—the day before you need to serve. Just keep them layered, but skip the dressing and the final cheese/bacon toppings. Store those toppings separately, wrapped up tight in the fridge.
When it comes time to serve your seven layer salad, you assemble the dressing, pour it on, and add the bacon and cheese. For the absolute best results, you need at least four hours of chilling time for the layers to truly marry and set. If you can manage it, overnight chilling is what makes the flavor pop!
Variations on the Retro Salad Recipes
While I adore keeping this recipe true to tradition, sometimes you just need to tweak things a bit for a new crowd! These retro salad recipes are wonderfully flexible. If you’re not a fan of sharp cheddar, try swapping in some Monterey Jack or even a finely crumbled blue cheese—that salty tang is divine with the bacon!
For a little crunch boost, try adding toasted pecans or sunflower seeds right on top with the bacon. I also know some folks skip the peas and use finely chopped raw broccoli florets instead, though you might want to blanch those very quickly first. If you’re looking for other great layered ideas, take a peek at my chicken salad sandwich filling—it’s creamy and satisfying too!
Frequently Asked Questions About the Creamy Layered Salad Guide
I always get questions about this classic dish because everyone wants to make sure they don’t mess up those precious layers! Here are the things folks ask me most often when they are getting ready to make their own beautiful seven layer salad. If you’ve perfected my creamy egg salad, you’ll find assembling this is just as straightforward!
Can I make this seven layer salad with bacon and peas without the bacon?
Absolutely! You can certainly omit the bacon if needed. The salad remains delicious, though you lose that essential smoky flavor and crunch. To keep the salty element, you could sprinkle a few crispy fried onions on top instead. But yes, the seven layer salad with bacon and peas is great even without the pork!
What is the best dish to serve this salad in?
You simply must use a clear glass bowl, like a trifle dish or a large punch bowl! It’s all about showing off those distinct, beautiful layers you worked hard to create. If it’s in an opaque bowl, you just have a big heap of white mayonnaise dressing, and that’s no fun!
How long does this salad last in the refrigerator?
For peak crispness, aim to serve it the day you make it! It’s definitely safe for up to 24 hours in the fridge, especially with that dressing sealing it in. After that, the lettuce starts to soften just a bit, though it’s still totally edible.
Nutritional Estimates for Your Seven Layer Salad
Now, let’s talk numbers for a second. Since this is a classic, rich salad involving mayonnaise and bacon, it definitely leans towards the comforting side of things. Keep in mind these are just close estimates based on my standard ingredient amounts—your exact results might vary depending on how much bacon grease ends up in the bowl!
- Serving Size: 1 serving
- Calories: 310
- Fat: 27g
- Protein: 10g
- Carbohydrates: 8g
- Sugar: 5g
This is why we call it a gathering salad, not an everyday lunch! But wow, it is worth every bit of that flavor.
PrintClassic Seven Layer Salad Recipe

Follow this straightforward guide to make a traditional, chilled Seven Layer Salad, perfect for potlucks and gatherings. This recipe includes the creamy dressing.
- Prep Time: 25 min
- Cook Time: 10 min
- Total Time: 35 min
- Yield: 8 servings 1x
- Category: Side Dish
- Method: Chilling
- Cuisine: American
- Diet: Vegetarian
Ingredients
- 1 head iceberg lettuce, chopped
- 1 cup frozen peas, thawed
- 1 cup shredded carrots
- 4 hard-boiled eggs, sliced or chopped
- 1 cup chopped celery
- 1/2 cup chopped red onion
- 1 cup shredded sharp cheddar cheese
- 6 slices bacon, cooked and crumbled
- 1 cup mayonnaise
- 2 tablespoons white vinegar
- 1 teaspoon sugar
- 1/2 teaspoon salt
- 1/4 teaspoon black pepper
Instructions
- Prepare the dressing: In a small bowl, whisk together the mayonnaise, white vinegar, sugar, salt, and pepper until smooth. Set aside.
- Layer the ingredients in a large, clear glass bowl in the following order: lettuce, peas, carrots, celery, red onion, and hard-boiled eggs.
- Spread the prepared dressing evenly over the top layer of eggs, covering the entire salad surface to seal the layers.
- Sprinkle the shredded cheddar cheese over the dressing layer.
- Top the cheese with the crumbled bacon.
- Cover the bowl tightly with plastic wrap.
- Chill the salad for at least 4 hours, or preferably overnight, before serving. Do not mix the salad until you are ready to serve it.
Notes
- You can prepare all the layers, except the bacon and cheese topping, one day ahead. Keep the dressing separate until ready to assemble.
- For a retro salad feel, use a decorative glass trifle dish to show off the layers.
- If you want a slightly sweeter dressing, increase the sugar to 1 1/2 teaspoons.
Nutrition
- Serving Size: 1 serving
- Calories: 310
- Sugar: 5
- Sodium: 350
- Fat: 27
- Saturated Fat: 8
- Unsaturated Fat: 19
- Trans Fat: 0
- Carbohydrates: 8
- Fiber: 2
- Protein: 10
- Cholesterol: 105