
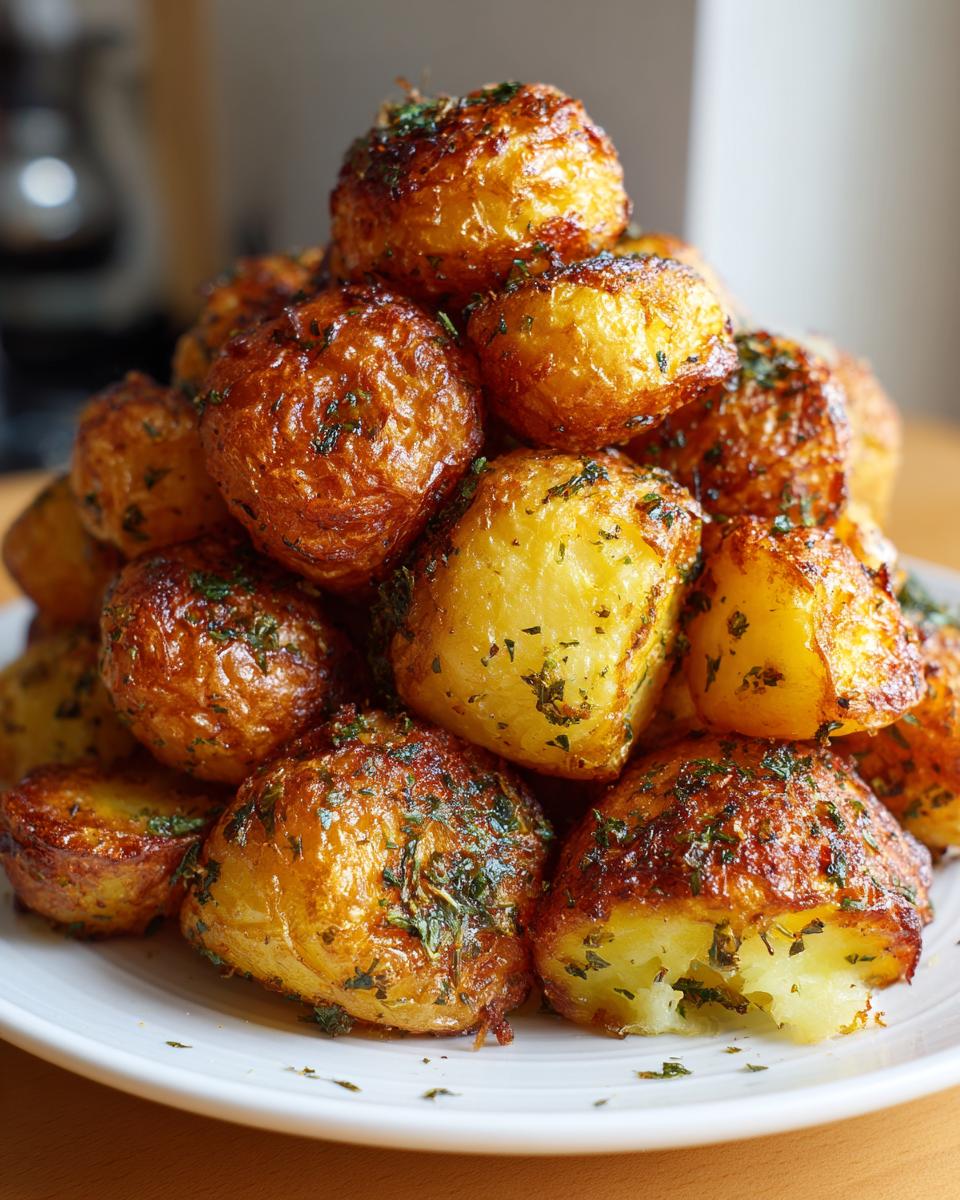
Oh, friends, let’s talk about the absolute king of side dishes: potatoes. I mean, seriously, is there anything more comforting than a steaming pile of perfectly seasoned spuds? For years, I chased that mythical texture—the kind where the outside shatters when you bite it, and the inside melts like butter. Too many times, my oven roasted potatoes ended up either soggy or burnt on the edges. Not anymore!
After I left teaching and started focusing more on my grandmother’s old kitchen notes, I perfected this method. This isn’t just a recipe; it’s the result of my quest to bring those rich, satisfying textures into your busy weeknight routine. We use one tiny, unexpected secret ingredient while boiling that guarantees the best oven roasted potatoes you’ve ever made. Trust me, you’ll never go back to just tossing them in oil and hoping for the best!
- Why You Will Make The Best Oven Roasted Potatoes Every Time
- Ingredients for Perfect Oven Roasted Potatoes
- The Foolproof Technique for Crispy Oven Roasted Potatoes
- Ingredient Notes and Potato Type Substitutions for Oven Roasted Potatoes
- Flavor Variations for Your Garlic Herb Roasted Potatoes
- Tips for Success When Making Oven Roasted Potatoes
- Serving Suggestions for This Easy Potato Side Dish
- Storage and Reheating Instructions for Oven Roasted Potatoes
- Frequently Asked Questions About Oven Roasted Potatoes
- Sharing Your Crispy Potatoes Oven Success
Why You Will Make The Best Oven Roasted Potatoes Every Time
I know you’ve seen a million recipes for roasted potatoes, but this one is different. Once you try this method, you’ll realize why this is the Best Roasted Potatoes Recipe you’ll ever need. I keep coming back to it because it solves all the common problems!
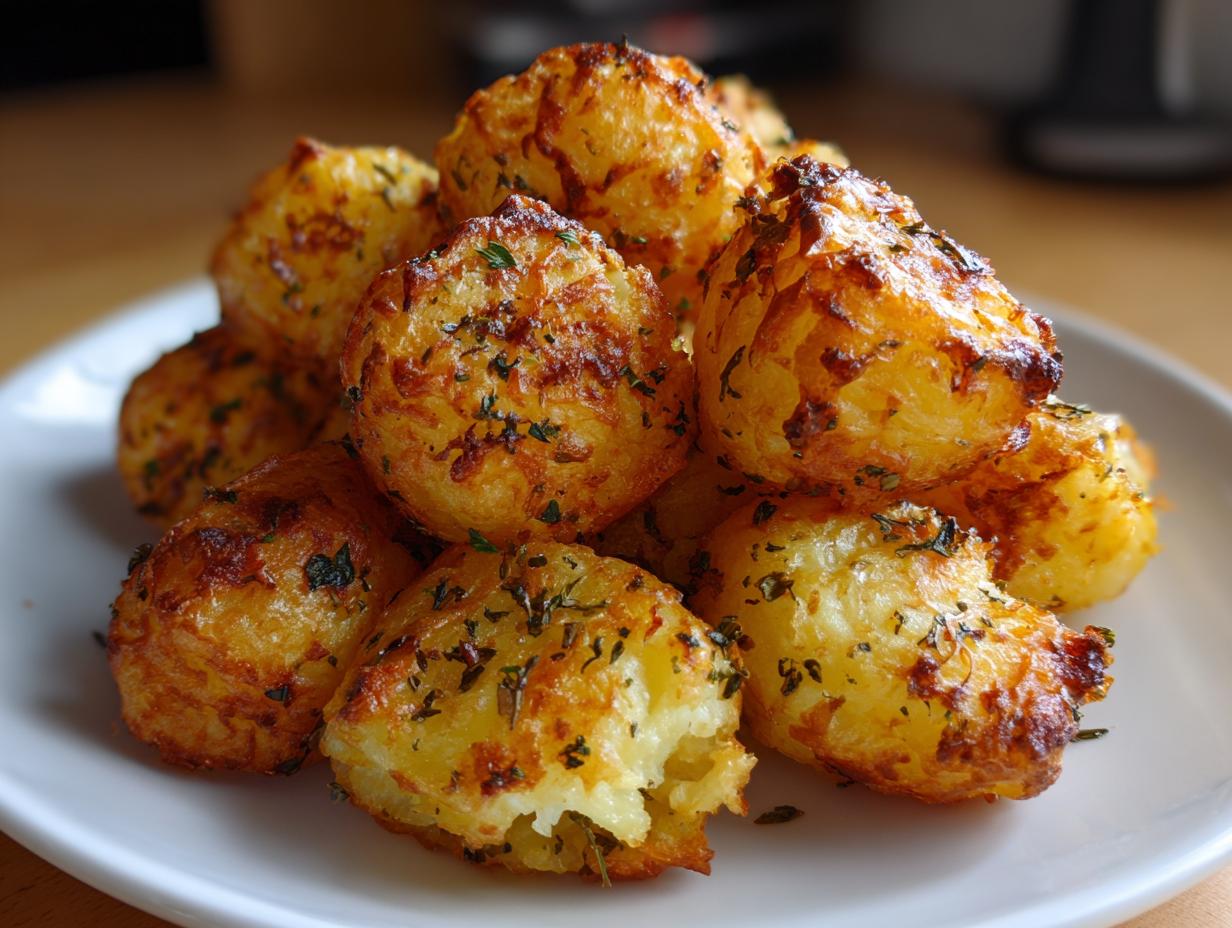
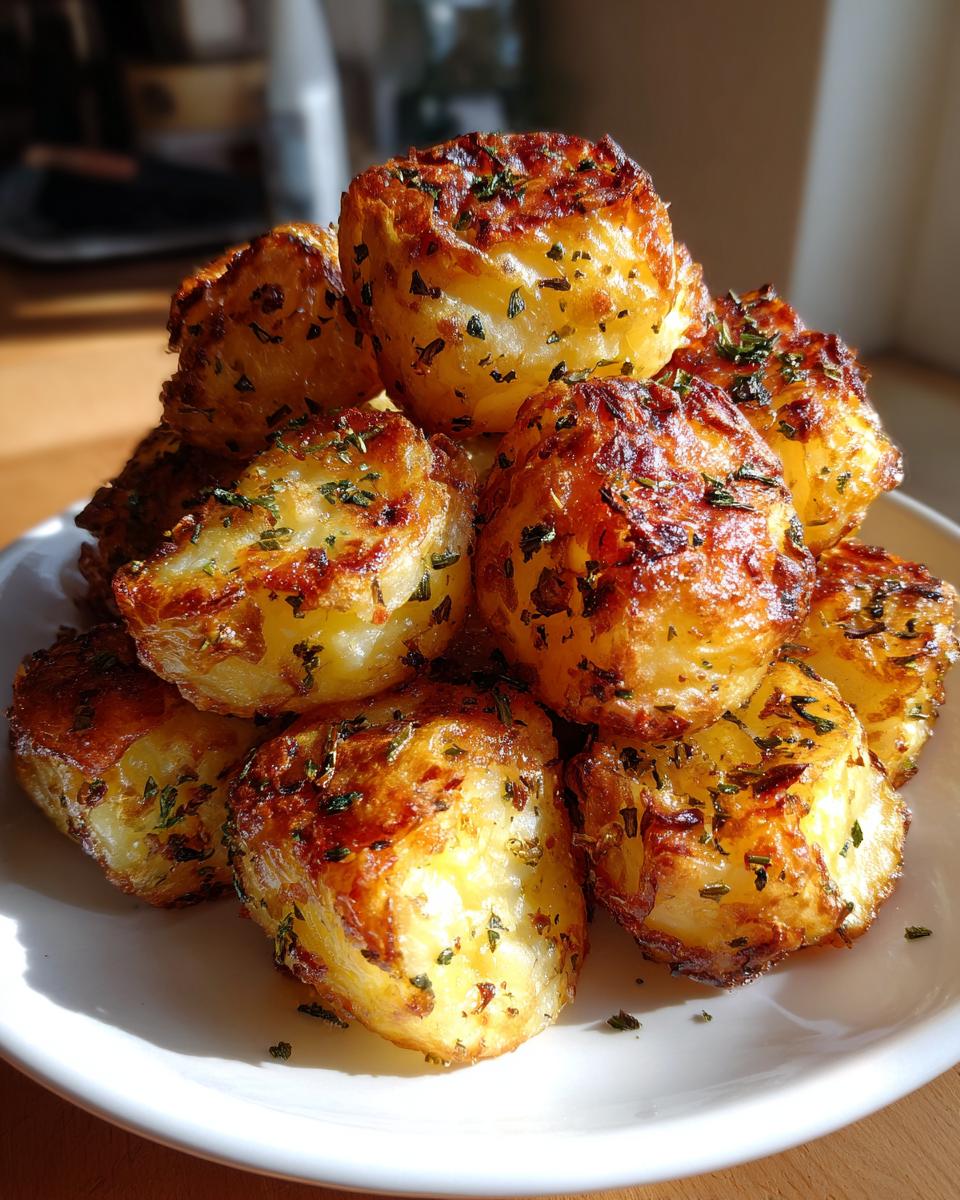
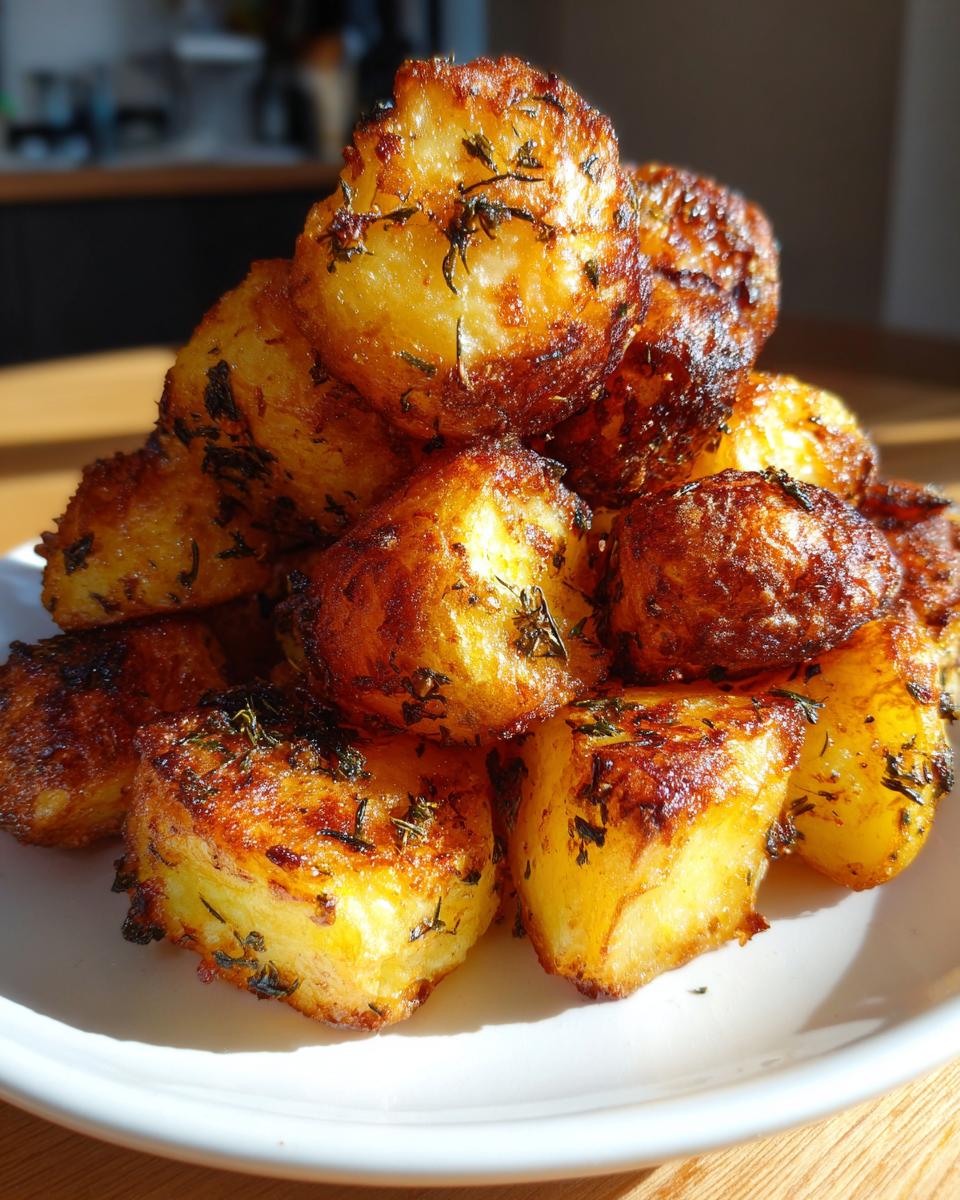
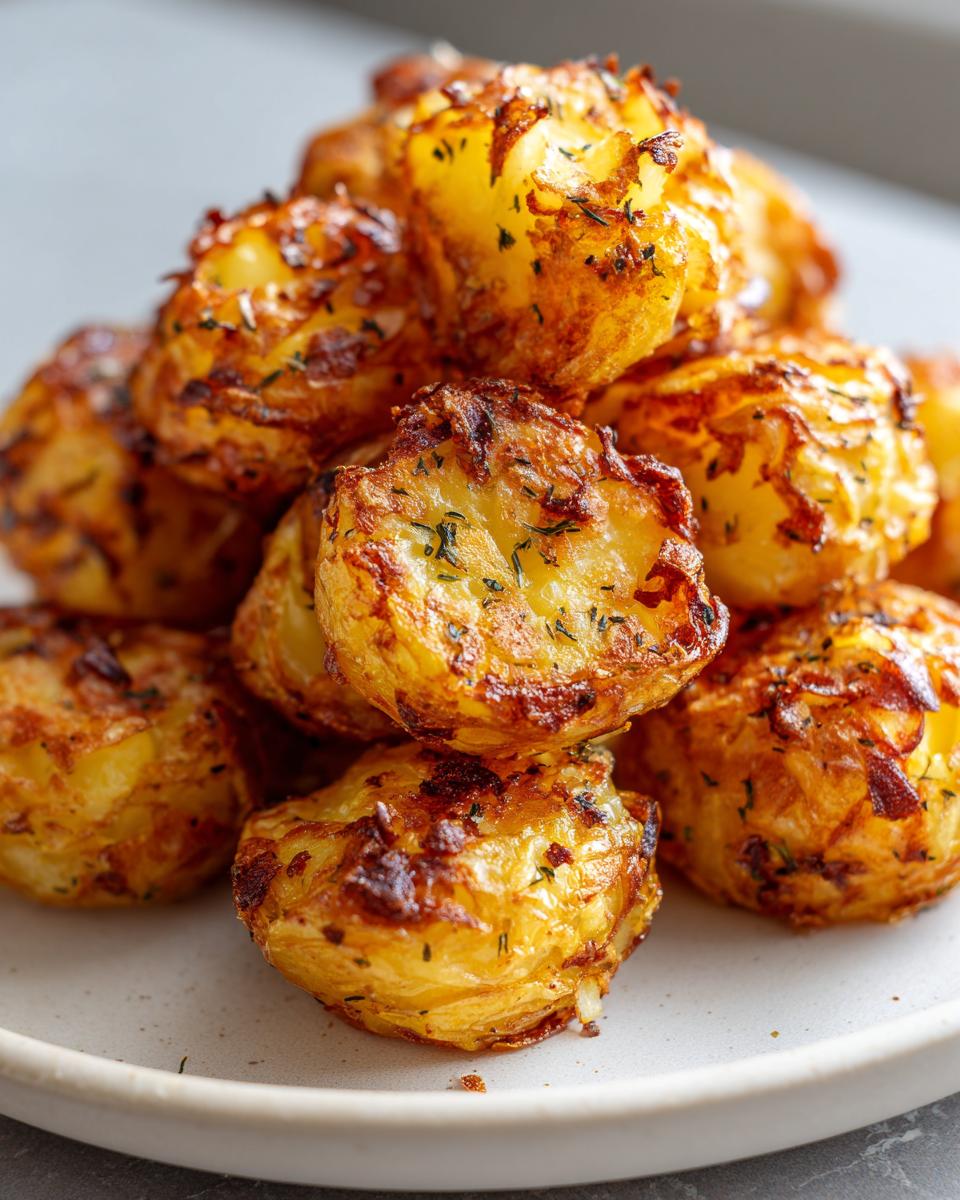
- Shatteringly Crisp Exterior: We are talking seriously golden brown potatoes! The high heat plus the trick in the boiling water creates crusts that crackle when you pierce them.
- Perfectly Fluffy Inside: Despite the amazing crispiness, the inside stays wonderfully soft and tender. You get that ideal fluffy inside crispy outside potatoes texture every single time.
- Simple Dinner Side Ideas: Even with the special boiling step, this is wonderfully easy. It’s a straightforward sheet pan potatoes recipe that fits into any dinner plan!
- Maximum Flavor, Minimal Effort: We layer garlic, rosemary, and other simple seasonings so that the flavor penetrates deep, giving you incredibly tasty Garlic Herb Roasted Potatoes without needing a million steps.
- Reliable Results: This is my foolproof roasted potato technique. If you follow the timing, you’re guaranteed that beautiful, golden finish without having to guess!
Ingredients for Perfect Oven Roasted Potatoes
Okay, gathering your supplies is the easy part! Honestly, the magic of these oven roasted potatoes comes from using nice, hearty potatoes and that one weird ingredient I mention later. Don’t panic about the list; everything here is super common and easy to grab at your regular grocery store.
For this recipe, I really prefer Yukon Gold because they keep their shape beautifully, but Russets are great if you want them extra fluffy inside. Just stick to the cutting size!
- 2.5 lbs Yukon Gold or Russet potatoes, scrubbed and cut into 1.5-inch chunks
- 1 teaspoon baking soda (This is our biggest secret weapon for that amazing crunchy crust, don’t skip it!)
- 1/2 cup olive oil, divided (We split this to make sure everything gets coated without burning.)
- 1 teaspoon kosher salt
- 1/2 teaspoon black pepper
- 1 teaspoon garlic powder
- 1 teaspoon dried rosemary
- 1/2 teaspoon onion powder
- 2 cloves garlic, minced (This gets added halfway through so it doesn’t burn off completely.)
- 2 tablespoons fresh parsley, chopped (Just for a pop of color at the very end!)
The Foolproof Technique for Crispy Oven Roasted Potatoes
Now, here is where the real magic happens! I’m going to walk you through how to roast potatoes perfectly. You see, crispy oven roasted potatoes don’t just happen by luck; they happen because of science—and a little bit of elbow grease when shaking the colander. This method, which involves a quick boil with baking soda, is the absolute key to getting those irresistible golden brown potatoes.
Step 1: Preparing the Potatoes for Maximum Crispiness
First things first, crank that oven up to 425°F (220°C). We need serious heat! Cut your potatoes into those consistent 1.5-inch chunks we talked about. Now for the real trick: put the potatoes in a big pot, cover them with cold water, and here’s the kicker—add one teaspoon of baking soda. When you bring this water to a rolling boil, something wild happens right away. The baking soda helps dissolve the outermost layer of starch on the potato. That starchy residue? That’s what turns beautifully crunchy later on, creating that lovely crust!
Once it’s boiling hard, set your timer for exactly 8 minutes. Don’t go over! This short boil softens the inside just enough for fluffiness but keeps the potato firm enough not to turn to mush.
Step 2: Roughing Up the Edges for Golden Brown Potatoes
Drain those potatoes immediately into a colander. Don’t rinse them, just let them sit there for about five minutes to steam off the excess water. This is important! Then, put the colander on the counter and gently shake it a few times. Seriously, just a gentle jiggle. You’ll actually see the edges get kind of fuzzy or rough looking. That rough, starchy surface is your golden ticket to success. It gives the oil something to grab onto when roasting.
Step 3: Seasoning and Initial Roasting of Oven Roasted Potatoes
In a big mixing bowl—your largest one, please!—toss those roughed-up potatoes with half of your olive oil (that’s about 1/4 cup), plus all your salt, pepper, garlic powder, rosemary, and onion powder. Make sure every single chunk is coated. Now, this next part is non-negotiable for achieving the best roasted potatoes recipe: Spread them on your baking sheet in a single, even layer. If they are piled up, they will steam, and we hate soggy potatoes! Roast them just like this for 20 glorious minutes. If you want that extra garlic punch, drizzle the minced garlic over them during the last five minutes of this initial roast.
Step 4: The Final Crisp: Roasting Oven Roasted Potatoes Perfectly
When those 20 minutes are up, pull the sheet pan out. Carefully drizzle the remaining olive oil over everything, maybe give them a gentle toss right there on the pan just to flip them over. Back into the 425°F oven they go for another 20 to 25 minutes. Keep an eye on them now! You want them deep golden brown and looking ready to jump off the pan. When they look shatteringly crisp, they are done. If you’re serving these alongside my easy chicken and green beans dinner, they’ll be ready at the same time!
Ingredient Notes and Potato Type Substitutions for Oven Roasted Potatoes
Part of what makes this recipe my favorite easy potato side dish is how forgiving it is, but I want you to have the absolute best results! Since technique is everything here, let’s talk about what you put in the bowl beyond the salt and rosemary. Getting the fat choice and potato type right really helps you nail that fluffy inside crispy outside potatoes goal.
The primary difference people ask me about is the potato itself. I listed Yukon Gold and Russet because they are workhorses, but they behave differently!
Yukon Gold vs. Russet: If you love potatoes that hold their shape no matter what, go with Yukon Gold. They are naturally a bit denser and waxy, so they give you a beautifully crisp exterior while staying firm inside. Russets, however, are starch bombs! They break down much more easily during that initial boil and rough-up stage. That means you get an incredible, almost whipped interior. They might break apart just a touch more, but wow, the fluff factor is unreal. Either way, this foolproof roasted potato technique wins.
Now, let’s talk fat. We used olive oil because it has a high smoke point and pairs so well with the garlic and herbs. But listen, this is your kitchen, too! If you want deeper flavor, try swapping out half the olive oil for melted butter. That’s going to give you richer, buttery roasted potatoes that taste straight-up decadent. For real gourmet treatment, use duck fat if you have it—it makes everything crispy and delicious! Just remember to account for the fat content if you are using something very soft like butter, which can lower the overall flash point slightly.
If you ever need a rich sauce to go with these amazing spuds, check out my recipe for homemade brown gravy without drippings. It’s perfect for smothering anything left over!
Flavor Variations for Your Garlic Herb Roasted Potatoes
The base recipe we nailed down is my go-to—it’s classic, savory, and reliable! Those Garlic Herb Roasted Potatoes sing with rosemary and garlic powder. But who wants the same thing every week, right? That’s the beauty of cooking at home; you can pivot based on what you have or what you’re craving alongside your main dish. I have a few simple swaps that turn these into completely new side dishes without messing up that perfect crispy exterior we worked so hard to achieve!
Don’t change the boil or the rough-up step, though. That’s the structure! Change the spices, not the texture, and you win every time. If you happen to be whipping up a batch of my easy 15-minute beer cheese dip for game day, you definitely want to tailor your potato flavors to match!
Here are my top three variations for taking your oven roasted potatoes up a notch:
- Cheesy Goodness: Parmesan Roasted Potatoes: About 10 minutes before your potatoes come out of the oven (Step 4), pull them out, toss them gently right there on the pan, and sprinkle them heavily with freshly grated Parmesan cheese. Pop them back in until the cheese is melted and beautifully golden brown at the edges. The salty, sharp flavor of the Parmesan is incredible with the fluffy insides. You get that salty, savory crunch that everyone loves!
- A Touch of Heat: Smoked Paprika & Chili Flakes: If you want a BBQ vibe or are serving something spicy, ditch the rosemary entirely for this one. Toss the potatoes in the seasoning step with 1 teaspoon of smoked paprika and maybe 1/4 teaspoon of red pepper flakes—or more, if you’re feeling brave! The paprika gives them a deep, almost fire-roasted color just like those amazing crispy potatoes oven shots you see everywhere.
- Bright & Zesty: Lemon Pepper Throwdown: For something totally different, especially good next to fish or chicken, skip the dried rosemary and onion powder. Instead, use standard salt, pepper, and garlic powder, and when you add the second drizzle of olive oil in Step 4, mix that oil with the zest of one whole lemon and 1 teaspoon of good quality lemon pepper seasoning. Toss quickly and get them back into the heat. The lemon lifts the flavors instantly!
See? It’s so easy to swap things up. As long as you keep that high heat and the rough edges, these oven roasted potatoes are guaranteed delicious, no matter what spices you choose!
Tips for Success When Making Oven Roasted Potatoes
I’ve been making oven roasted potatoes for so long now that I could probably do it in my sleep, but those early attempts were… well, let’s just say they weren’t *shatteringly crisp*. I want to save you any disappointment! These few nuggets of wisdom are what I learned after ruining enough batches to fill a small wagon. This is my hard-won experience boiled down for you so you can jump straight to potato perfection.
If you follow the main recipe steps, you’re golden, but these little extras are what take you from “good side dish” to “the reason the dinner stops talking.” Honestly, if you’re looking for more quick wins in the kitchen, you have to check out my guide on quick crusty French bread—it pairs amazing with these spuds!
- Don’t Skimp on the Heat: I can’t stress this enough! We’re roasting at 425°F, and that’s non-negotiable. If you toss these into a medium oven (say, 350°F), they’ll slowly leech moisture and just steam themselves into soft, sad lumps. We need that blast of high heat right away to set that crispy exterior ASAP.
- Pan Crowding is the Enemy: Remember the lesson from Step 3? If you pile your potatoes on top of each other, they start steaming, and you lose all that beautiful, rough surface area we worked so hard creating with the baking soda. If you have to use two sheet pans instead of one big crowded messy one, use two! Give your oven roasted potatoes some personal space to breathe and crisp up properly.
- The Baking Soda is Mandatory: Yes, I know it sounds weird—you’re boiling your potatoes in laundry cabinet soda water? (Kidding! It’s food grade!) But that baking soda is the single most important ingredient for texture outside of the potato itself. It raises the pH of the water, which in turn helps break down the pectin in the potato skin. This is what allows that starchy, fuzzy coating to form during the drain and shake. If you skip it, they won’t get that perfect crunch. If you’re feeling doubtful, take a look at what I learned from others who’ve tried this crispy roast recipe.
- Oil the Pan, Not Just the Potatoes: Everyone remembers to drizzle the oil over the spuds, which is great. But here’s a little cheat: Take a tiny bit of your initial oil and brush the bottom of your sheet pan before you spread the seasoned potatoes out. Adding a little fat underneath helps prevent sticking and gives those bottom pieces an extra barrier against the hot metal, making them deeply golden right from the start!
Serving Suggestions for This Easy Potato Side Dish
This is the beauty of the perfect oven roasted potatoes, isn’t it? They aren’t fussy! They are sturdy enough to hold up to rich sauces and flavorful enough to stand proudly next to something simple. I designed this recipe to be the ultimate versatile player in your kitchen arsenal—truly one of the best Simple Dinner Side Ideas you can have in your rotation.
No matter what you’re cooking this week, these potatoes adapt. They are fantastic for a casual Tuesday but look just as gorgeous piled high on the table for Thanksgiving. When I make a big holiday meal, these are the first side dish I make because they can sit warm for a bit without turning limp!
Here are my favorite pairings for these golden, crunchy beauties:
- The Sunday Roast Staple: You absolutely have to try these alongside a classic roast chicken or a perfectly cooked pork loin. The herbs we used (rosemary!) naturally complement roasted meats. If you want to add another layer of flavor to your plate, you could try whipping up a batch of my easy creamy horseradish sauce to dip the potatoes into! It’s wild.
- Steak Night Upgrade: Forget the plain baked potato for once. These crispy, seasoned cubes are the perfect vehicle for soaking up steak juices. They work brilliantly with anything grilled, from a simple flat iron steak to a fancy ribeye.
- Holiday Side Dishes Potatoes: These shine at holiday tables. They are phenomenal next to baked ham or even a roast turkey. Their deep color makes the plate look instantly more appealing than standard mashed potatoes do. They are rich enough to feel special but straightforward enough not to stress out the cook.
- Brunch Helper: Don’t box these into dinner only! They are fantastic next to scrambled eggs, bacon, and a little side of that runny yolk. They’re much better than dull hash browns, trust me!
Seriously, these potatoes go with everything, which is why they remain my number one easy potato side dish recommendation. It’s all about that crunchy exterior we worked so hard to create!
Storage and Reheating Instructions for Oven Roasted Potatoes
Okay, let’s be real. If you’re making the best oven roasted potatoes using my special technique, there probably won’t be many leftovers. But, just in case you *do* manage to save any of those perfectly golden chunks, we need to talk about how to store them correctly so they don’t turn into sad, limp sponges overnight.
We want to preserve that hard-earned crispiness! The biggest mistake people make the next day is grabbing the microwave. Never, ever microwave these delicious crispy roasted potatoes. The steam will instantly turn your beautiful crust soft. If you need to reheat them, you need that high heat again!
- Storing Them Right: Let the potatoes cool down completely after you take them out of the oven. Once they are totally room temperature, put them into an airtight container. If you try to seal them while they are warm, the trapped steam will absolutely ruin the texture. They should keep well in the fridge for about three to four days.
- The Reheat Strategy: When you’re ready for round two, you have two great choices, depending on how much time you have. The absolute best way is using the oven again. Spread those cold potatoes back out onto a rimmed baking sheet—and please, make sure they are in a single layer!—and bake them at 400°F for about 8 to 10 minutes. This dries out any residual fridge moisture and crisps up the edges again.
- The Quick Fix: Air Fryer Magic: If you have an air fryer, you are going to love this! It’s actually faster than the conventional oven for reheating. Pop the leftover potatoes in your air fryer basket (don’t overcrowd, maybe do smaller batches) at about 375°F for 4 to 6 minutes. They come out shockingly close to fresh-from-the-oven quality!
The key takeaway is simple: High, dry heat is your friend for reheating. Keep them spread out on a pan, and you’ll still get that satisfying crunch you crave from the perfect oven roasted potatoes!
Frequently Asked Questions About Oven Roasted Potatoes
I get so many messages asking for clarification on a few points, especially when people try to adjust the timing or tweak the technique for their first batch of oven roasted potatoes. Don’t sweat it if you have questions! We all start somewhere. Here are the common things my readers ask me about getting that perfect texture.
How do I keep my oven roasted potatoes from getting soggy?
This is the biggest hurdle, right? If you want to avoid the dreaded soggy potato, you have to nail two things we talked about. First, you must do that initial parboil with the baking soda. That step is what breaks down the surface starches so they can get rough and fuzzy when you shake them. Second, and this is huge, do not overcrowd the pan! If you pile them on top of each other, the moisture they release has nowhere to go but back down onto the potato. Spread them out in a single layer so they are roasting, not steaming. That keeps them beautifully crisp!
Can I use Russet potatoes instead of Yukon Gold for this crispy potatoes oven recipe?
Yes, absolutely! I give the nod to Yukon Golds because they tend to hold their shape a little better, even after the boil, which makes for prettier, uniformly shaped fries or cubes. However, if you are chasing that ultra-fluffy, cloud-like interior combined with the crisp shell—which is what the very best crispy potatoes oven results look like—Russets are your best bet! Russets have higher starch content, so they fluff up much more dramatically. Just be extra gentle when you’re roughing up the edges in Step 2 so they don’t totally disintegrate on you.
What is the best temperature for how to roast potatoes perfectly?
You need serious, consistent heat to shock those potato edges into crispiness! For this recipe, we use 425°F (220°C). Don’t try to be a hero and rush it by setting the oven higher because that just runs the risk of burning the outside before the inside cooks. The goal here is high heat roasting. That temperature blasts away the exterior moisture quickly while giving the inside enough time to turn soft and fluffy. If your oven runs cool, you might bump it up to 450°F for the last 10 minutes, but 425°F is the sweet spot for reliable results when you follow how to roast potatoes perfectly!
If you’re planning your whole week’s menu, check out my collection of weeknight dinner ideas for easy pairing inspiration!
Sharing Your Crispy Potatoes Oven Success
Alright, my friend, you’ve tackled the boiling, you’ve roughed up those edges, and I bet your kitchen smells incredible right now! You’ve officially mastered the technique for genuinely amazing oven roasted potatoes. Now that you’ve made the crispy potatoes oven dreams come true, I would be so thrilled if you came back and told me all about it!
This community is built on sharing what works—and what doesn’t—so your feedback truly helps the next home cook achieve that perfect crunch. Remember, Rosa is here to cheer you on!
- Give Me a Rating! If these were the best roasted potatoes you’ve ever made, please take a second to tap those stars at the top of the page and give this recipe a rating. If they were phenomenal, tell everyone why!
- Drop a Comment: Did you try the Parmesan variation? Did you use duck fat instead of oil? I absolutely love hearing how you adapted the recipe for your own table. Let me know in the comments below how crispy those edges got!
- Share the Love: If you took a picture of your glorious, golden plate of potatoes—and I hope you did!—snap a photo and share it on Instagram or Pinterest. Tag me so I can see your beautiful handiwork! It helps other busy cooks find this foolproof method.
And hey, if you’re already thinking about your next meal, why not try something completely different? These potatoes are amazing with savory dishes, but sometimes you just want something sweet in the morning. Check out my collection of easy breakfast recipes for some fresh ideas!
Thank you so much for inviting this recipe into your home kitchen. Happy roasting!
PrintThe ULTIMATE Crispy Oven Roasted Potatoes: Perfectly Fluffy Inside & Shatteringly Crisp Outside

Learn the foolproof technique for making the best oven roasted potatoes. This recipe guarantees golden, crunchy exteriors and soft, fluffy interiors every time. It is an easy potato side dish perfect for weeknight dinners or holiday meals.
- Prep Time: 15 min
- Cook Time: 45 min
- Total Time: 60 min
- Yield: 6 servings 1x
- Category: Side Dish
- Method: Roasting
- Cuisine: American
- Diet: Vegetarian
Ingredients
- 2.5 lbs Yukon Gold or Russet potatoes, scrubbed and cut into 1.5-inch chunks
- 1 teaspoon baking soda
- 1/2 cup olive oil, divided
- 1 teaspoon kosher salt
- 1/2 teaspoon black pepper
- 1 teaspoon garlic powder
- 1 teaspoon dried rosemary
- 1/2 teaspoon onion powder
- 2 cloves garlic, minced (optional)
- 2 tablespoons fresh parsley, chopped (for garnish)
Instructions
- Preheat your oven to 425°F (220°C). Place the potato chunks in a large pot and cover them with cold water. Add 1 teaspoon of salt.
- Bring the water to a rolling boil over high heat. Once boiling, add the baking soda. The water will foam up immediately.
- Boil the potatoes for exactly 8 minutes. This step is crucial for creating the starchy, rough surface needed for crispiness.
- Drain the potatoes completely in a colander. Let them sit for 5 minutes to allow excess moisture to evaporate. Gently shake the colander to rough up the edges of the potatoes; this creates more surface area for crisping.
- In a large bowl, toss the roughed-up potatoes with 1/4 cup of olive oil, salt, pepper, garlic powder, dried rosemary, and onion powder until evenly coated.
- Spread the seasoned potatoes in a single layer on a large, rimmed baking sheet. Do not overcrowd the pan; use two sheets if necessary.
- Roast for 20 minutes. Remove the pan from the oven, drizzle with the remaining 1/4 cup of olive oil (and minced garlic, if using), and toss the potatoes gently.
- Return the potatoes to the oven and roast for another 20 to 25 minutes, flipping halfway through, until they are deep golden brown and shatteringly crisp.
- Remove from the oven. Sprinkle immediately with fresh parsley before serving hot.
Notes
- Using baking soda during the boil breaks down the starches on the exterior, which is the secret to maximum crispiness.
- For extra flavor, you can substitute half of the olive oil with melted butter or duck fat.
- Yukon Gold potatoes generally hold their shape better, while Russets yield a fluffier interior.
Nutrition
- Serving Size: 1.5 cups
- Calories: 310
- Sugar: 1
- Sodium: 350
- Fat: 18
- Saturated Fat: 2.5
- Unsaturated Fat: 15.5
- Trans Fat: 0
- Carbohydrates: 35
- Fiber: 4
- Protein: 4
- Cholesterol: 0