
If you’re like me, you’ve probably spent way too much time searching the internet for that mythical recipe—the one that delivers a deeply fudgy, decadent chocolate cake without leaving you with a sink full of bowls. Well, stop looking! I’ve finally nailed it down. This is my tried-and-true, can’t-fail version: The Ultimate One-Bowl Moist Chocolate Cake with Rich Buttercream. After years of juggling my classroom lessons and family dinners, I learned that incredible flavor shouldn’t require a complicated process. Trust me, this simple, from-scratch chocolate cake is reliable enough for a Tuesday night and rich enough for the biggest birthday bash.
- Why This One-Bowl Moist Chocolate Cake Recipe Works (The Secret to Moisture)
- Ingredients for the Ultimate Moist Chocolate Cake
- Step-by-Step Instructions for Your Easy Chocolate Cake Recipe
- Tips for the Best Homemade Chocolate Cake Experience
- Variations on the Classic Chocolate Cake
- Storage and Reheating Your Chocolate Cake
- Frequently Asked Questions About This Chocolate Cake
- Nutritional Estimate for this Decadent Chocolate Dessert
- Share Your Ultimate Chocolate Cake Success
Why This One-Bowl Moist Chocolate Cake Recipe Works (The Secret to Moisture)
I know so many recipes promise the world, but this moist chocolate cake is truly different, and it’s all about the liquids we use and that glorious one-bowl method. Being a busy mom, clean-up time is almost as important as taste testing time! The magic here isn’t just that it’s fast; it’s the texture. You are getting a wonderfully fudgy cake because of two key players: buttermilk and hot liquid.
The buttermilk adds a little acidity that reacts beautifully with the baking soda, giving us the perfect lift without that dry, crumbly texture you get from other recipes. Combined with the oil instead of all butter, it guarantees this cake stays soft for days—seriously, days! This is what separates a good dessert from the *best homemade chocolate cake* you’ll ever bake. If you are looking for easy baking recipes that don’t skimp on flavor, you’ve found it.
The Role of Hot Coffee in Your Chocolate Cake
Okay, deep breath: don’t panic about the coffee! When I first saw this step, I was nervous, but this is where we lock in that intense, deep chocolate profile. Pouring in hot coffee—even if it’s decaf or just hot water—does something amazing. It actually ‘blooms’ the cocoa powder. That means it fully dissolves those cocoa particles, releasing all their rich, dark flavor compounds.
You won’t taste coffee, I promise. You’ll just taste the richest chocolate you’ve ever made from scratch. That hot liquid creates the necessary structure for this ultra-rich cake batter to actually become that thin, pourable liquid that bakes up perfectly fudgy.
Ingredients for the Ultimate Moist Chocolate Cake
As I always say, you can’t make a great cake with weak instructions! Getting the ingredients right upfront is half the battle, especially since we are counting on that one-bowl method to do all the hard work. Don’t substitute things like the buttermilk, okay? It really matters for that tender crumb we are after in this chocolate cake.
Here’s exactly what you need to gather for both the batter and the amazing topping that makes this a proper celebration dessert.
For the Chocolate Cake Batter
First, let’s get those dry things whisked together really well. Remember, we are using one bowl, so we need everything well distributed!
- 1 3/4 cups all-purpose flour
- 1 3/4 cups granulated sugar
- 3/4 cup unsweetened cocoa powder (Make sure this is good quality!)
- 1 1/2 teaspoons baking soda
- 1 1/2 teaspoons baking powder
- 1 teaspoon salt
Next up are the wet ingredients. I always have these measured out before I even start whisking the dry stuff. And when I say hot, I mean hot—we need that steam releasing the flavor!
- 2 large eggs, just lightly beaten in a separate small bowl
- 1 cup buttermilk (Make sure it’s room temperature if you can!)
- 1/2 cup vegetable oil
- 2 teaspoons vanilla extract
- 1 cup hot strong brewed coffee (Or hot water if you absolutely must skip the coffee secret!)
For the Rich Chocolate Frosting
Now for the topper! This is a fantastic, rich chocolate frosting that whips up beautifully and isn’t overly sweet. Once you taste this homemade frosting, you’ll never go back to store-bought, I promise.
- 1 cup unsalted butter, totally softened to room temperature
- 3 1/2 cups powdered sugar (Sifted is best, trust me on this!)
- 3/4 cup unsweetened cocoa powder
- 1/2 cup heavy cream (Cold works great here)
- 1 teaspoon vanilla extract
- Pinch of salt
Step-by-Step Instructions for Your Easy Chocolate Cake Recipe
Alright, time to put those gorgeous ingredients to work! I designed this recipe to prove that you can make a beautiful, deeply flavored easy chocolate cake recipe without hovering over multiple bowls. This is the kind of baking where you feel like a genius because the process is so quick, but the results look like you spent all day on them. Come on over to the sink, because we are doing this all in one spot!
First things first, let’s get that oven warmed up. Preheat your oven to a steady 350°F (175°C). Then, grab two 9-inch round cake pans. Make sure you grease them really well—I mean, really well—and dust them lightly with flour, or better yet, cut out circles of parchment paper to line the bottom. Chocolate cakes love to stick, and we need these layers to come out perfect so we can assemble our ultimate chocolate cake!
Mixing the One Bowl Cake Recipe
Grab that big mixing bowl. Toss in all your dry ingredients—the flour, sugar, cocoa, baking soda, baking powder, and salt. Use a whisk and just mix it until you don’t see any white streaks of flour anymore. Now, add your eggs, the buttermilk, the oil, and the vanilla right on top of that dry mess. Turn your mixer on medium speed—don’t splash!—and beat it for a solid two minutes, scraping down the sides once or twice. The batter will actually look a little strange here, almost stiff.
Here comes the crucial step for our moist chocolate cake: Carefully pour in that hot coffee or water just while the mixer is running on low speed. Mix it until it’s just combined. Seriously, stop mixing as soon as it’s uniform. I know it seems thin, almost runny, but that’s exactly what you want for that incredible fudgy texture! Don’t overmix, or the magic disappears fast.
Baking and Cooling the Chocolate Cake Layers
Divide that beautiful, thin batter evenly between your two prepared pans. Pop them gently into your preheated 350°F oven. You’ll want to bake them for about 30 to 35 minutes. How do you know they are done? Insert a wooden pick into the center; if it comes out with moist crumbs clinging to it, you’re good to go! Not wet batter, just moist crumbs.
Leave them alone in the pans for just 10 minutes. This little rest is important so they firm up just enough. After ten minutes, carefully flip those pans over onto a wire rack to cool completely. They need to be stone-cold before we even think about grabbing that frosting, trust me.
Preparing the Rich Chocolate Frosting
While those layers chill out, let’s make the frosting. In a clean, large bowl, beat your softened butter until it looks really creamy and pale. Now, we add the dry stuff—the powdered sugar and cocoa—alternating it slowly with the heavy cream. Start low so you don’t create a sugar cloud in your kitchen!
Once it’s mostly mixed, add the vanilla and salt, and then increase the speed. You want to beat this until it gets light and fluffy. If it seems too thick to spread over your homemade chocolate cake from scratch, just drizzle in another tiny splash of cream until it’s perfect for spreading.
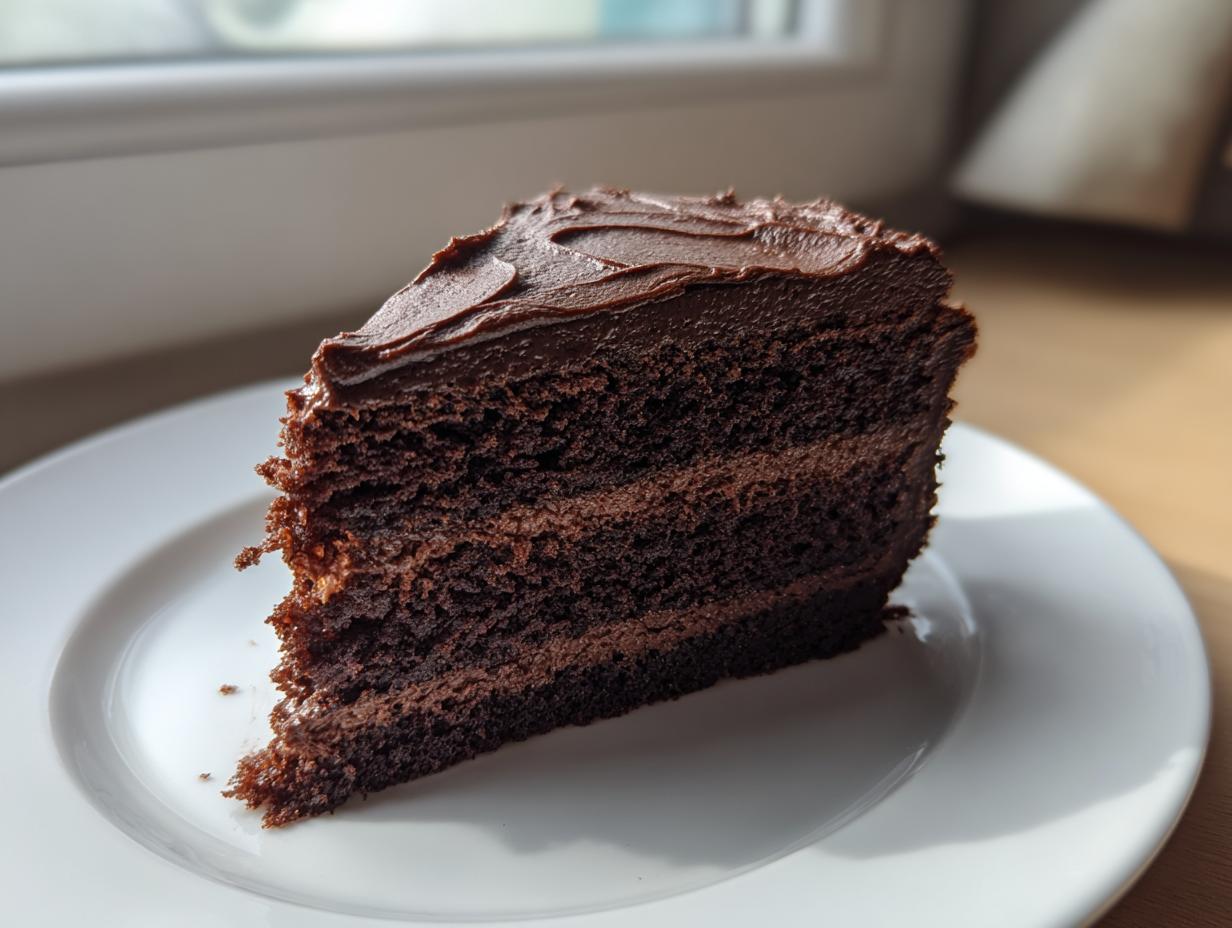
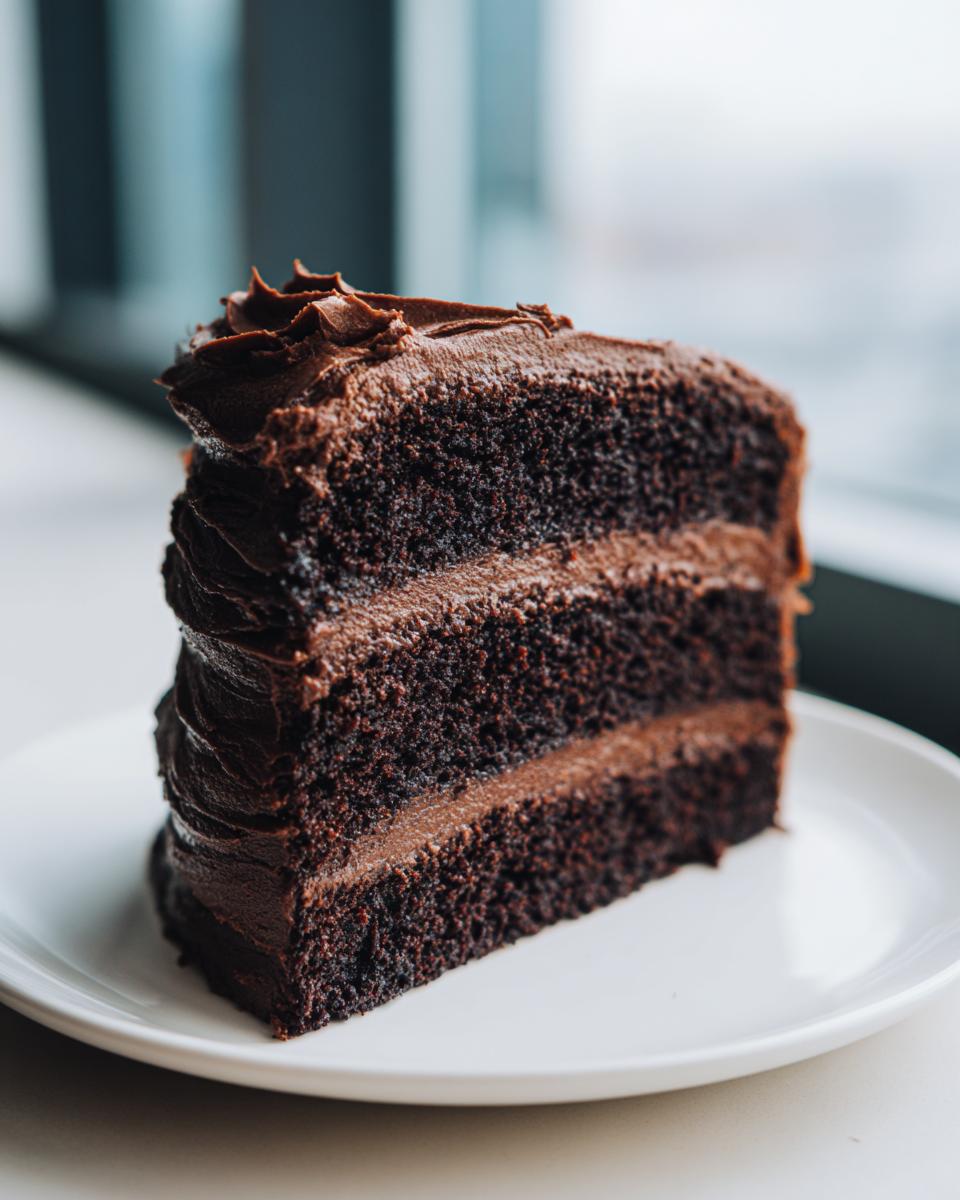
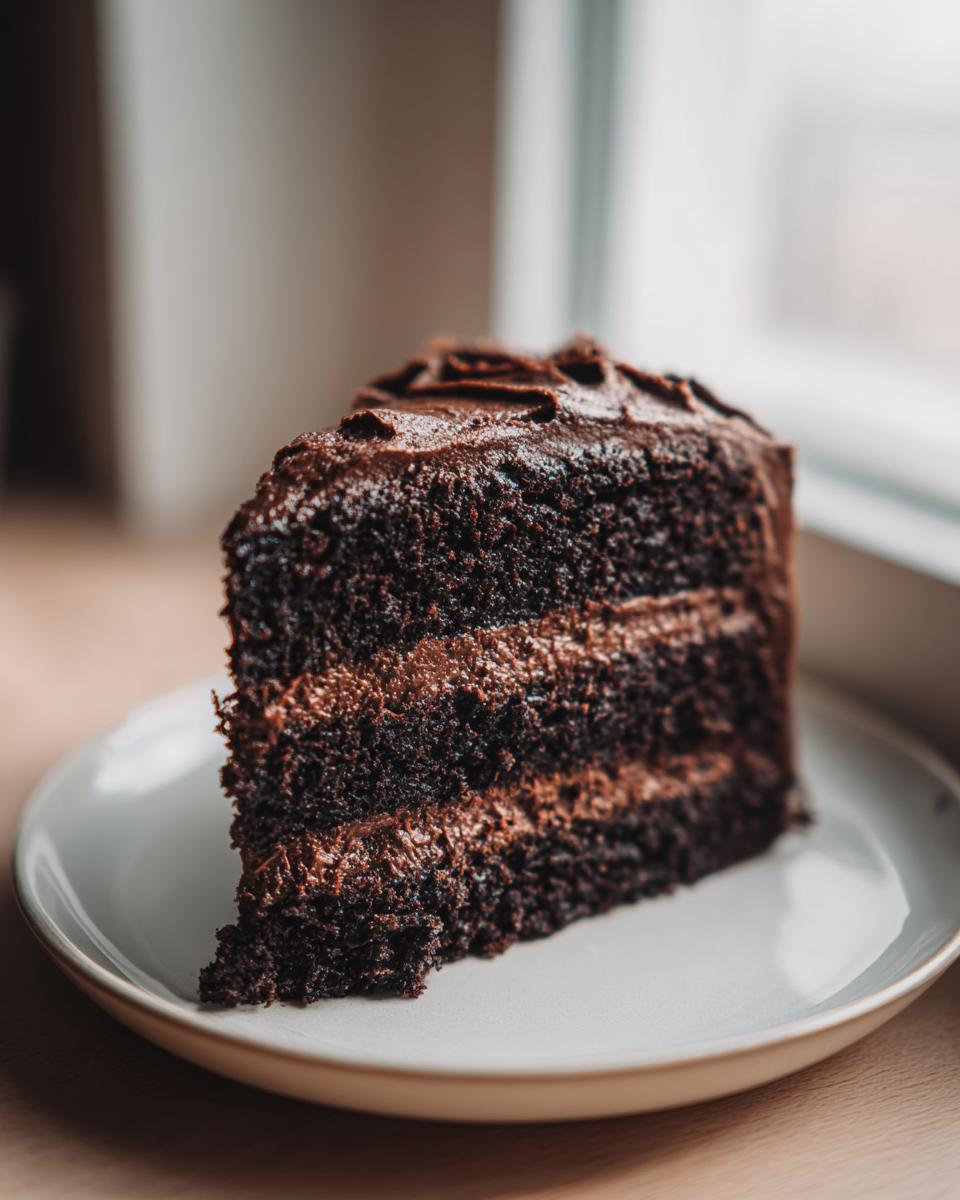
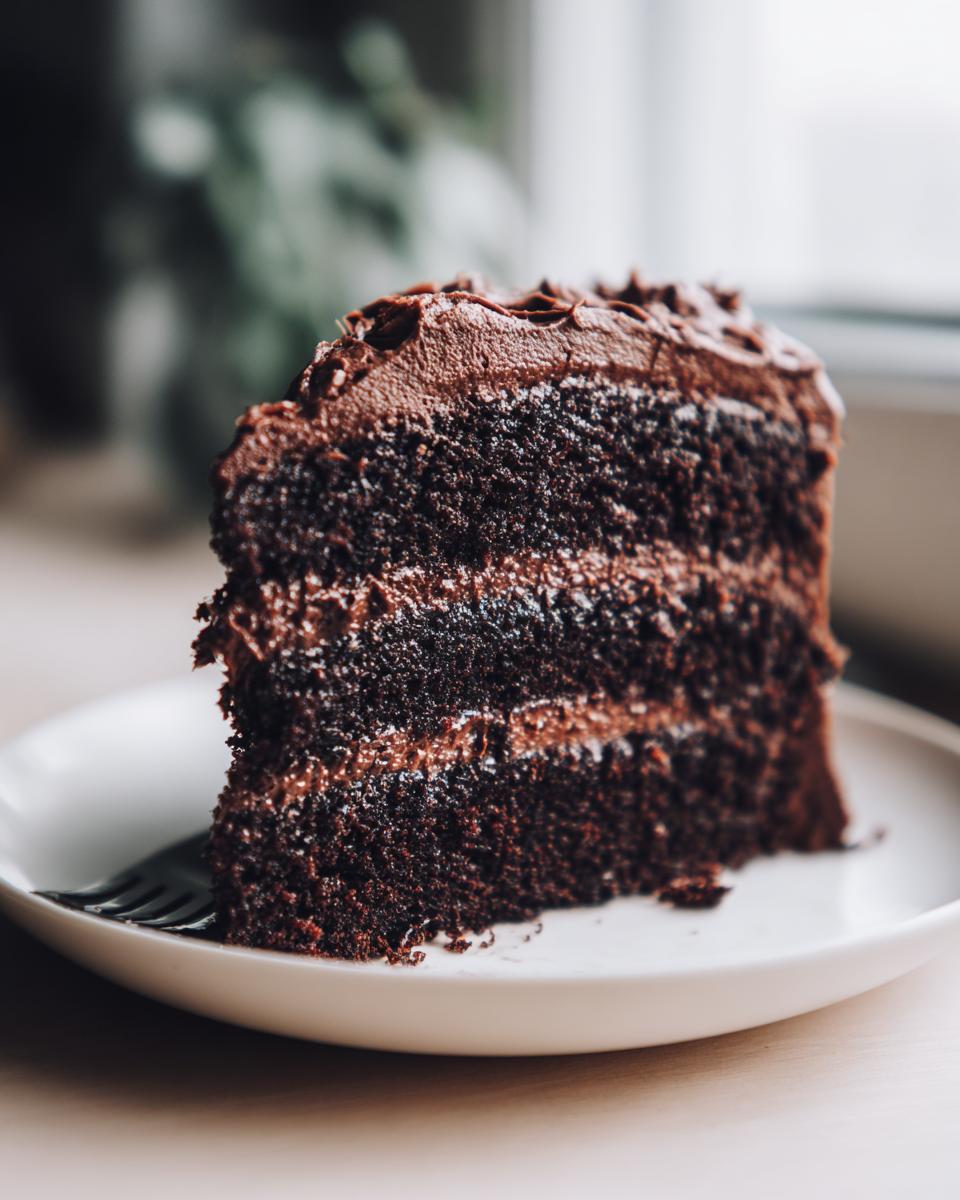
Assembling Your Homemade Chocolate Cake from Scratch
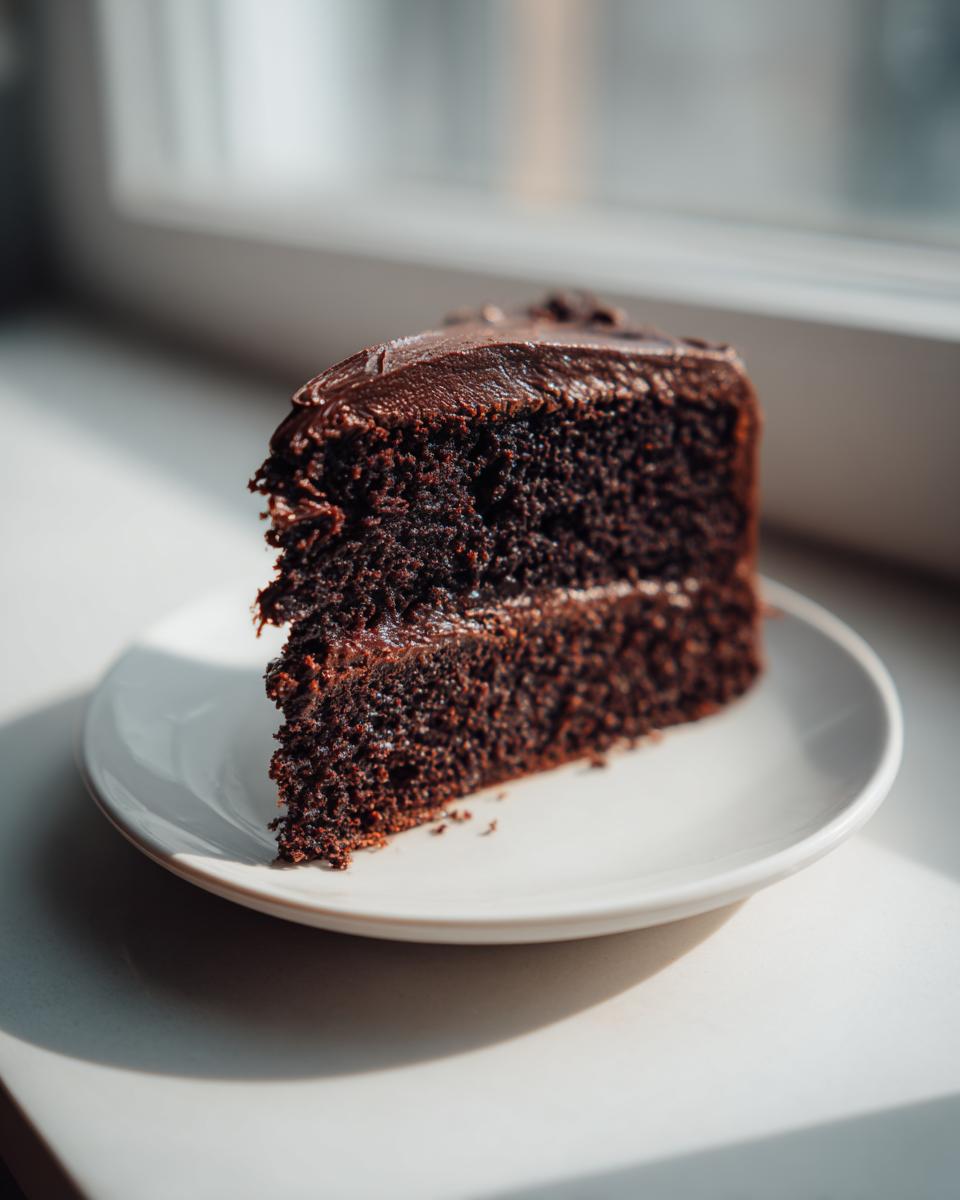
This is the fun part! Place your first cooled layer down on your serving plate. Take about one-third of that wonderful rich chocolate frosting and spread it evenly over the top. This layer of frosting acts like glue! Next, gently—very gently—place the second cake layer right on top.
Now, cover the entire masterpiece. Use the remaining frosting to cover the top and smooth it down the sides. This is your moment to shine and create a stunning chocolate birthday cake. If you want the absolute prettiest finish, I sometimes use a hot offset spatula dipped in hot water to smooth the final coat. Look at that! You just did it.
For more simple wins in the kitchen, check out my guide to easy baking recipes.
Tips for the Best Homemade Chocolate Cake Experience
You’ve got the recipe down, and the actual baking is done (hooray!). But if you want this chocolate cake to transition from great to legendary, especially if it’s going to be the star of a homemade birthday cake celebration, a few little tweaks really make the difference. These are the things I absolutely insist on when I bake for my family, ensuring every slice feels rich and that lovely fudgy texture holds up.
Remember, cooking is about knowing the rules so you can break them gracefully, but for this particular cake, sticking close to the technique keeps that signature moistness intact. These tips are my little secrets for that bakery-quality result without all the fuss.
Achieving Fudgy Chocolate Cake Texture
The absolute biggest mistake folks make when aiming for a fudgy chocolate cake is overworking the batter once that hot liquid goes in. When you add that cup of hot coffee, you are activating the cocoa powder (blooming!), and the batter gets really thin. That’s a good thing! It means you have dissolved all that chocolate goodness.
If you keep beating it on high trying to make it thick again, you’ll develop too much gluten in the flour, and boom—your cake turns chewy instead of tender and fudgy. After you pour in that hot coffee, just mix on the lowest setting until you see *just* the last streak of batter disappear, and then stop immediately. I mean it! Step away from the mixer. That thin batter is the key to maximum moistness.
Making This a No Mixer Chocolate Cake
Listen, I totally get it. Sometimes the stand mixer is already dirty, or maybe you just don’t have one! You can absolutely whip up this easy chocolate cake recipe by hand. It just takes a bit more elbow grease, and honestly, it’s great for getting your frustration out!
When you get to the part where you add the eggs, oil, and vanilla to the dry ingredients, you’ll need to whisk vigorously by hand for the full two minutes. Vigorously means effort! You have to work hard to incorporate air into that mixture to mimic what the electric mixer does. When it comes time to add the hot coffee, switch to a sturdy wooden spoon or spatula and just fold it in gently until combined. It works beautifully, it’s just a bit more of a workout!
For more foolproof methods for all your baking projects, check out my collection of best homemade desserts where reliability is always guaranteed.
Variations on the Classic Chocolate Cake
While I absolutely think this two-layer cake version is the pinnacle of what this recipe offers—perfect for stacking high for a birthday—sometimes you need a different shape, right? Maybe you’re heading to a potluck or just don’t want fiddly layers. Don’t you worry your pretty little head! This batter is so versatile, you can adapt it easily for a simple chocolate dessert or a big tray bake. It takes all the best parts of this classic chocolate cake and puts them into whatever pan you happen to have clean.
We designed this recipe for reliability, and that means it translates beautifully across different baking vessels. It’s all about knowing the adjustments needed, which are seriously minimal. Before you start pouring, just make sure your equipment is ready to go!
How to Make a Chocolate Sheet Cake Recipe
When I need to feed a crowd, I always default to the 9×13 pan. It’s my go-to for school events or big family gatherings because it covers so much surface area! To turn this into a perfect chocolate sheet cake recipe, you just need to adjust the container and the time slightly. The batter volume is perfect for one standard 9×13 inch pan—it won’t spill over, which is always a relief.
Make sure that 9×13 pan is greased and floured really well because sheet cakes can sometimes cling! Pour all the batter right in there. Since the batter is spread across a wider, shallower area, it bakes faster than our deep rounds. Check for doneness around the 35-minute mark, but you might push it closer to 40 minutes total. The toothpick test is your best friend here: you want moist crumbs, not wet batter. Honestly, topping this with the same rich buttercream and spreading it right to the edges makes for the easiest, most crowd-pleasing chocolate dessert!
For more super reliable and easy dessert ideas that always impress, have a look at my chocolate eclair cake recipe—another simple winner!
Storage and Reheating Your Chocolate Cake
One of the best parts about this moist chocolate cake is that it genuinely tastes even better on day two, which is a rare treat! I used to worry constantly that if I didn’t eat the whole thing immediately, it would dry out. Not with this recipe, thank goodness.
The best way to store your finished chocolate cake—once it’s fully frosted with that beautiful buttercream—is at cool room temperature for up to three days. Why room temp? Because refrigeration is the enemy of moisture, especially moist cakes! Cold air kind of sucks the softness right out of the crumb.
Keep it covered, of course, otherwise, it will get stale and attract kitchen dust bunnies. I usually use an actual cake dome, but if you don’t have one, just cover the plate loosely with plastic wrap, making sure the wrap doesn’t touch the frosting swirls too much. If you use a cake carrier, that’s even better!
Keeping the Buttercream Happy
The frosting is quite stable because it’s mostly butter and sugar, which is a great thing for storage stability! However, if your kitchen gets really warm—say, above 75°F—the beautiful chocolate peaks might start looking a little slumpy and sad. If that happens, you can pop the whole covered cake into the fridge for up to five days.
If you do refrigerate it, you MUST bring it back to room temperature for at least two hours before slicing. Seriously, two hours! Cold cake doesn’t taste as deeply chocolatey, and the texture will be firm. You want that lush, fudgy bite, not a slice that requires sawing.
Reheating Single Slices
Sometimes, you just need one perfect slice, right? If you stored leftovers in the fridge, let that individual slice sit out to warm up for 30 minutes or so. If you’re in an absolute rush and can’t wait, you can microwave a single slice very gently. Use just 8 to 10 seconds on 50% power. Don’t zap it too long! You just want to take the chill off so that rich, dark chocolate flavor wakes back up. It creates a lovely, slightly gooey texture that’s just amazing.
Frequently Asked Questions About This Chocolate Cake
I know you’re planning your bake, and maybe you still have a few little niggles in your mind. That’s totally normal! When I started adapting family recipes for the busy life, I had a million questions too. I’ve gathered the most common things folks ask about pulling off this moist chocolate cake perfectly. Hopefully, this helps you get straight into baking mode!
If you are looking for more quick wins, don’t forget to check out my guide on easy baking recipes for more great ideas.
Can I substitute the buttermilk in this chocolate cake?
Yes, you absolutely can make a great substitute if you don’t keep buttermilk on hand—though I really love the acidity it brings for maximum tenderness! If you are missing it, just take one cup of regular milk (whole milk works best) and stir in one tablespoon of white vinegar or fresh lemon juice. Let that sit on the counter for about five to ten minutes until it starts to look slightly curdled. That’s your homemade buttermilk!
The only small difference you might notice is that the homemade version can result in a crumb that is just a tiny bit softer or less dramatic in its reaction than store-bought buttermilk, but honestly, for this homemade chocolate cake from scratch, you won’t notice a huge difference at all. It works every time!
Is this recipe suitable as a simple chocolate dessert?
Oh, beyond suitable, it’s perfect! If you don’t want the big spectacle of a two-layer cake, this recipe scales down like a dream. You can totally make this into a wonderful simple chocolate dessert without any fuss. If you divide the batter into standard lined cupcake tins, you’ll get about 24 cupcakes, and they bake super fast—check them around 18 to 20 minutes. You can frost them with the same rich chocolate frosting, or even just dust them with powdered sugar if you are in a real rush.
Alternatively, pouring the entire single batch into a greased 9×13 inch pan makes an amazing sheet cake that is fantastic served warm with ice cream. So yes, it’s highly adaptable for those days when you just need a quick, amazing chocolate fix.
What is the best way to get a smooth finish on the rich chocolate frosting?
Ah, the eternal quest for smooth frosting! Buttercream can be tricky, especially when it’s this rich. Once you have frosted the cake and done your first rough layer, pop the whole thing into the fridge for about 15 minutes just to firm up that first coat a little bit. Then, it’s time for the final coat. My absolute favorite trick for the smoothest, most professional-looking finish? Get a clean, short metal spatula or an offset knife and dip the tip into a tall glass of very hot, almost boiling water.
Quickly wipe the excess water off with a paper towel so it’s just warm, not dripping. Then, use that warmed tool to smooth the sides and top of your frosting. The heat glides through the butter wonderfully, melting those tiny imperfections right away. Just wipe the spatula clean and re-dip it often. It makes a spectacular difference on a chocolate birthday cake!
Nutritional Estimate for this Decadent Chocolate Dessert
Now, let’s talk numbers. I teach elementary school, so I know that while we bake with love first and foremost, sometimes we need a quick ballpark figure for what’s in these treats. Because this recipe uses rich ingredients like oil, butter, and sugar to achieve that fantastic, moist chocolate cake texture, the numbers might look a little cozy!
Please remember, this is just a guide, not a strict nutritional analysis. I’m measuring flour and cocoa, not running a licensed lab! These figures are based on standard ingredient calculations for one serving, sliced from the full recipe. Think of this as ‘happy estimate’ information for your next chocolate birthday cake preparation.
- Serving Size: 1 slice
- Calories: Around 450
- Sugar: Approximately 45g (It is a decadent chocolate dessert, after all!)
- Fat: About 25g (That’s the butter and oil giving us that amazing, fudgy crumb. Worth it!)
- Saturated Fat: Around 14g
- Carbohydrates: Roughly 58g
- Protein: About 5g
- Cholesterol: Around 65mg
This homemade chocolate cake from scratch is certainly an indulgence, not an everyday breakfast, but when those cravings hit? This is certainly the way to satisfy them! Bake it with joy, and enjoy every single bite of that rich flavor.
Share Your Ultimate Chocolate Cake Success
Phew! We made it through the ultimate kitchen adventure together. I really hope you feel empowered now to skip those boxed mixes and bake this gorgeous, ridiculously moist chocolate cake from scratch. This recipe is a piece of my heart, bringing that warmth from my grandma’s kitchen straight to your home, which is the whole point of Rosa’s Tasty Kitchen, isn’t it?
When you pull those perfect, rich layers out of the oven, or when you finally get that smooth coat of frosting onto your chocolate birthday cake, I want to see it! Baking is so much better when we share the results. Please, if you make this recipe, take a photo! Tag me on social media so I can cheer you on.
And if you have a moment, come back here and leave a star rating below. Knowing that this recipe brings that same level of dependable deliciousness to your family gatherings as it does to mine means the world to me. Happy baking, friends! For more recipes built on reliability and heart, you can always browse my full collection of best homemade desserts any time you need a guaranteed win!
PrintThe Ultimate One-Bowl Moist Chocolate Cake with Rich Buttercream

This recipe delivers a deeply rich, fudgy chocolate cake that stays incredibly moist for days. It comes together easily in one bowl, making cleanup simple. Top it with a luscious homemade chocolate buttercream for the best homemade birthday cake experience.
- Prep Time: 20 min
- Cook Time: 35 min
- Total Time: 55 min
- Yield: 12 servings 1x
- Category: Dessert
- Method: Baking
- Cuisine: American
- Diet: Vegetarian
Ingredients
- 1 3/4 cups all-purpose flour
- 1 3/4 cups granulated sugar
- 3/4 cup unsweetened cocoa powder
- 1 1/2 teaspoons baking soda
- 1 1/2 teaspoons baking powder
- 1 teaspoon salt
- 2 large eggs
- 1 cup buttermilk
- 1/2 cup vegetable oil
- 2 teaspoons vanilla extract
- 1 cup hot strong brewed coffee (or hot water)
- For the Frosting: 1 cup unsalted butter, softened; 3 1/2 cups powdered sugar; 3/4 cup unsweetened cocoa powder; 1/2 cup heavy cream; 1 teaspoon vanilla extract; Pinch of salt
Instructions
- Preheat your oven to 350°F (175°C). Grease and flour two 9-inch round cake pans, or line the bottoms with parchment paper.
- In a very large bowl, whisk together the flour, sugar, cocoa powder, baking soda, baking powder, and salt until fully combined. This is your one-bowl start.
- Add the eggs, buttermilk, oil, and vanilla extract to the dry ingredients. Beat with a mixer on medium speed for two minutes, scraping down the sides of the bowl as needed.
- Carefully pour the hot coffee (or hot water) into the batter and mix on low speed until just combined. The batter will be thin; this is correct for a moist chocolate cake.
- Divide the batter evenly between the prepared cake pans.
- Bake for 30 to 35 minutes, or until a wooden pick inserted into the center comes out clean.
- Let the cakes cool in the pans for 10 minutes before inverting them onto a wire rack to cool completely.
- To make the frosting, beat the softened butter in a large bowl until creamy.
- Gradually add the powdered sugar and cocoa powder, alternating with the heavy cream, beating until smooth. Add the vanilla and salt, beating until the frosting is light and fluffy. Add more cream if the frosting is too stiff.
- Once the cakes are completely cool, place one layer on a serving plate. Spread about one-third of the frosting over the first layer. Top with the second cake layer.
- Frost the top and sides of the entire cake with the remaining rich chocolate frosting. Slice and serve your decadent chocolate dessert.
Notes
- Using hot coffee deepens the chocolate flavor without making the cake taste like coffee. If you avoid caffeine, use hot water instead.
- For a sheet cake, pour the batter into a greased 9×13 inch pan and bake for 35-40 minutes.
- You can make this a no mixer chocolate cake by mixing the batter by hand with a whisk, but mix for the full two minutes after adding the wet ingredients.
Nutrition
- Serving Size: 1 slice
- Calories: 450
- Sugar: 45g
- Sodium: 300mg
- Fat: 25g
- Saturated Fat: 14g
- Unsaturated Fat: 11g
- Trans Fat: 0.5g
- Carbohydrates: 58g
- Fiber: 3g
- Protein: 5g
- Cholesterol: 65mg