
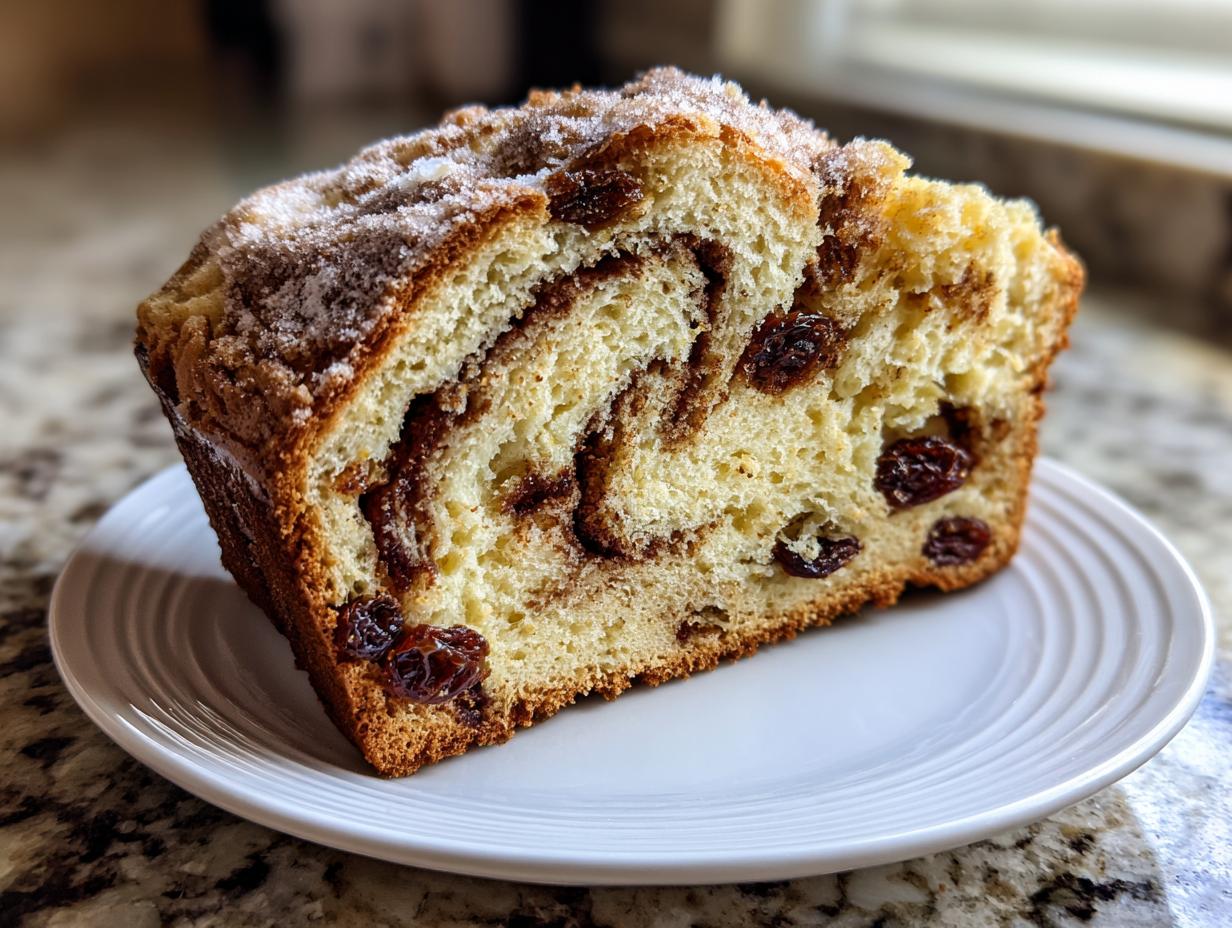
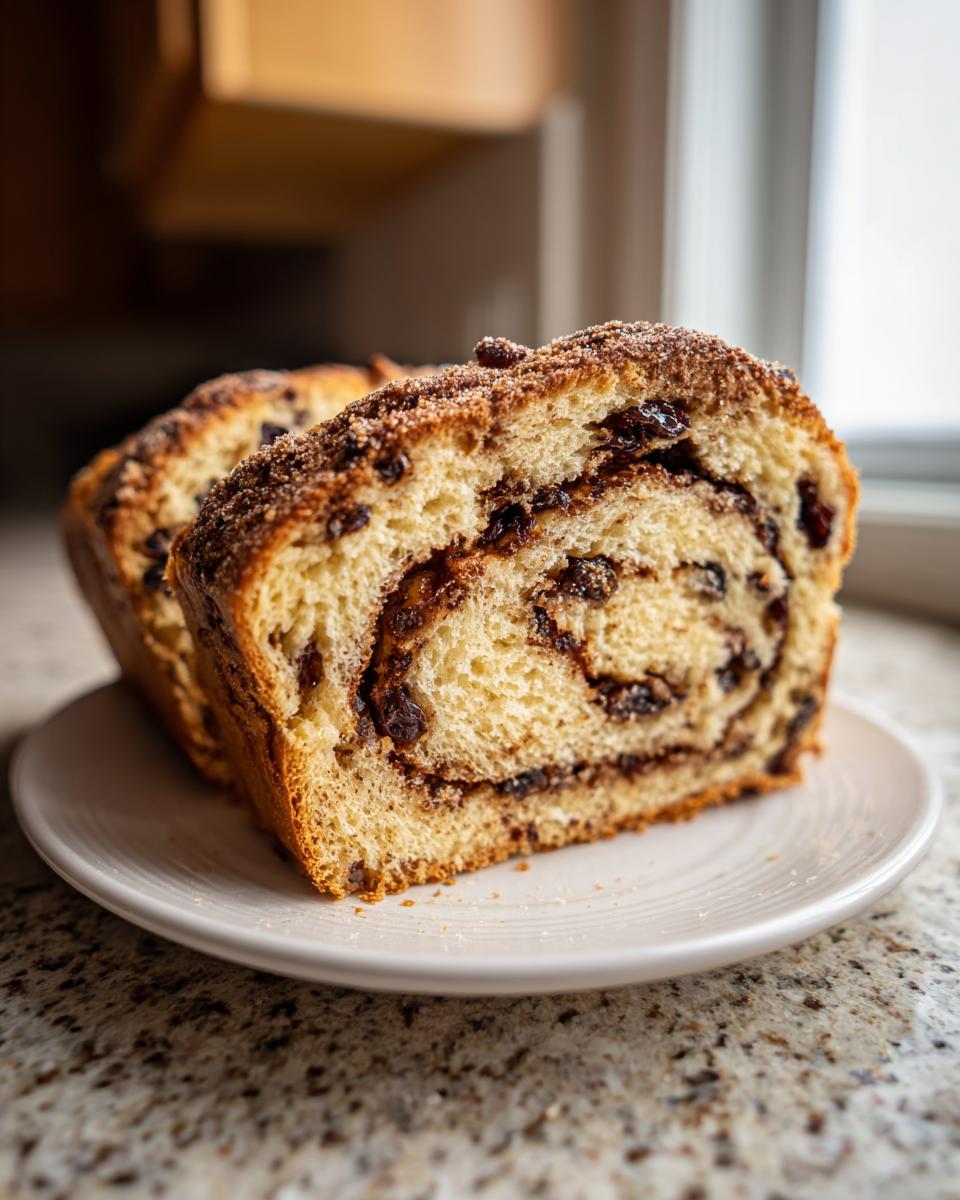
There is nothing quite like waking up to the smell of warm, sweet spices swirling through the house, is there? That cozy aroma signals the start of a perfect morning. If you chase that feeling, you absolutely must try this recipe for homemade raisin bread. Seriously, I think this is the absolute best Cinnamon Raisin Bread you’ll ever make, achieving that soft, fluffy texture that bakeries charge way too much for!
I’m Rosa Sterling, and before I settled into full-time recipe testing, I spent years as an elementary school teacher. Balancing a classroom and a home taught me something crucial: our family recipes *must* be reliable, delicious, and worthy of the effort, even on a busy weekday. This sweet breakfast bread delivers every single time. Forget dry, crumbly loaves; we’re aiming for tender perfection right here.
- Why This Homemade Raisin Bread Recipe is Your New Favorite
- Gathering Ingredients for Soft and Fluffy Raisin Bread
- Step-by-Step Instructions for Perfect Raisin Bread
- Tips for Achieving the Best Cinnamon Raisin Bread
- Ingredient Notes and Substitutions for Your Raisin Bread
- Serving Suggestions for Warm Raisin Toast Ideas
- Storage and Make-Ahead Tips for Homemade Raisin Bread Recipe
- Frequently Asked Questions About Making Raisin Bread
- Estimated Nutritional Data for This Raisin Bread
- Share Your Cozy Morning Baking Experience
- Estimated Nutritional Data for This Raisin Bread
- Share Your Cozy Morning Baking Experience
Why This Homemade Raisin Bread Recipe is Your New Favorite
I know what you’re thinking—another bread recipe? But trust me, this one is different. When I adapted this recipe from my grandmother’s old notebook, I swore I wouldn’t share it unless it truly stood above the rest. This is foolproof baking, designed for maximum cozy vibes without needing fussy techniques.
- Seriously Soft and Fluffy Crumb: We use just enough binding ingredients and a gentle kneading process to ensure this isn’t dense or heavy. Every slice feels light, airy, and perfectly tender—the sign of a truly great raisin bread.
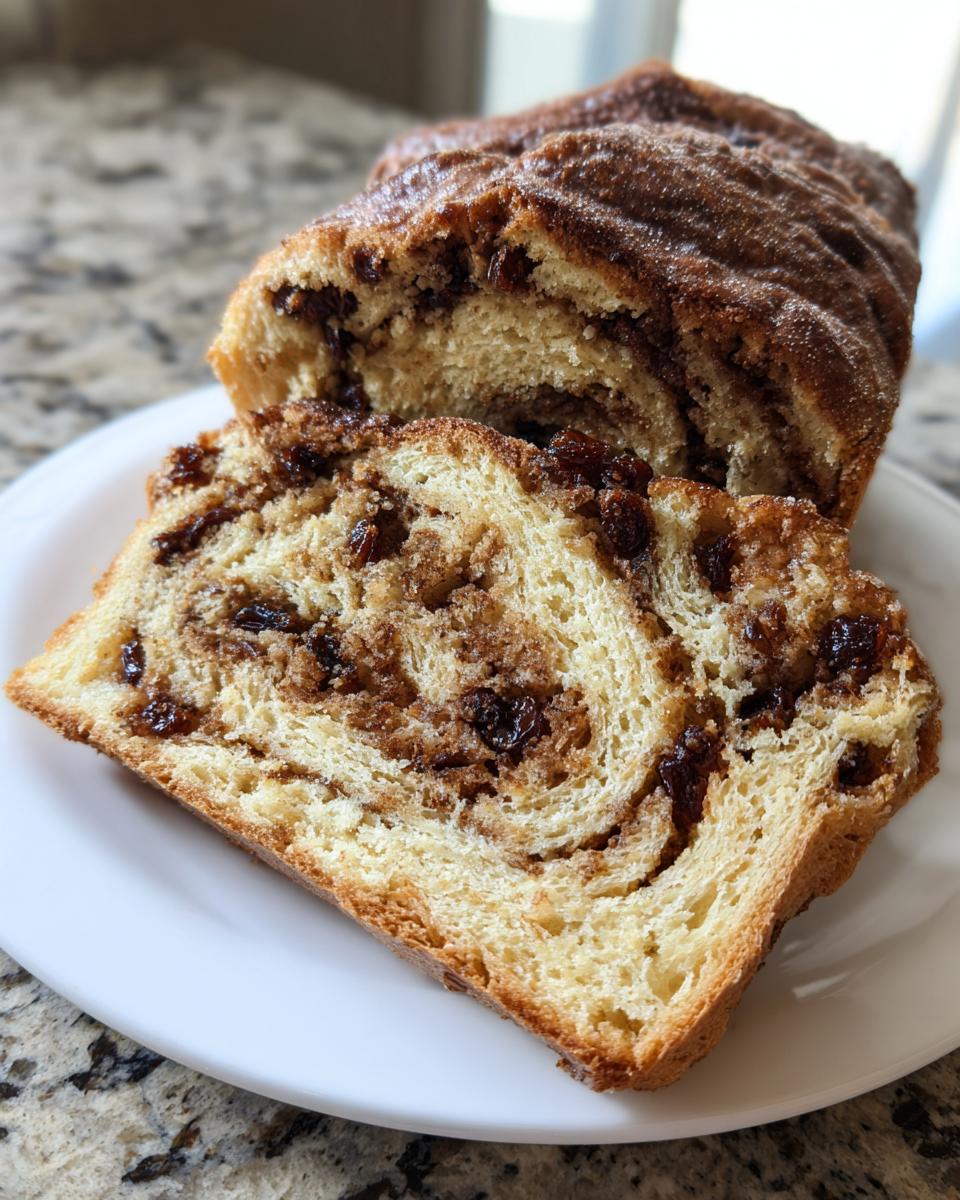
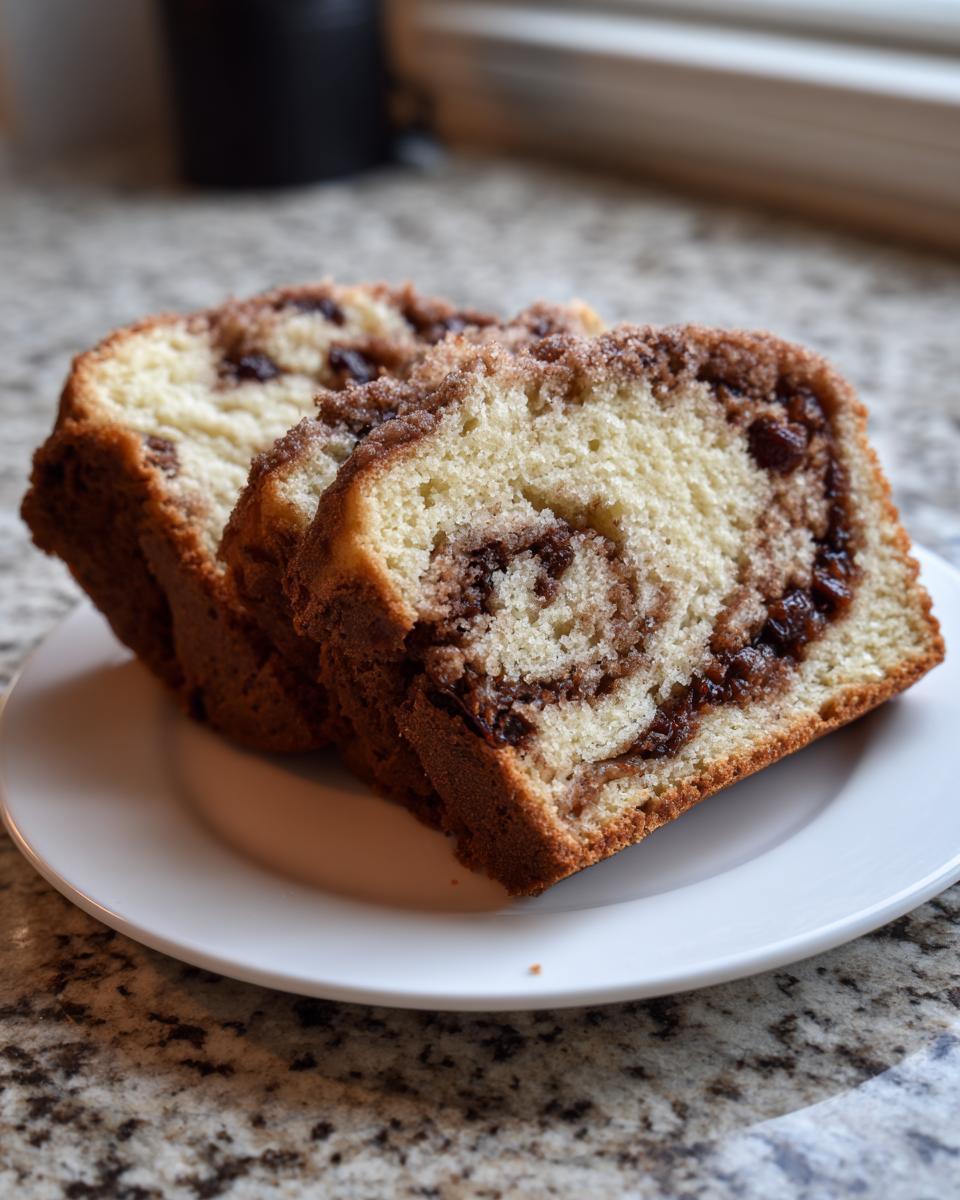
- Bakery-Quality Cinnamon Swirl: Forget sparse streaks! We use brown sugar and softened butter to create a thick, gooey ribbon of cinnamon that runs right through the middle of the loaf. It melts beautifully when toasted.
- It’s So Much Easier Than You Think: While it uses yeast, this recipe is straightforward. You get the deep, satisfying flavor of from-scratch baking without complicated shaping or artisan techniques. It’s truly beginner-friendly!
- Perfect for Leftovers: While it vanishes fast eaten warm, this bread is sturdy enough to last several days on the counter (if you can resist it!) and toasts up beautifully, making it an excellent choice for your weekly meal prep.
Gathering Ingredients for Soft and Fluffy Raisin Bread
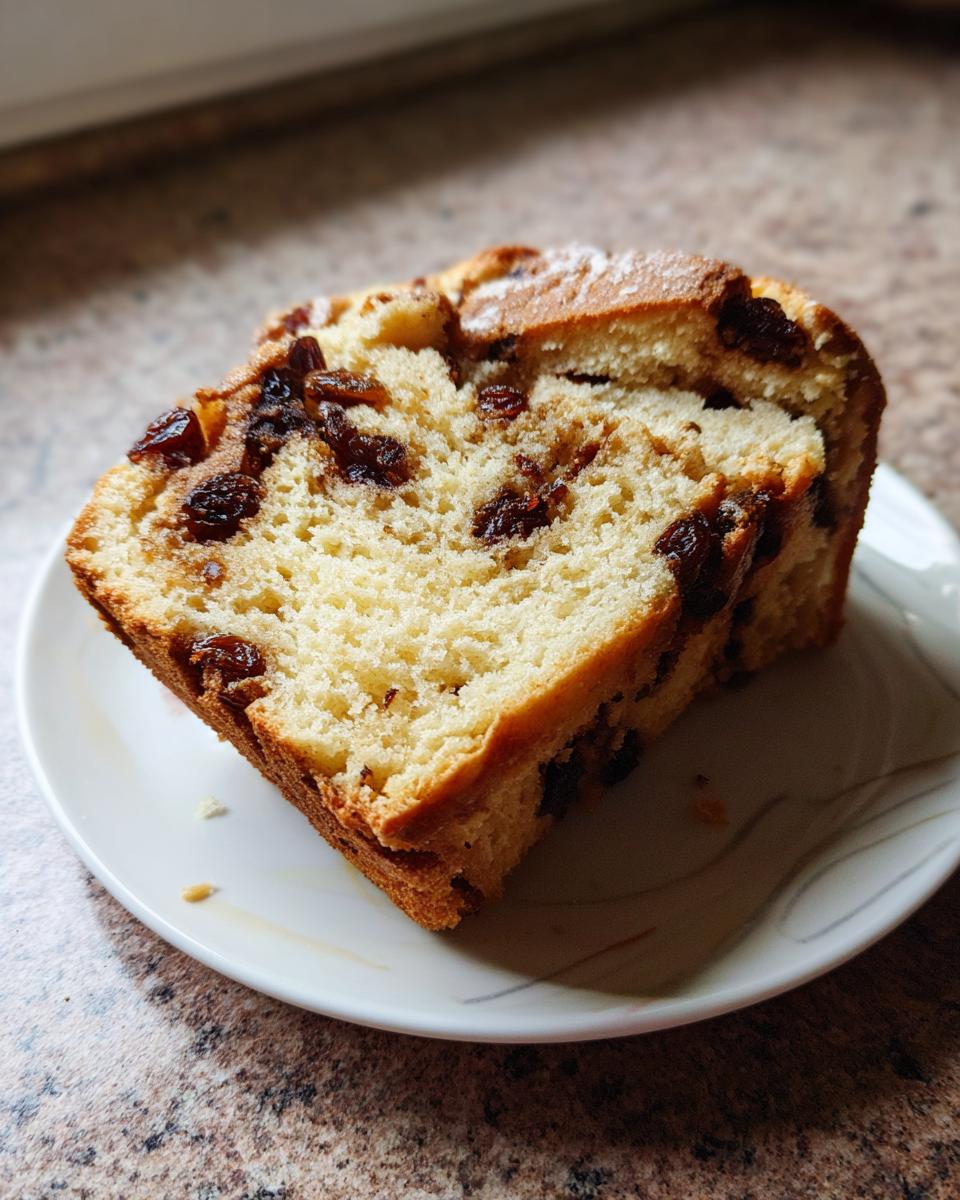
Getting started on your homemade raisin bread always starts with setting out your ingredients. Quality really matters here, especially if you are aiming for that show-stopping, ‘Best Cinnamon Raisin Bread’ flavor everyone swoons over. I always make sure my egg is at room temperature—it mixes in so much smoother! Never skip plumping the raisins; they should be nice and soft, not shriveled little hard bits hiding in your beautiful crumb.
Don’t worry about having specialty flours. Regular old all-purpose flour works perfectly for this soft texture we’re after. Getting these elements ready before you start mixing is half the battle won!
Here is what you’ll need for this sweet breakfast bread adventure:
- 1 cup warm water (105-115°F—you need warm, not hot!)
- 2 1/4 teaspoons active dry yeast
- 1/4 cup granulated sugar
- 1 large egg, room temperature
- 1/4 cup unsalted butter, melted (plus more for greasing)
- 1 teaspoon salt
- 3 1/2 cups all-purpose flour, plus more for dusting
- 1 cup raisins, plumped (see notes below!)
For the Cinnamon Swirl
This is where all the magic happens, so don’t skimp on the spice!
- 1/2 cup packed light brown sugar
- 2 tablespoons ground cinnamon
- 2 tablespoons unsalted butter, softened (this needs to be spreadable!)
Step-by-Step Instructions for Perfect Raisin Bread
This is the part everyone gets nervous about, but honestly, this process makes for truly satisfying Easy Homemade Bread. The key here is patience during the rising stages. Get your timing right, and you are halfway to the best breakfast bread ever!
Activating Yeast and Mixing the Dough for Raisin Bread
First things first: we wake up the yeast! Mix your yeast into the warm water. Now, here’s my expert tip: don’t use water that’s too hot, or you’ll kill your yeast before it even starts bubbling. It should feel just slightly warmer than lukewarm on your wrist, maybe 110°F. Let it sit for about 5 minutes until it looks foamy on top. That foam means the yeast is awake and ready to work its magic!
Once foamy, stir in the granulated sugar, the room temperature egg, your melted butter, and the salt. Now, slowly start adding your flour. Mix it in until you have a shaggy, messy dough in the bottom of the bowl. Don’t try to mix it perfectly yet; just get everything incorporated.
Kneading and First Rise of the Raisin Bread Dough
Turn that shaggy dough out onto a lightly floured surface. This is where we develop the structure. Knead this dough for a good 8 to 10 minutes. I know, it feels like forever when you’re doing it by hand! You know you’re finished when that dough stops feeling sticky and starts feeling smooth, supple, and elastic—it should spring back slowly when you poke it.
Lightly oil a clean bowl and place your kneaded dough inside, flipping it over so the top gets a little coating of oil. Cover it tightly with plastic wrap or a clean cloth. Let it rise in a warm spot for about an hour to an hour and a half. We want it to double completely in size. Resist the urge to poke it too early!
Creating the Cinnamon Swirl and Shaping the Raisin Bread Loaf
While it’s rising, mix that light brown sugar and cinnamon in a small dish—that potent spice filling is what gives us those amazing swirls. Once the dough has doubled, gently punch it down to release all that air you worked so hard to create.
Roll the dough out into a large rectangle, about a quarter of an inch thick. You’re aiming for evenness here to avoid big air gaps later. Now, spread the 2 tablespoons of softened butter all over that surface—it needs to cover from edge to edge. Sprinkle your cinnamon-sugar mix generously over the butter, and scatter those plumped raisins evenly across the top.
Starting at the long side, tightly roll the dough up into a log, like rolling a jelly roll. The tighter you roll, the tighter your Cinnamon Swirl Bread will be. Pinch that seam closed really well and tuck it seam-side down right into your prepared 9×5 inch loaf pan.
Second Proof and Baking Your Raisin Bread
Cover the loaf pan loosely again. This second rise takes less time, usually about 30 to 45 minutes. You want the dough to crest about an inch over the rim of the pan. Preheat your oven to 375°F (190°C) while it finishes rising.
Bake for 30 to 35 minutes. If you notice the top getting too dark before the middle is cooked, just loosely tent a piece of foil over the top to protect it from burning. To check doneness, an instant-read thermometer is your friend—we want that internal temperature to hit 200°F (93°C). The very last thing you should do is turn the loaf out onto a wire rack immediately. You *must* let this spectacular loaf cool completely before slicing, or you’ll crush that beautiful Soft and Fluffy Raisin Bread texture!
Tips for Achieving the Best Cinnamon Raisin Bread
When dealing with yeasted doughs, especially sweet ones like this Cinnamon Raisin Bread, the little details make the difference between great and absolutely unforgettable. Seriously, mastering these small steps took me years of baking after school lets out!
First off, focus on those raisins. I mentioned plumping them, but let me stress again: drain them *completely* dry after soaking them in hot water. Any residual moisture can mess with the dough structure, making the dough heavy. Take an extra minute to pat them on a paper towel—it pays off!
Next up is the butter for the swirl. It must be softened, not melted! If you try to spread melted butter over your dough rectangle, it just seeps straight down to the bottom layer, and you end up with a greasy bottom instead of gorgeous ribbons. Softened butter acts almost like glue, holding that cinnamon-sugar mixture right where you want it against the dough.
For that perfectly tight roll, which prevents those dreaded tunnels in your finished raisin bread, use a piece of plastic wrap underneath your rolled-out dough rectangle. You can use the plastic to help guide the roll, making sure it’s super snug as you go. Once it’s rolled, gently press the seam down firmly with your fingers before pinching it shut.
Finally, be patient with the rising! If your kitchen is cool, find a spot for that dough to proof. Sometimes I turn my oven light on (with the oven completely OFF, obviously!) and place the covered bowl inside. That gentle warmth is perfection in the winter when our kitchen gets chilly. Don’t rush those rises; they are what make this bread fluffy, not dense!
Ingredient Notes and Substitutions for Your Raisin Bread
When you’re first starting out with any yeast bread, ingredient questions pop up faster than kids ask for seconds on breakfast! Let’s talk about making sure every component supports that soft, fluffy final texture we are aiming for in this raisin bread.
The biggest question I always get is about the raisins themselves. If you don’t plump them, they act like little dry sponges in your nice, moist dough, sucking moisture away from the crumb. Don’t do it! Here is the fastest trick for getting plumped raisins for your baking: Get a small bowl, cover your measured raisins with hot tap water—not boiling, just nice and hot. Let them sit for about 10 minutes while you measure out your flour. Then, here’s the key: drain them completely and pat them dry between a couple of paper towels. This ensures they add moisture and sweetness, not dryness, to your bread.
What about the fat? You need butter for good flavor, there’s no replacing that rich taste. If you’re in a pinch, you can substitute the melted butter in the dough part with an equal amount of vegetable oil—it will still result in a tender loaf. However, for the cinnamon swirl layer, you really need that softened butter; oil just makes the swirl run right out the bottom, and we want those beautiful ribbons, remember?
For flour, I rely on standard all-purpose flour because it gives us the perfect balance between structure and softness. Some folks ask about using bread flour for a chewier texture, and you certainly can if you like a heartier bite! But if your goal is that melt-in-your-mouth, comforting slice of sweet breakfast bread, stick with the AP flour we listed. It handles the sugar content beautifully while keeping the final raisin bread delightfully tender.
Serving Suggestions for Warm Raisin Toast Ideas
I swear, this bread is almost impossible to wait for, isn’t it? That beautiful swirl just begs to be sliced immediately. If you can manage to let it cool down enough—and I do mean *slightly* warm, not scorching hot—you’ll be rewarded tenfold!
The gold standard, of course, is simply tearing off a thick slice and slathering it with salted butter while the steam is still curling off the crust. That’s what I call the ultimate Buttery Raisin Bread experience. The butter sinks right into the air pockets, melting the cinnamon sugar just a touch more. Mmm, it’s heavenly!
When it comes to making Warm Raisin Toast Ideas happen later in the week, here are a few ways my family loves to use up the loaf:
- Simple Toasting: Don’t toast it too dark! I prefer just a light warming in the toaster oven to bring back that wonderful aroma without drying out the soft crumb we worked so hard to achieve.
- Cream Cheese Dream: Seriously, if you haven’t tried this bread with plain, slightly softened cream cheese, you are missing out. The slight tang of the cheese contrasts perfectly with the warm cinnamon flavor. It’s even better than the plain store-bought loaf!
- French Toast Surprise: Since this bread is already sweet and full of spices, it makes amazing French toast. Just dip the slices quickly in a standard egg/milk mixture and fry them lightly. Serve them with a side of warmed local honey instead of maple syrup. It tastes like a treat, but it’s just breakfast!
No matter how you decide to eat it—whether straight from the rack or buttered the next morning—this loaf is designed for comfort. Enjoy every cozy bite!
Storage and Make-Ahead Tips for Homemade Raisin Bread Recipe
Life gets busy, and sometimes you just can’t get to that glorious loaf right away, or maybe you want to have dough ready to go when that sudden craving hits! I totally get it. The good news is that this raisin bread recipe is very forgiving about make-ahead timing.
If you finish baking and manage to have leftovers (which is rare in my house!), store the cooled loaf tightly wrapped in plastic wrap at room temperature for up to three days. Keep it away from direct sunlight or heat, which can make the crust soften too quickly. If you plan on keeping it longer, the freezer is your best friend. Wrap slices or the whole loaf securely in plastic wrap and then pop them inside a freezer bag. It keeps beautifully for up to three months, and you just pull out what you need!
Now, about that make-ahead trick? This dough is fantastic for an Overnight Raisin Bread approach, which is perfect for busy mornings. Once you finish the primary kneading (Step 4), instead of letting it rise on the counter, just place the oiled bowl into the refrigerator immediately. Let it cold-proof slowly overnight—say, 10 to 16 hours. The cold temperature slows the yeast way down.
When you wake up, the dough will have slowly doubled, and the flavor will actually be richer! Just punch it down as usual, add your swirl, shape it, give it that final 30-to-45-minute warm proof, and bake! Suddenly, you’ve got fresh, warm, homemade raisin bread ready before the coffee is even brewed. See? Baking doesn’t have to wait for a free Saturday!
Frequently Asked Questions About Making Raisin Bread
When you’re diving into baking with raisins, sometimes those little details aren’t covered in the main instructions. It’s totally normal! These questions are exactly what separated my early attempts from the perfectly swirled loaves I bake now. Let’s tackle some common ones so you can feel totally confident baking this Sweet Breakfast Bread.
Can I use a bread machine for this raisin bread recipe?
Oh, I get this one a lot! While this specific recipe is hand-kneaded because it gives you much better control over the swirl placement, you absolutely can adapt it for a bread machine. If you want a true Bread Machine Raisin Bread Recipe, use the Basic or White Bread setting. You’ll add the liquids, yeast, and flour first, letting the machine mix and knead for you. The tricky part is adding the cinnamon-sugar swirl—you’ll want to check your machine’s manual. Many machines have a dispenser for mix-ins near the end of the kneading cycle; that’s when you’d drop in your cinnamon sugar and raisins!
How do I get a more pronounced cinnamon swirl in my raisin bread?
This is all about managing temperature and sticking power! If your swirl is running out the sides, it’s likely because the butter you spread wasn’t quite soft enough, or your dough was too warm when you finally rolled it up. For a super defined swirl, try this: after you roll the dough out and spread the butter and cinnamon sugar, pop the whole thing into the fridge for about 10 minutes *before* you roll it up tightly. Chilling it for just a short time lets the butter firm up slightly, so the cinnamon mix clings better. When you roll it up super snugly after chilling, those beautiful ribbons stay put during the rise and bake!
What is the best flour to use for soft and fluffy raisin bread?
For the absolute best, tender, melt-in-your-mouth result, stick with standard All-Purpose flour. It has the perfect balance of protein to offer just enough gluten structure while staying tender. If you want a chewier loaf—something that has a bit more tooth to it but isn’t as soft—you can swap about half the All-Purpose flour for bread flour. Bread flour has higher protein, which creates more gluten and gives you that denser, chewier texture. But remember, if ‘soft and fluffy’ is your main goal for your homemade raisin bread, AP flour wins every time!
Estimated Nutritional Data for This Raisin Bread
It’s always good to have a general idea of what’s in your wonderful creation! Please remember that these numbers are estimates based on the specific ingredients I use, and they will change depending on the brand of flour, sugar, or fat you substitute.
For one slice of this raisin bread:
- Calories: 240
- Sugar: 12g
- Fat: 5g (Saturated Fat: 3g)
- Carbohydrates: 45g
- Protein: 6g
It’s a wonderful treat, but enjoy it as part of a balanced breakfast, especially topped with a little protein!
Share Your Cozy Morning Baking Experience
Honestly, seeing your loaves come out of the oven makes my whole week! I hope this recipe brings that warm, cozy feeling right into your kitchen. If you baked this loaf up, please come back and give it a star rating below—it really helps other bakers know this is a reliable recipe. And if you have a fantastic serving idea, especially one involving butter or cream cheese, please drop a comment below! I’m always looking for new ways to enjoy my favorite homemade raisin bread. Happy baking!
PrintEasy Homemade Cinnamon Raisin Bread
Make this soft and fluffy Cinnamon Raisin Bread from scratch. This recipe delivers bakery-style flavor perfect for warm toast with butter.
- Prep Time: 30 min
- Cook Time: 35 min
- Total Time: 2 hr 40 min
- Yield: 1 loaf 1x
- Category: Breakfast
- Method: Baking
- Cuisine: American
- Diet: Vegetarian
Ingredients
- 1 cup warm water (105-115°F)
- 2 1/4 teaspoons active dry yeast
- 1/4 cup granulated sugar
- 1 large egg, room temperature
- 1/4 cup unsalted butter, melted
- 1 teaspoon salt
- 3 1/2 cups all-purpose flour, plus more for dusting
- 1 cup raisins, plumped
- 1/2 cup packed light brown sugar
- 2 tablespoons ground cinnamon
- 2 tablespoons unsalted butter, softened (for swirl)
Instructions
- In a large bowl, dissolve the yeast in the warm water. Let stand for 5 minutes until foamy.
- Add the granulated sugar, egg, melted butter, and salt to the yeast mixture. Mix well.
- Gradually add the flour, mixing until a shaggy dough forms. Turn the dough out onto a lightly floured surface.
- Knead the dough for 8 to 10 minutes until it becomes smooth and elastic.
- Place the dough in a lightly oiled bowl, turning to coat. Cover the bowl and let it rise in a warm place for 1 to 1.5 hours, or until doubled in size.
- While the dough rises, mix the brown sugar and cinnamon together in a small bowl.
- Gently punch down the risen dough. Roll the dough out into a large rectangle, about 1/4 inch thick.
- Spread the 2 tablespoons of softened butter evenly over the dough surface. Sprinkle the cinnamon-sugar mixture over the butter. Scatter the plumped raisins evenly over the top.
- Starting from the long edge, tightly roll the dough into a log. Pinch the seam closed.
- Place the log seam-side down into a greased 9×5 inch loaf pan. Cover loosely and let rise again for 30 to 45 minutes, or until the dough has crowned about 1 inch over the rim of the pan.
- Preheat your oven to 375°F (190°C).
- Bake for 30 to 35 minutes, or until the top is golden brown and the internal temperature reaches 200°F (93°C). If the top browns too quickly, loosely tent it with foil.
- Remove the loaf from the pan immediately after baking and cool completely on a wire rack before slicing for the best texture.
Notes
- To plump raisins quickly, soak them in hot water for 10 minutes, then drain thoroughly before using.
- For a sweeter finish, brush the top of the warm loaf with melted butter immediately after it comes out of the oven.
- This bread is excellent toasted the next day and served with cream cheese.
Nutrition
- Serving Size: 1 slice
- Calories: 240
- Sugar: 12g
- Sodium: 280mg
- Fat: 5g
- Saturated Fat: 3g
- Unsaturated Fat: 2g
- Trans Fat: 0g
- Carbohydrates: 45g
- Fiber: 2g
- Protein: 6g
- Cholesterol: 30mg